

Deploying a Two-Tier Application on AWS Using 2-Tier Architecture: A Step-by-Step Guide


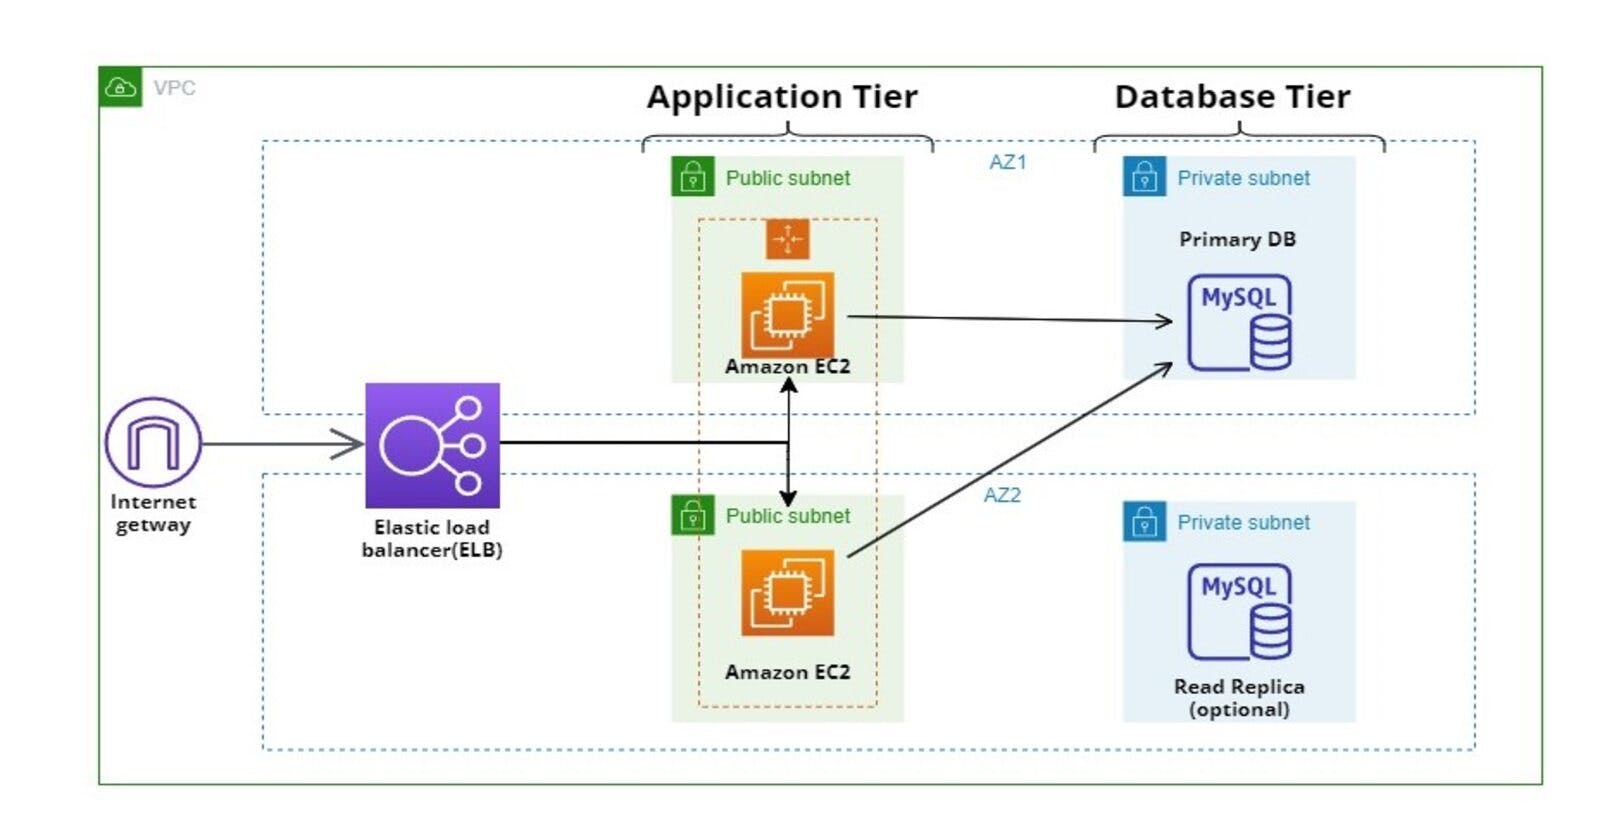
In this guide, we will walk you through the process of deploying a two-tier application on AWS using a 2-tier architecture. This architecture separates the presentation layer (frontend) and the data management layer (backend) for improved scalability and maintainability of the application. We will utilize various AWS services such as VPC, EC2, RDS, Auto Scaling, and Application Load Balancer to achieve our deployment.
Step 1: Setting Up the Infrastructure
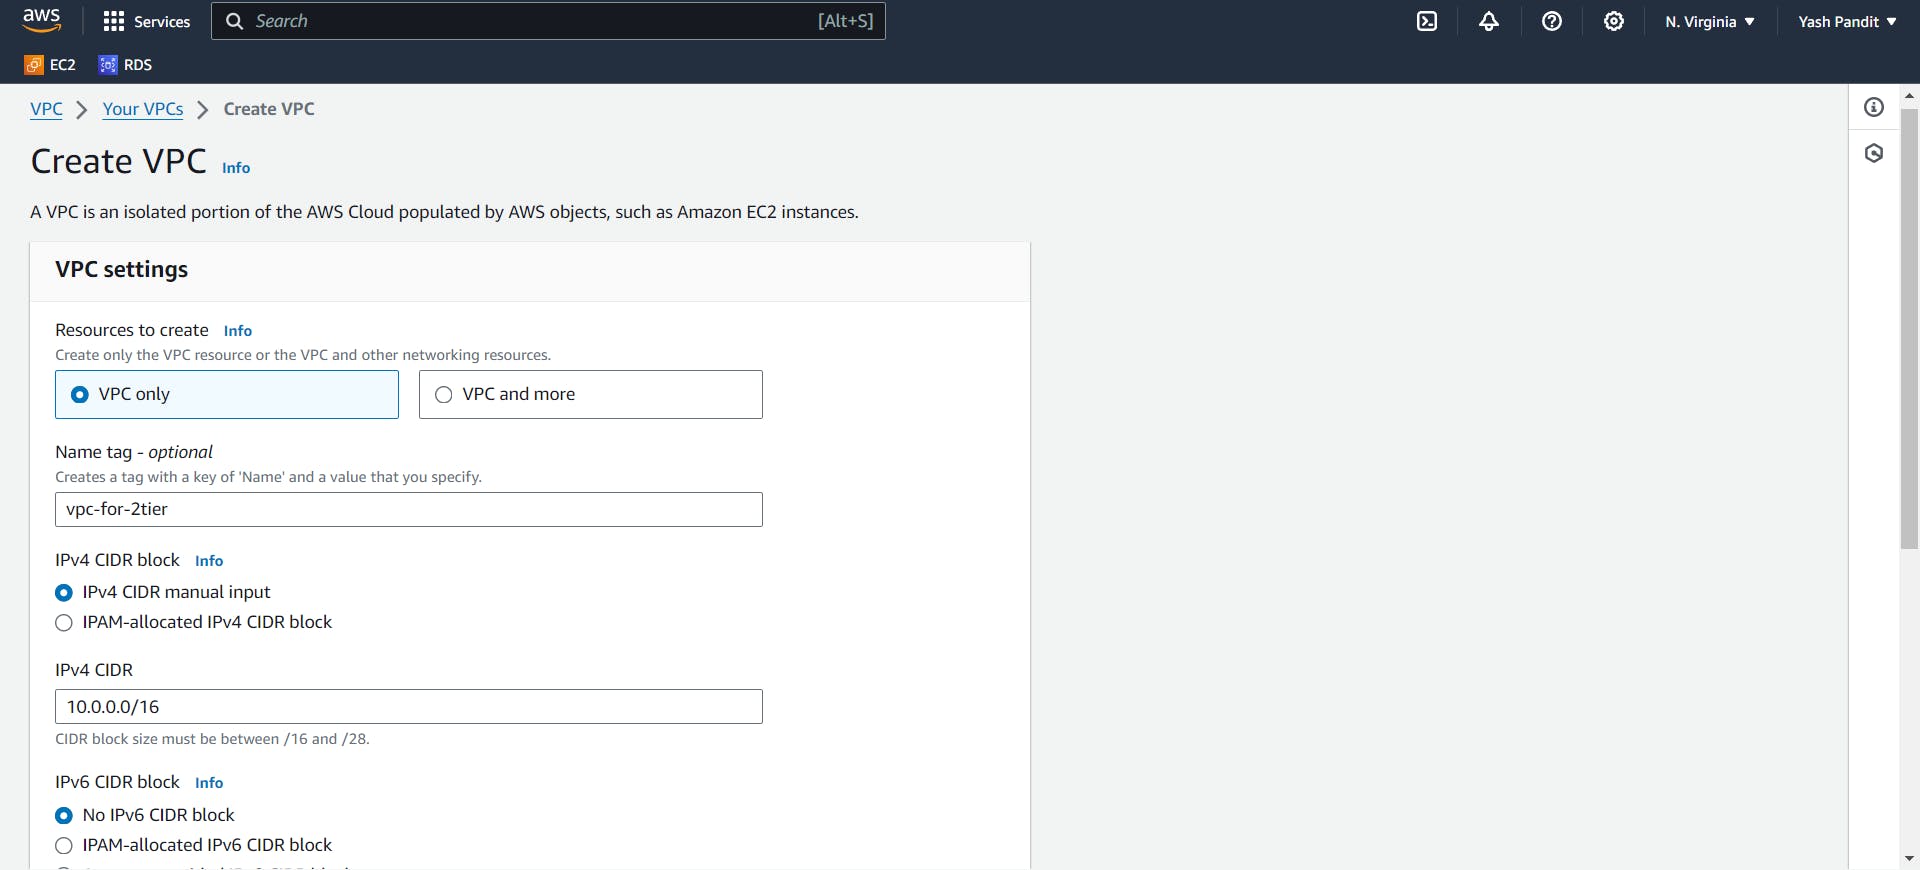
Creating a Virtual Private Cloud (VPC):
Navigate to the AWS Management Console and create a new VPC.
name "vpc-for-2tier"
IPv4 CIDR block "10.0.0.0/16"
Click on "Create VPC"
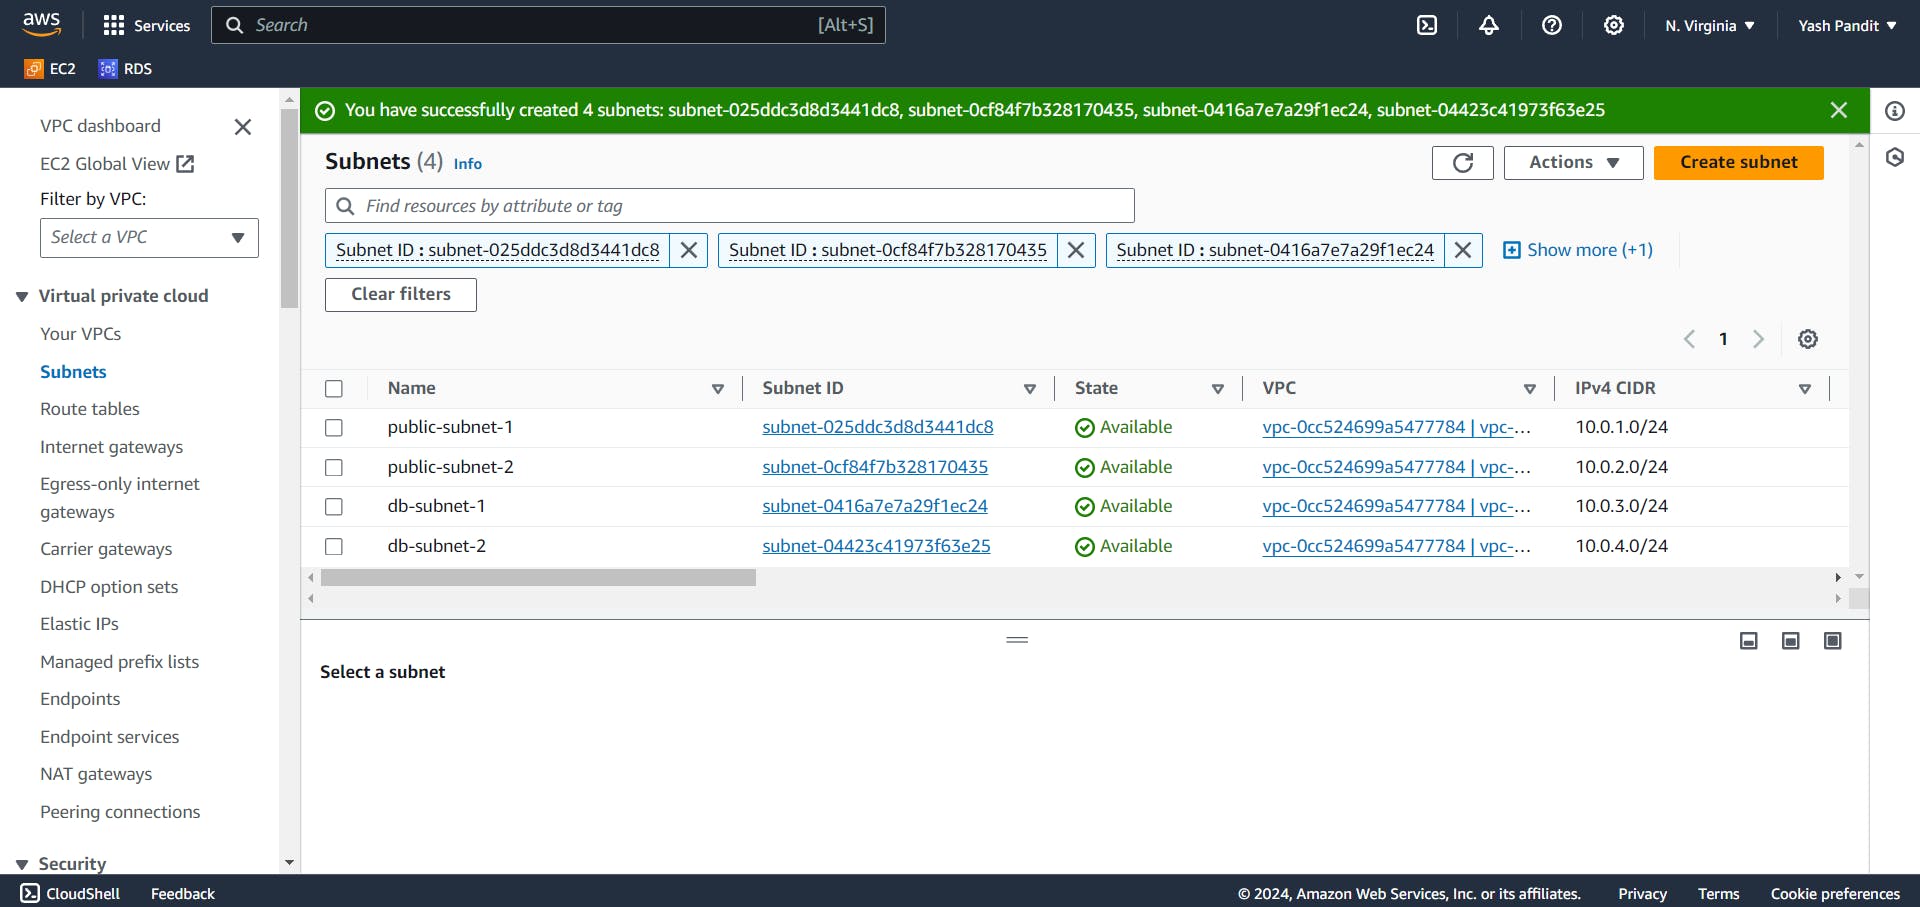
Creating Subnets:
Create the following subnets within the VPC:
VPC ID "vpc-for-2tier"
Subnet Setting:
Subnet 1(subnet for application ec2):
Name: public-subnet-1, Availability Zone: us-east-1a, CIDR: 10.0.1.0/24
Subnet 2(subnet for application ec2):
Name: public-subnet-2, Availability Zone: us-east-1b, CIDR: 10.0.2.0/24
Subnet 3(subnet for Database):
Name: db-subnet-1, Availability Zone: us-east-1a, CIDR: 10.0.3.0/24
Subnet 4(subnet for Database):
Name: db-subnet-2, Availability Zone: us-east-1b, CIDR: 10.0.4.0/24
Click on "Create subnet"
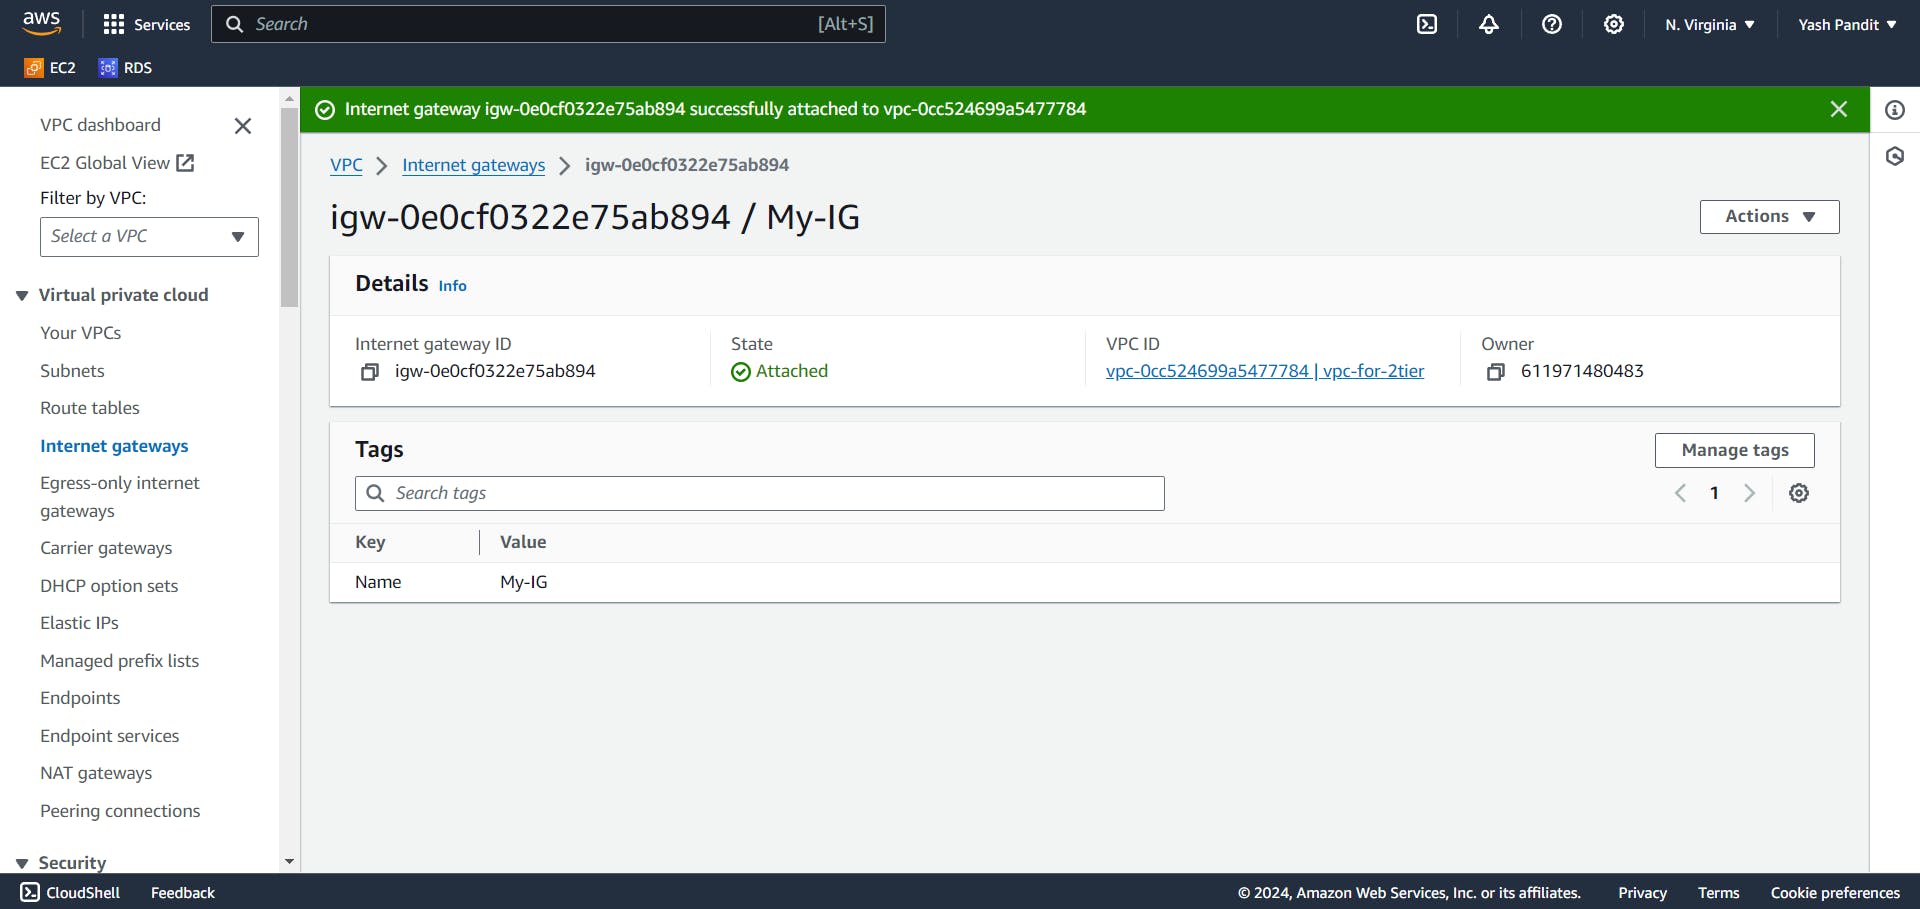
Setting Up Internet Gateway (IGW):
Create an Internet Gateway.
Name tag "My-IG"
Click on "Create internet Gateway"
Select Internet Gateway "My-IG" and click on "Attach to vpc"
Select vpc "vpc-for-2tier"
Click on "Attach internet Gateway"
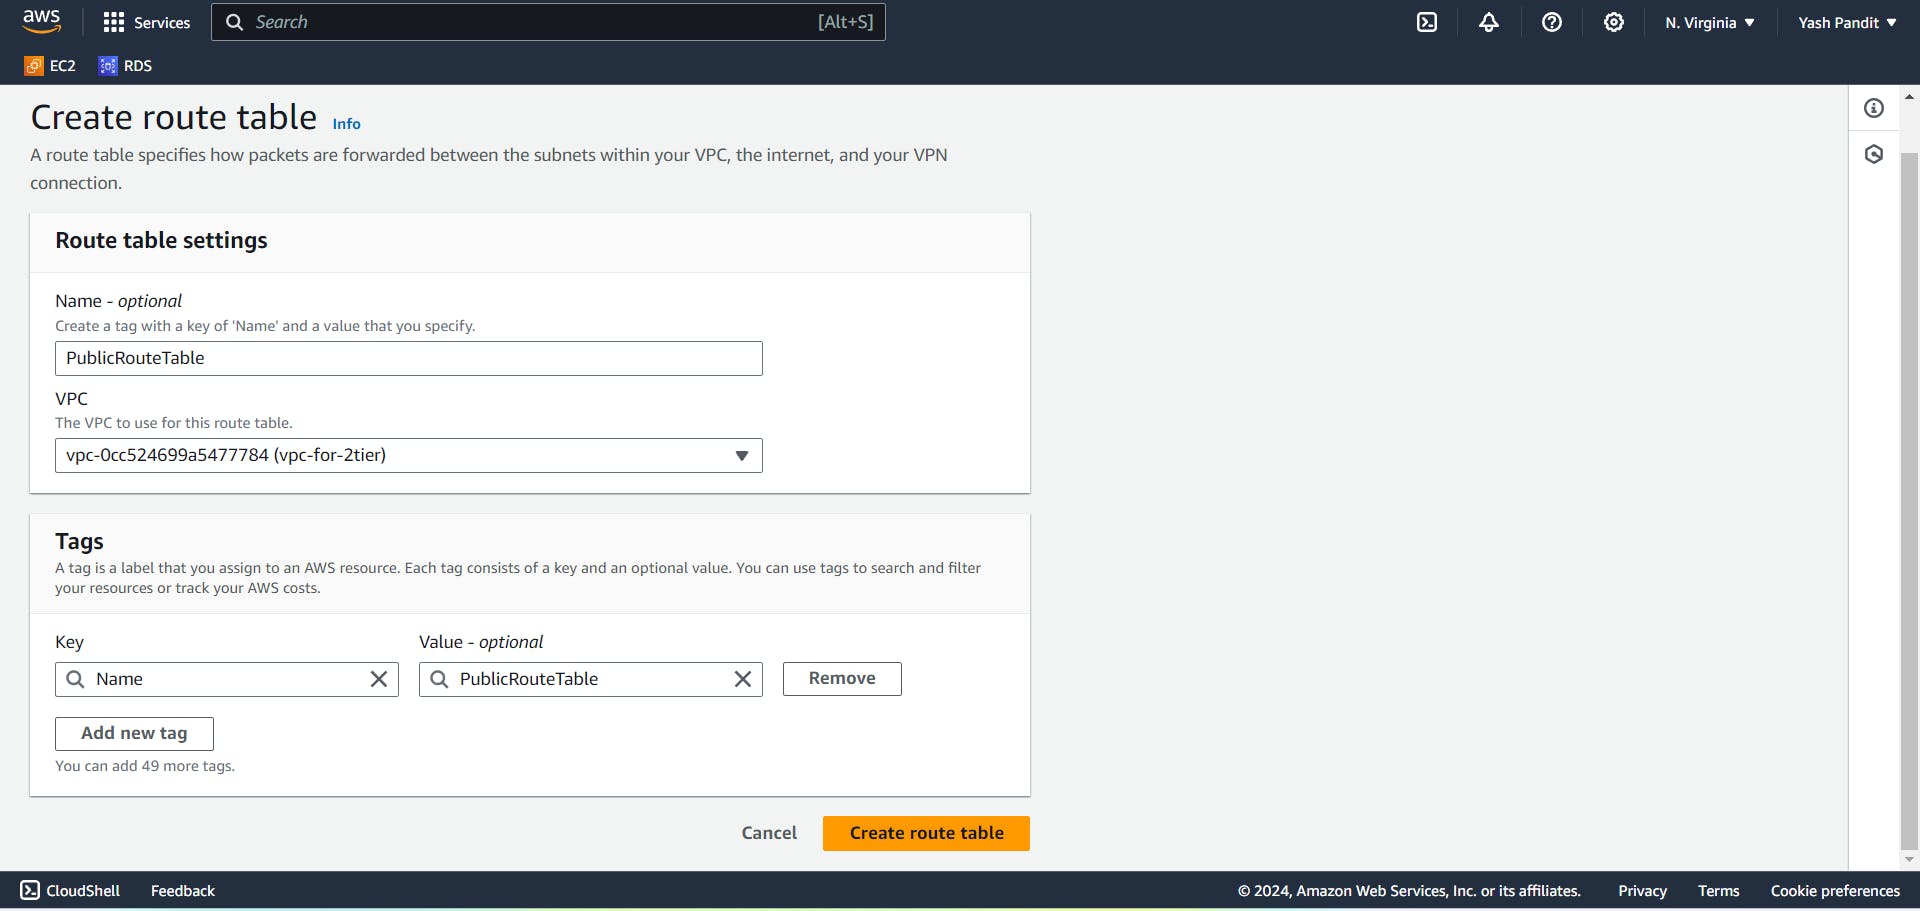
Configuring Route Tables:
Create a route table.
Name "PublicRouteTable"
VPC "vpc-for-2tier"
Click on "Create route table"
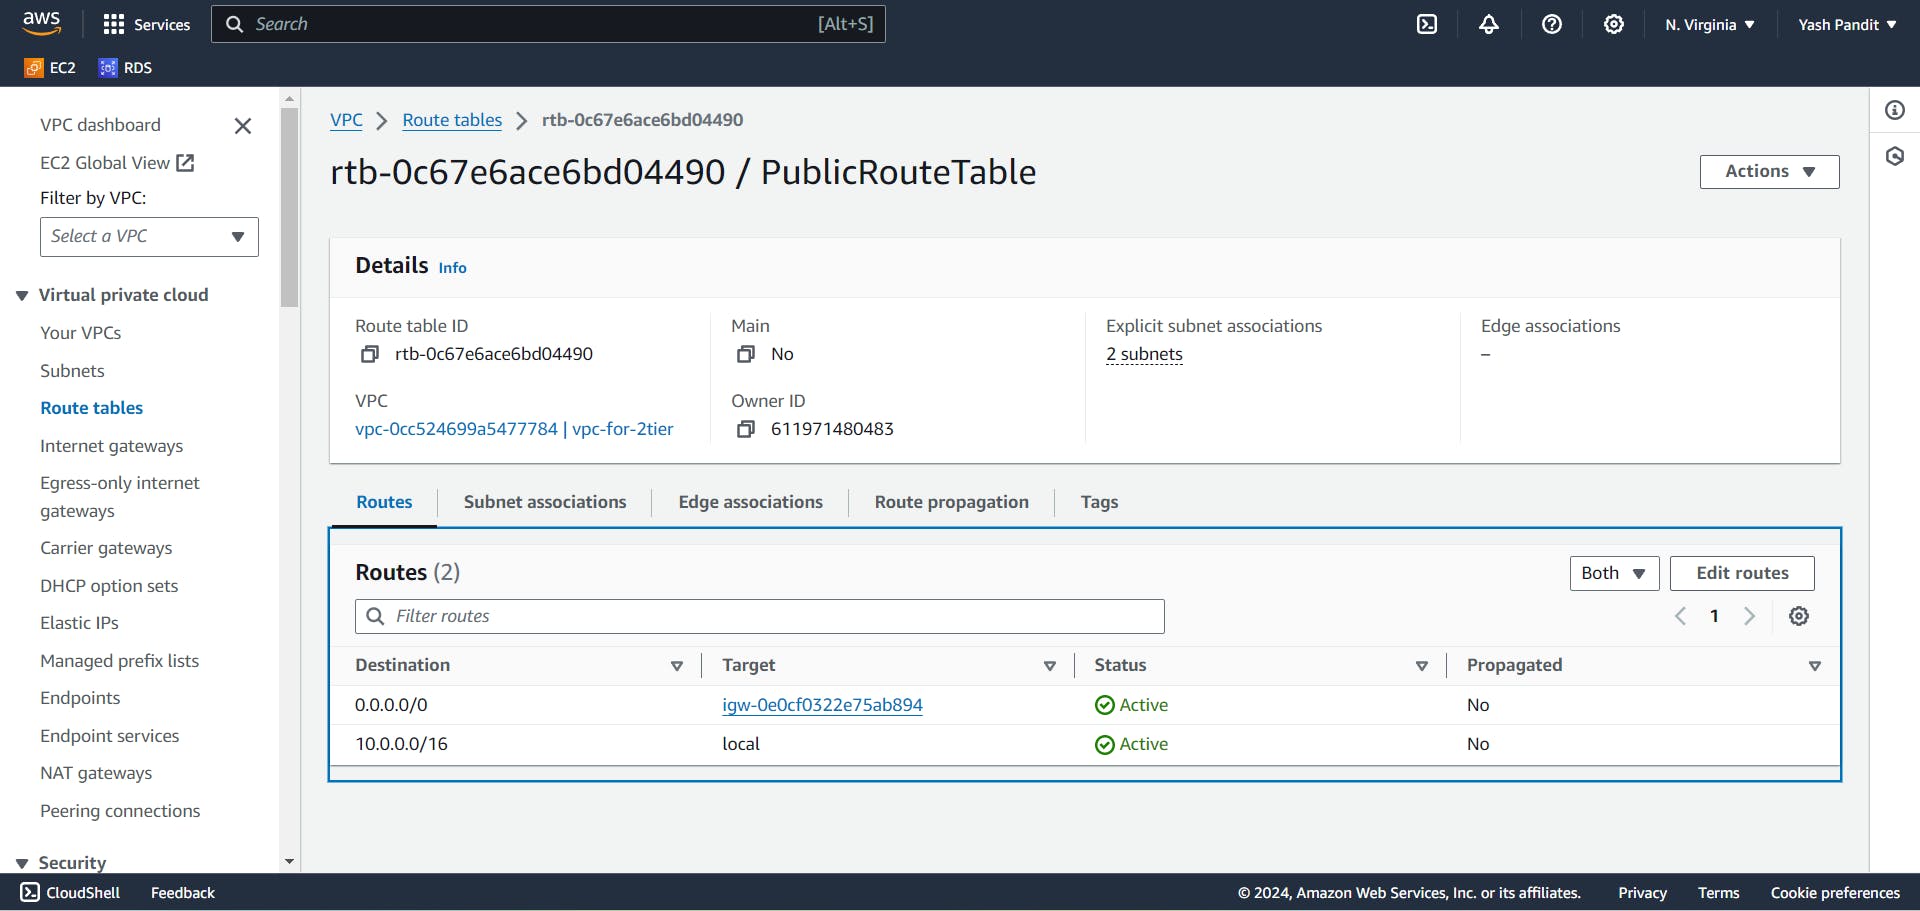
Associate the route table with public subnets.
Click on "Actions" select "Edit subnet associations"
In "Available subnets" select "public-subnet-1" and "public-subnet-2"
Click on "Save associations"

Add a route with destination "0.0.0.0/0" pointing to the Internet Gateway "My-IG".
Click on "Edit routes"
In "Edit routes" click on "Add routes"
destination "0.0.0.0/0" , Target "My-IG"
Click on "Save changes"
Step 2: Configuring Security Groups
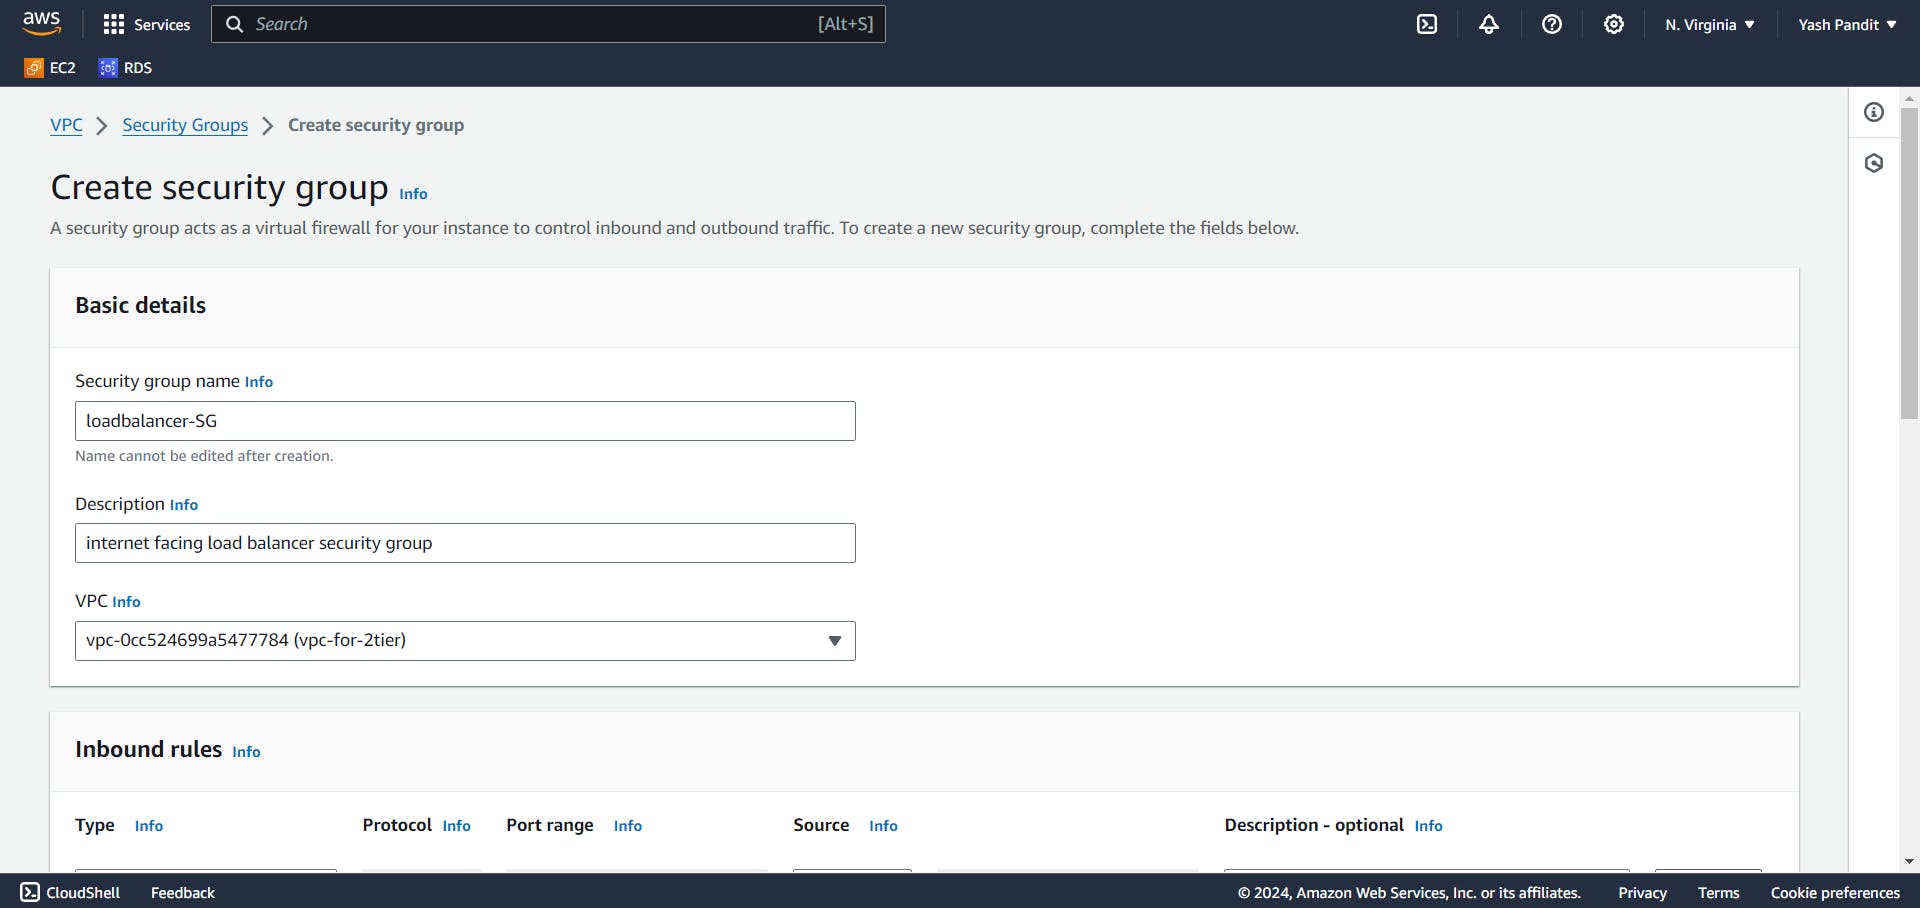
Load Balancer Security Group (loadbalancer-SG):
Click on "Create security group"
Security group name "loadbalancer-sg"
VPC "vpc-for-2tier"
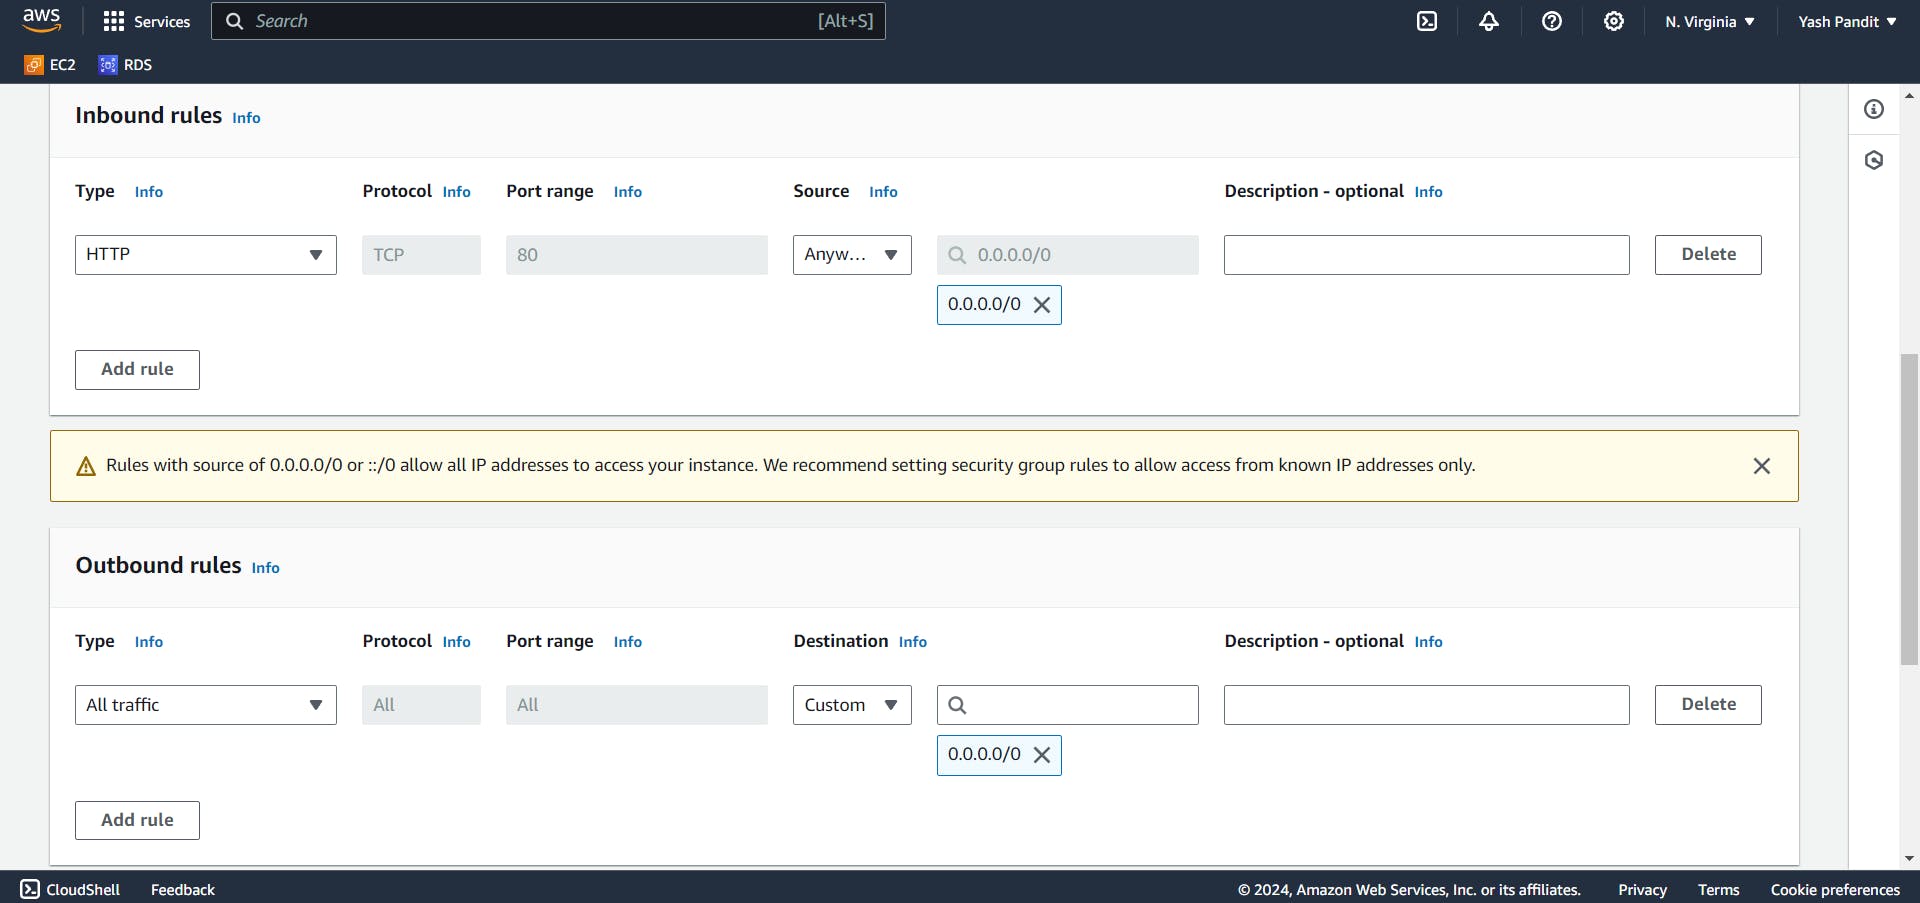
Allow inbound HTTP traffic (Port 80) from anywhere.
Type "HTTP", Source "0.0.0.0/0"
Allow all outbound traffic
Type "All traffic" , Destination "0.0.0.0/0"
Click on "Create security group"
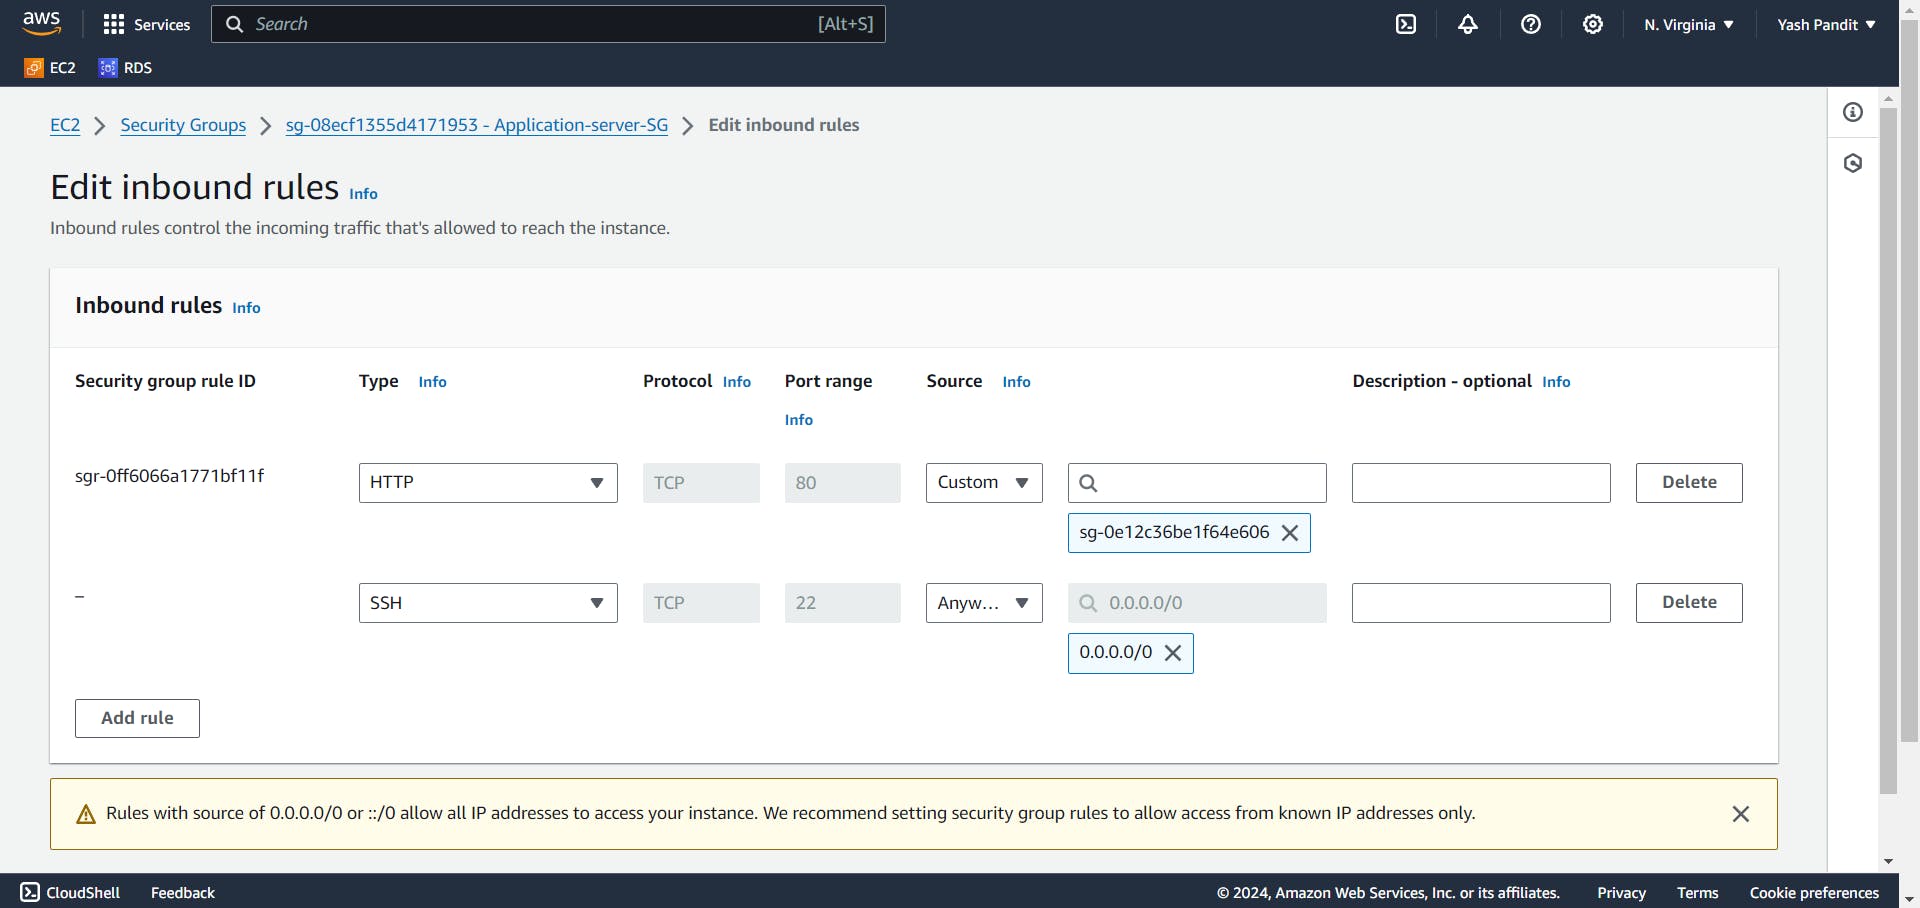
Application Server Security Group (Application-server-SG):
Click on "Create security group"
Security group name "Application-server-SG"
VPC "vpc-for-2tier"
Allow inbound HTTP traffic (Port 80) from Load Balancer Security Group and Allow SSH traffic (Port 22) from anywhere for administrative access.
Type "HTTP", Source "loadbalancer-sg"
Click on "Add rule"
Type "SSH", Source "0.0.0.0/0"
Allow all outbound traffic.
Type "All traffic" , Destination "0.0.0.0/0"
Click on "Create security group"
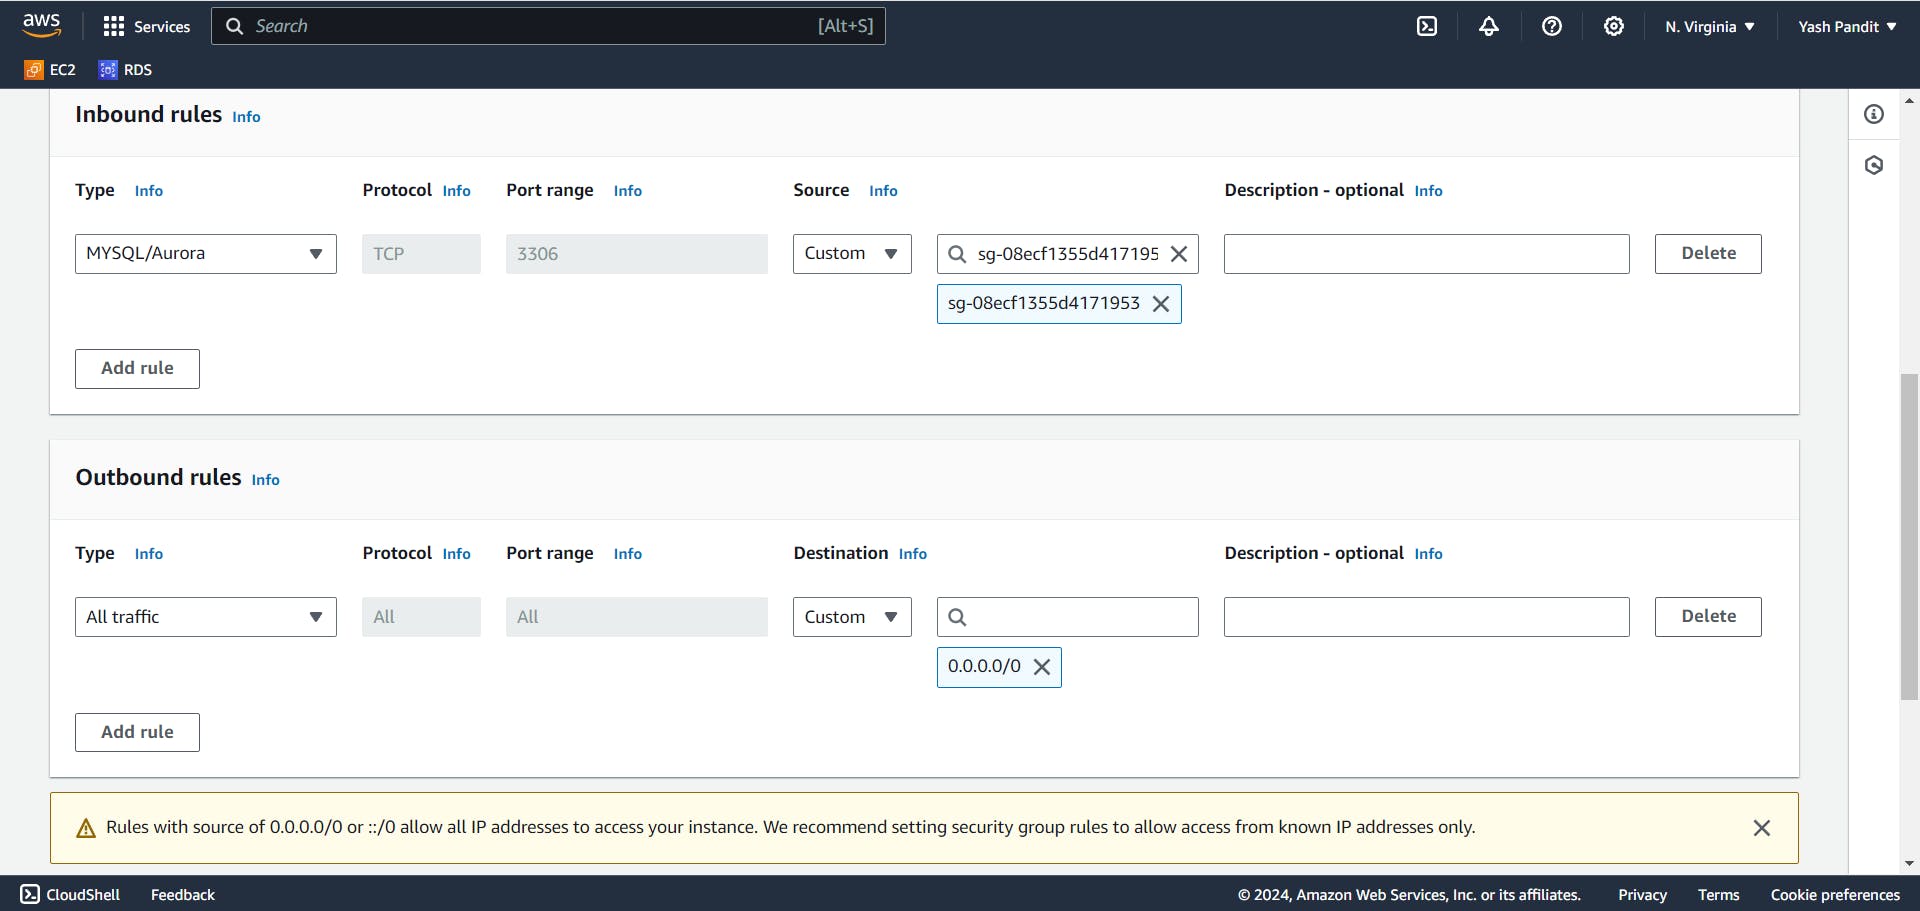
Database Server Security Group (DBserver-SG):
Click on "Create security group"
Security group name "DBserver-SG"
VPC "vpc-for-2tier"
Allow inbound MySQL traffic (Port 3306) from Application Server Security Group.
Type "MYSQL/Aurora", Source "Application-server-SG"
Allow all outbound traffic.
Type "All traffic" , Destination "0.0.0.0/0"
Click on "Create security group"
Step 3: Setting Up the Database
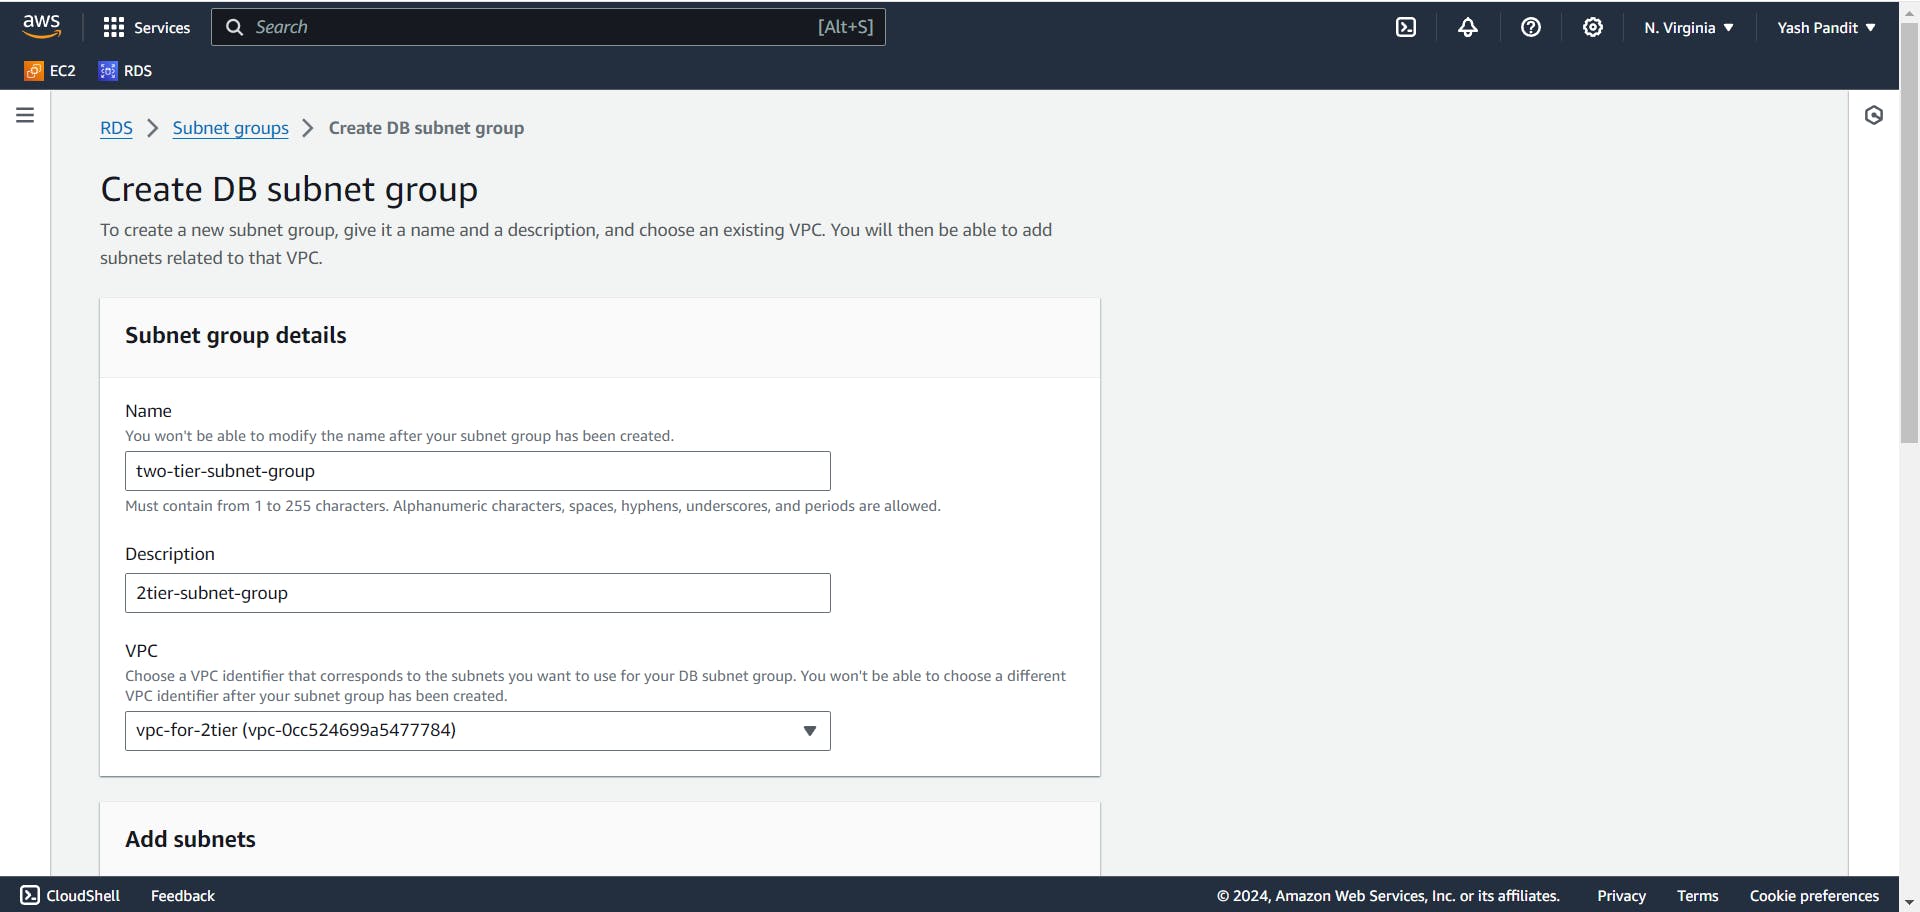
Creating a Database Subnet Group:
Go to Amazon RDS and select "Subnet groups".
Click on "Create DB Subnet Group"
Name "two-tier-subnet-group"
VPC "vpc-for-2tier"
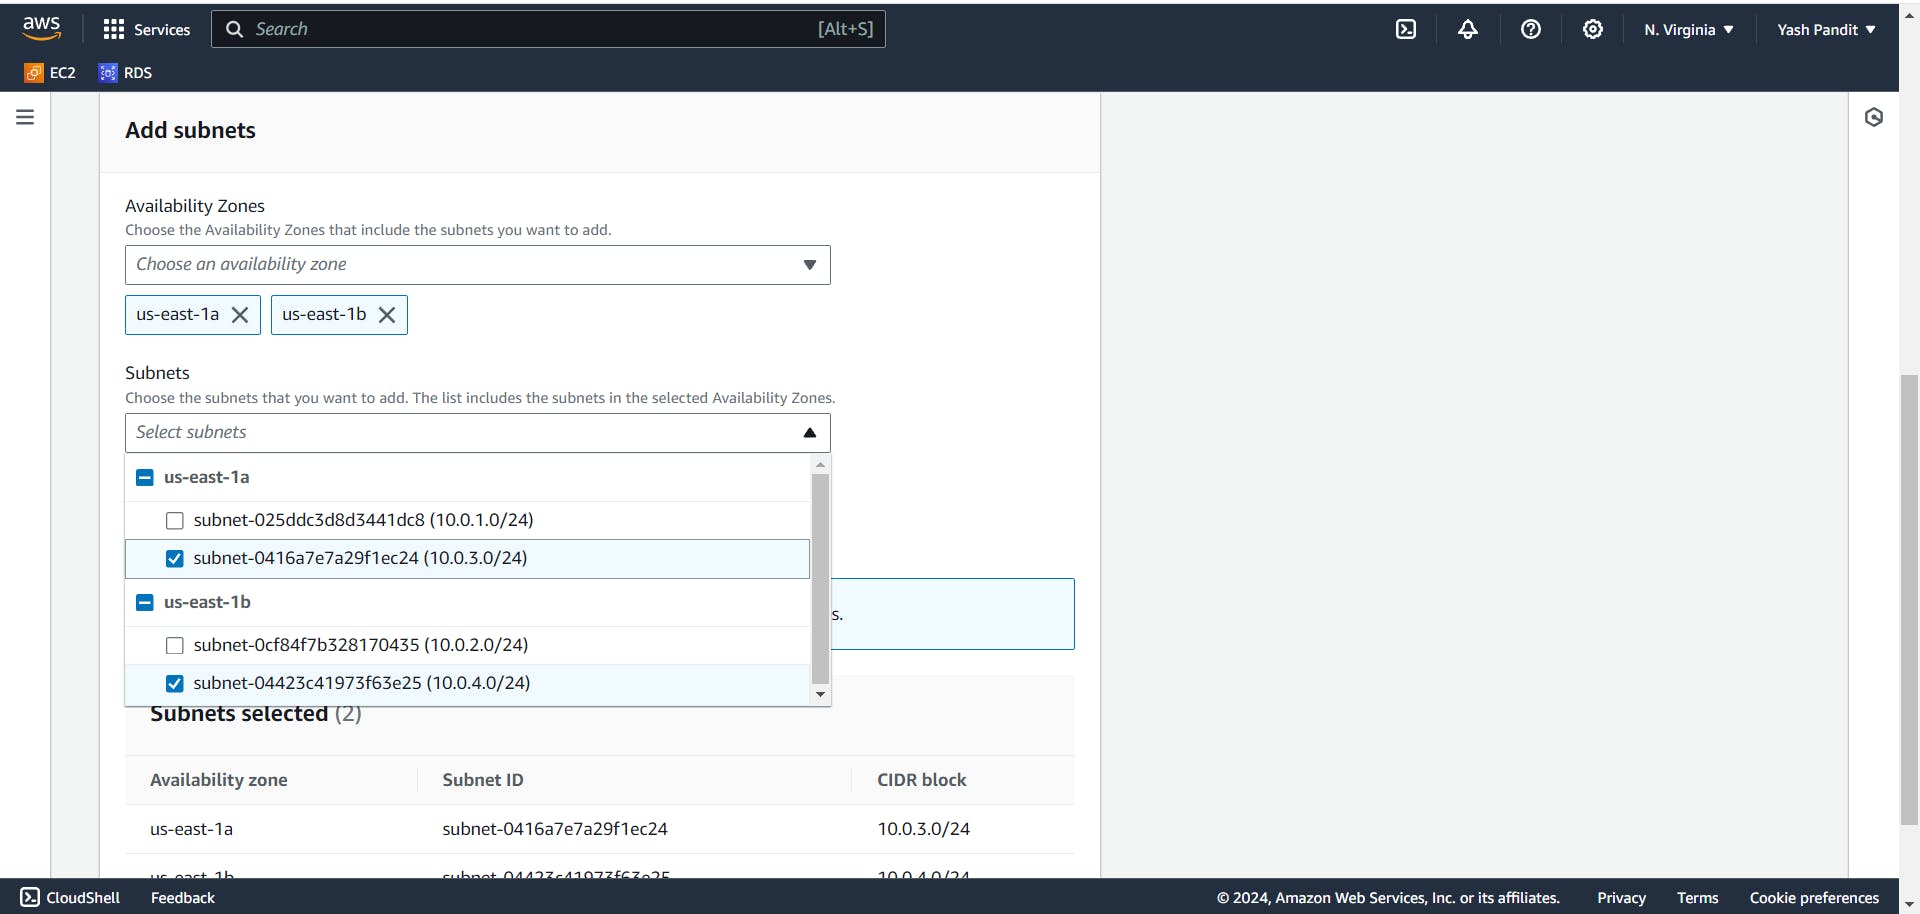
Include subnets from both availability zones.
Availability Zone: "us-east-1a", "us-east-1b"
Subnets "10.0.3.0/24", "10.0.4.0/24"
Click on "Create"
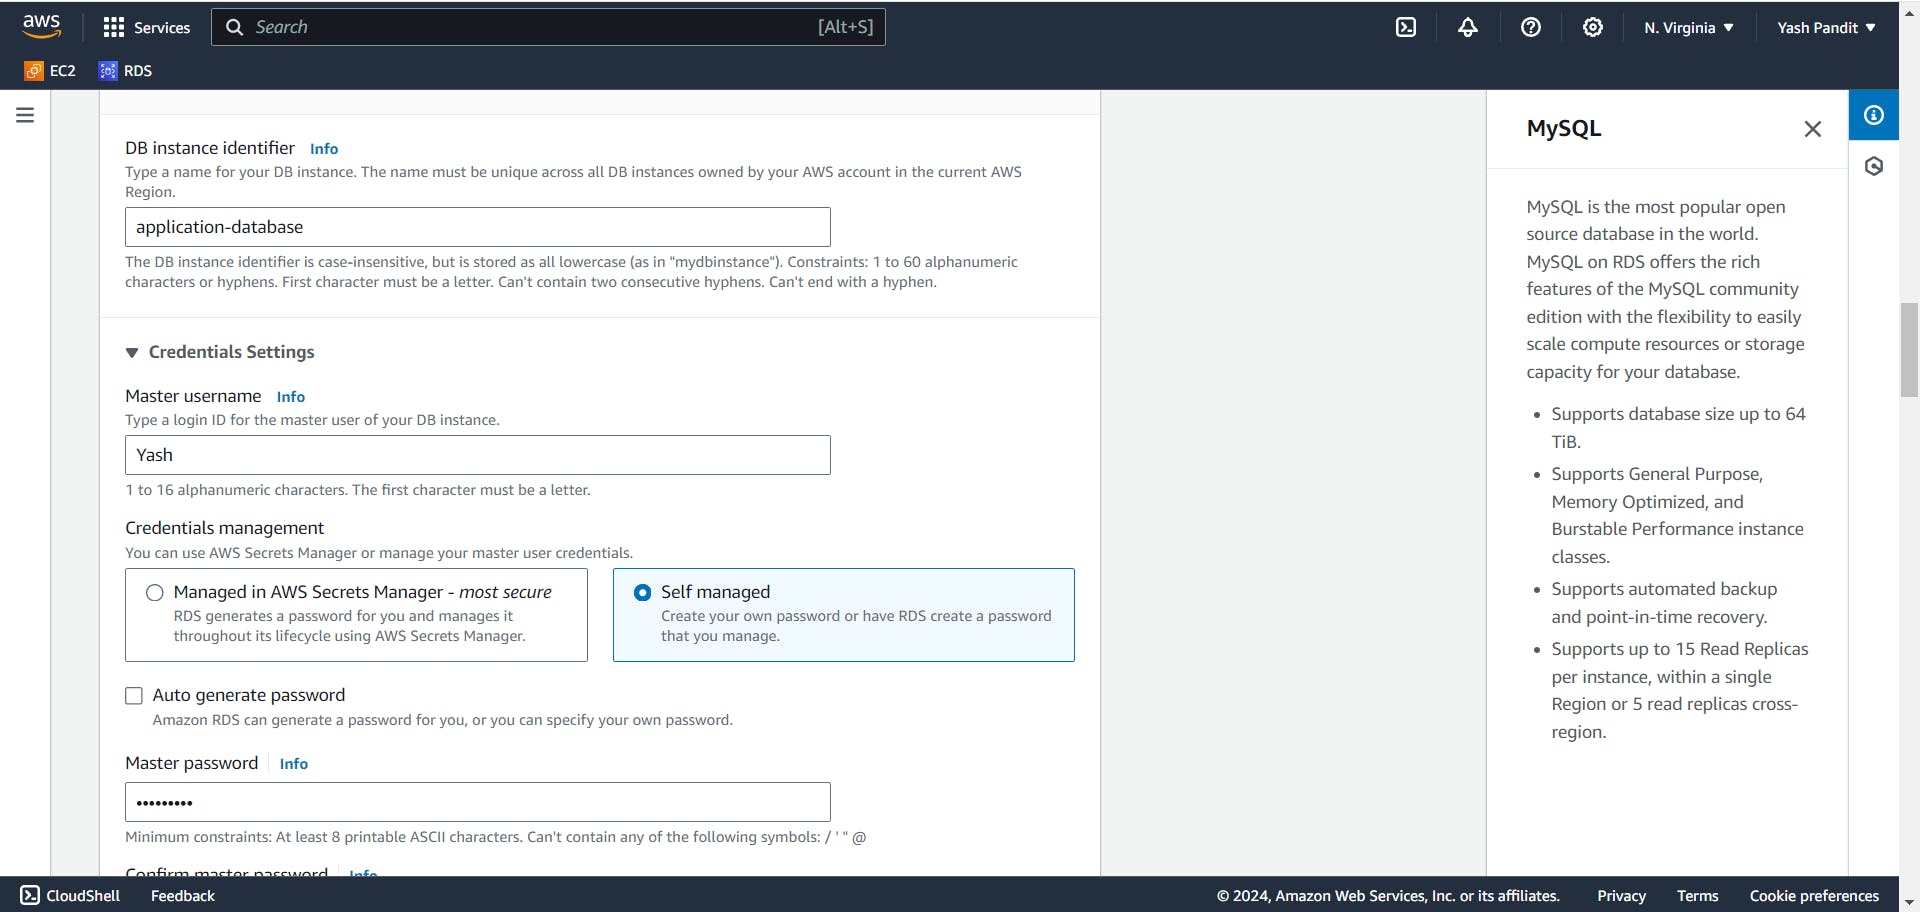
Creating a Database Instance (RDS):
Create a MySQL database instance named "application-database" with appropriate master username and appropriate password.
Go to "Databases"
Click on "Create database"
Engine type "MySQL"
If you want replication select "Production" or "Dev/Test" im going with "Free tier"
DB instance identifier "application-database"
Give Master username and Master password as per your requirements.
Select DB instance class as per your requirements im using "db.t3.micro"
Set the DB subnet group to "two-tier-subnet-group".
VPC "vpc-for-2tier"
DB subnet group "two-tier-subnet-group"
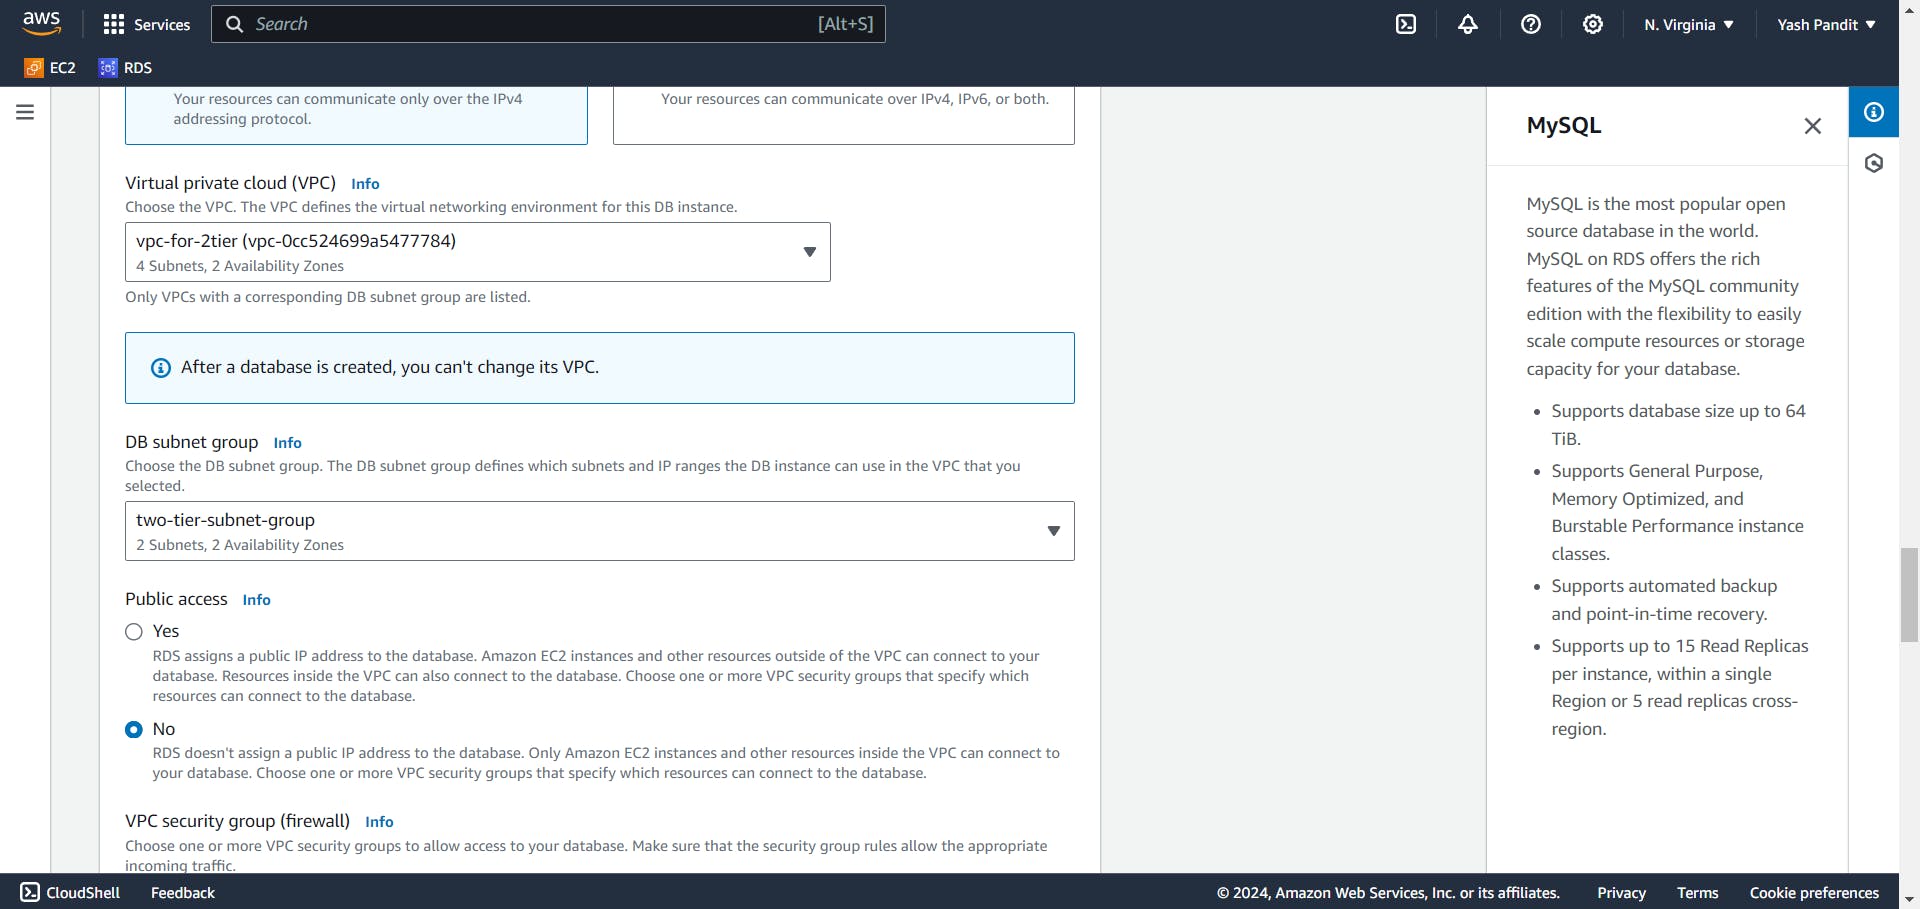
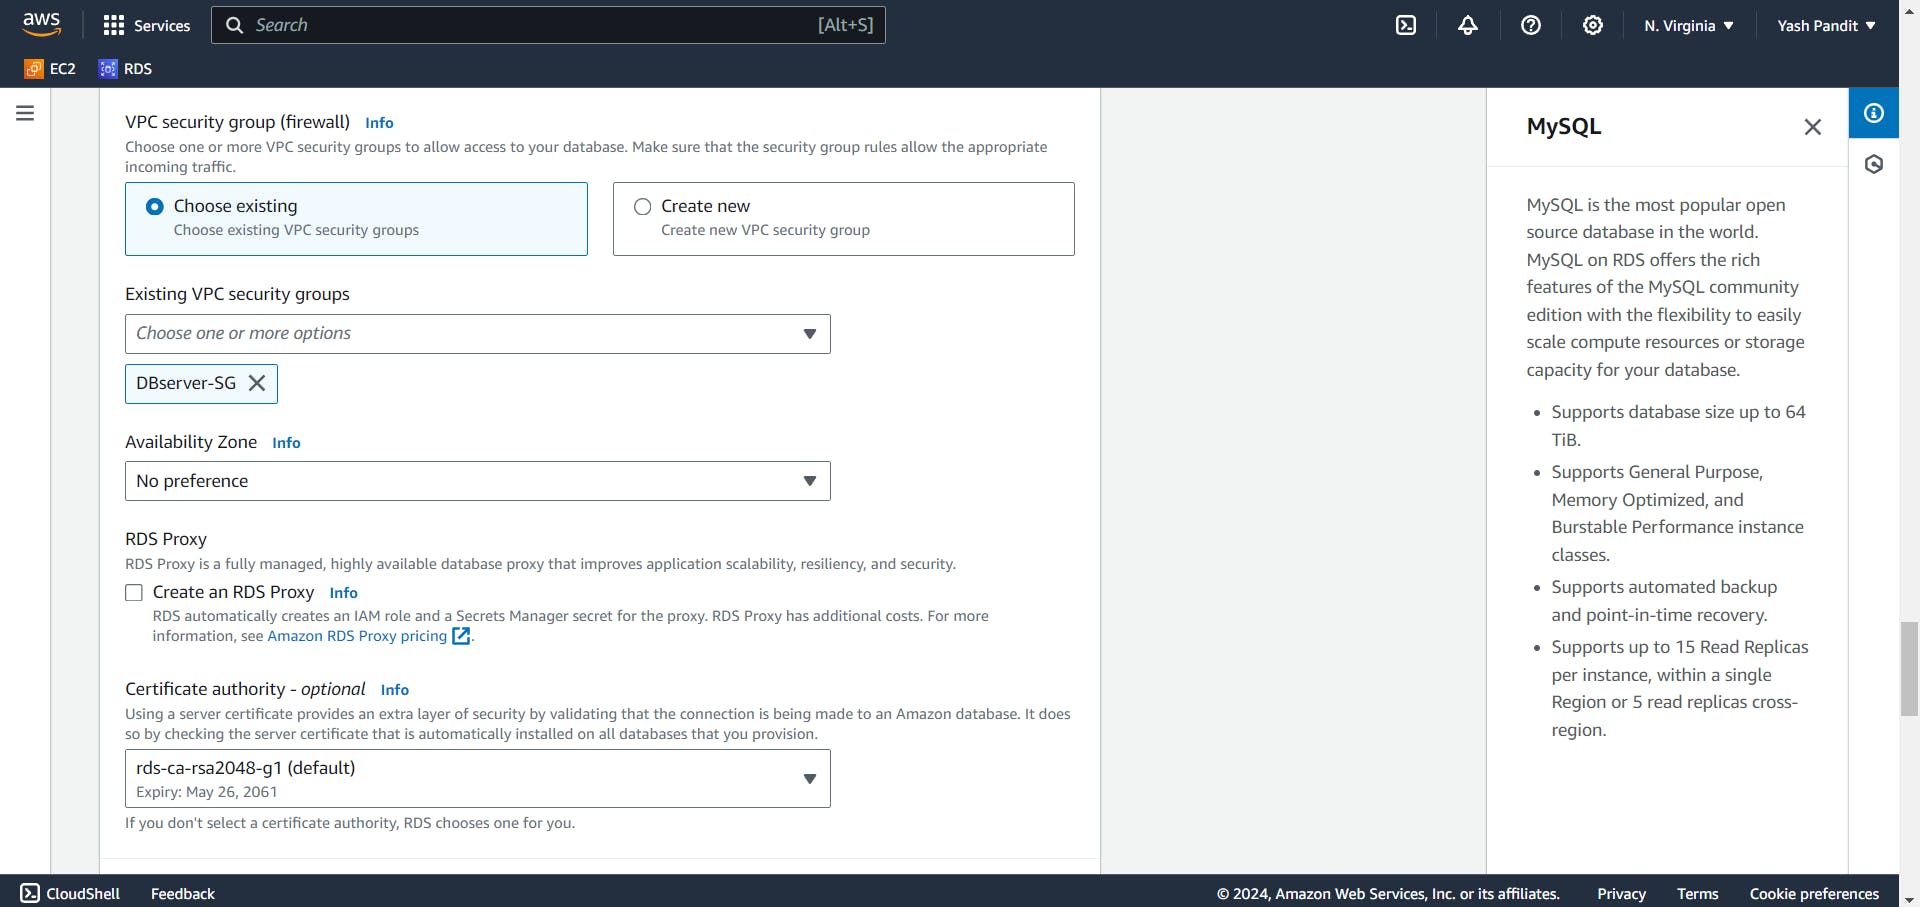
Restrict public access and assign the security group "DBserver-SG".
Public access "No"
VPC security group "choose existing"
Existing VPC security groups "DBserver-SG"
Availability Zone "No preference"
Click on "Create database"
Step 4: Setting Up the Application Servers
Launching EC2 Instances:
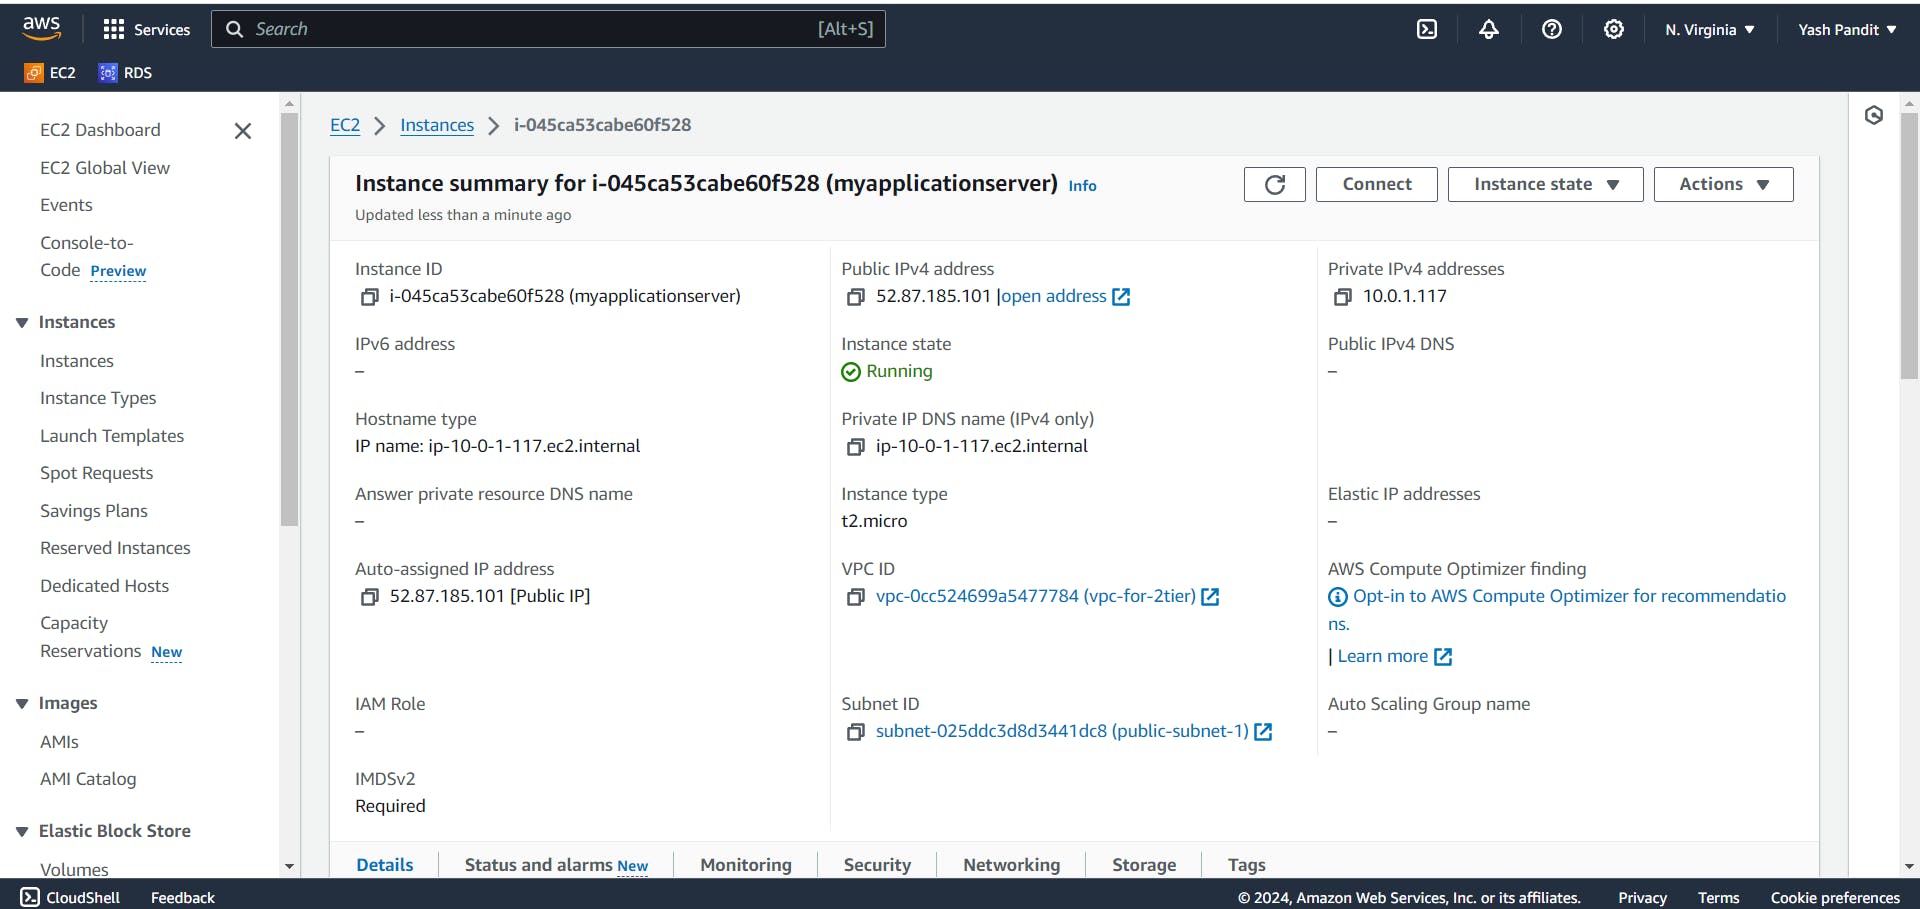
Launch an EC2 instance.
Name "myapplicationserver"
AMI "Ubuntu"
Instance type "t2.micro (free tier)"
Key pair : Create > "aws-project.pem" (Download the .pem file.)
VPC "vpc-for-2tier"
Subnet "public-subnet-1"
Auto-assign public IP "Enable"
Firewall (security groups) "Select existing security group"
security group "Application-server-SG"
Click on "Launch instance"
Connecting to EC2 Instance:
Go to folder where your pem file is downloaded
SSH into the EC2 instance using the public IP address.(change pem key and public ip address as per your instance)
ssh -i 'aws-project.pem' ubuntu@52.87.185.101
Configuring the Server:
Update the server and install MySQL server.(It is important for acessing database)
  sudo apt-get update
  sudo apt-get install mysql-server
Step 5: Deploying the Application
Setting Up Backend:
Go to AMAZON RDS and copy endpoint of your database
Connect to the RDS instance.(paste endpoint insted of host and change username as per you gave)
  #copy your mysql database endpoint and put it instead of host
  #write your Master hostname instead of username
  mysql -h host -u username -p
create a database named "employees".
Create necessary tables and configurations.
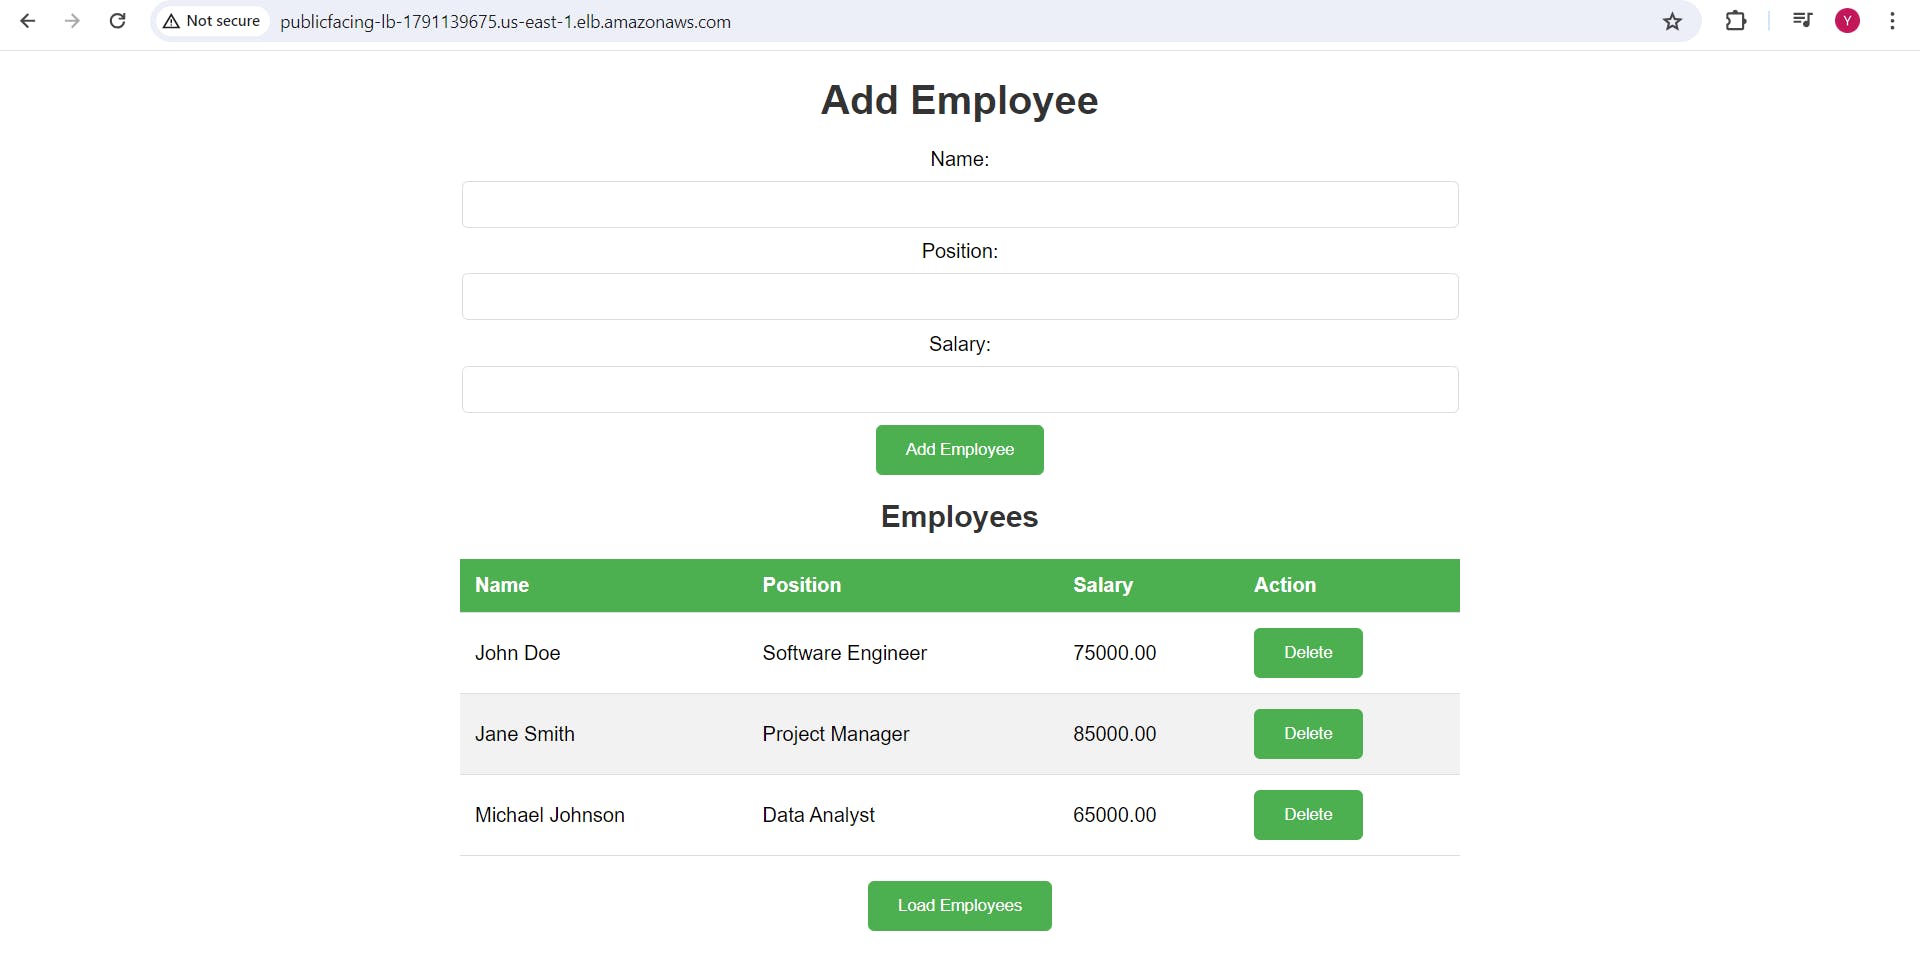
  CREATE DATABASE employees;

  USE employees;

  CREATE TABLE employees (
    id INT AUTO_INCREMENT PRIMARY KEY,
    name VARCHAR(255) NOT NULL,
    position VARCHAR(255) NOT NULL,
    salary DECIMAL(10, 2) NOT NULL
  );

  INSERT INTO employees (name, position, salary) VALUES
  ('John Doe', 'Software Engineer', 75000.00),
  ('Jane Smith', 'Project Manager', 85000.00),
  ('Michael Johnson', 'Data Analyst', 65000.00);
Setting Up Frontend and backend:
Now, we are going to run our frontend and backend on docker container.
So, Install Nginx and Docker on the EC2 instance.
  sudo apt-get update
  sudo apt install nginx
  sudo apt install docker.io
  sudo systemctl enable nginx
  sudo systemctl enable docker
Clone the project from GitHub (https://github.com/yashrpandit/My-application.git).
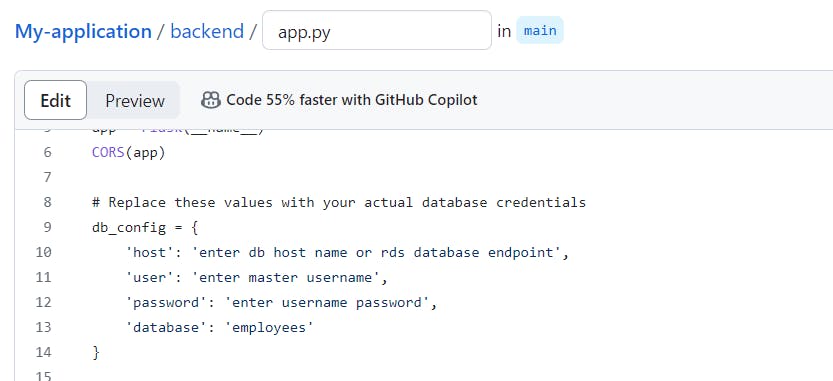
git clone https://github.com/yashrpandit/My-application.gitNavigate to the backend directory and edit app.py
  cd My-application/backend/
  sudo vi app.py
change the database credentials as per your database credentials.
build and run the application using docker on port 5000.
  sudo docker build -t backendapp .
  sudo docker run -itd -p 5000:5000 --restart=always backendapp
Navigate to the frontend directory.
  cd
  cd My-application/frontend
build the app and run it on port 81.
  sudo docker build -t webapp .
  sudo docker run -itd -p 81:80 --restart=always webapp
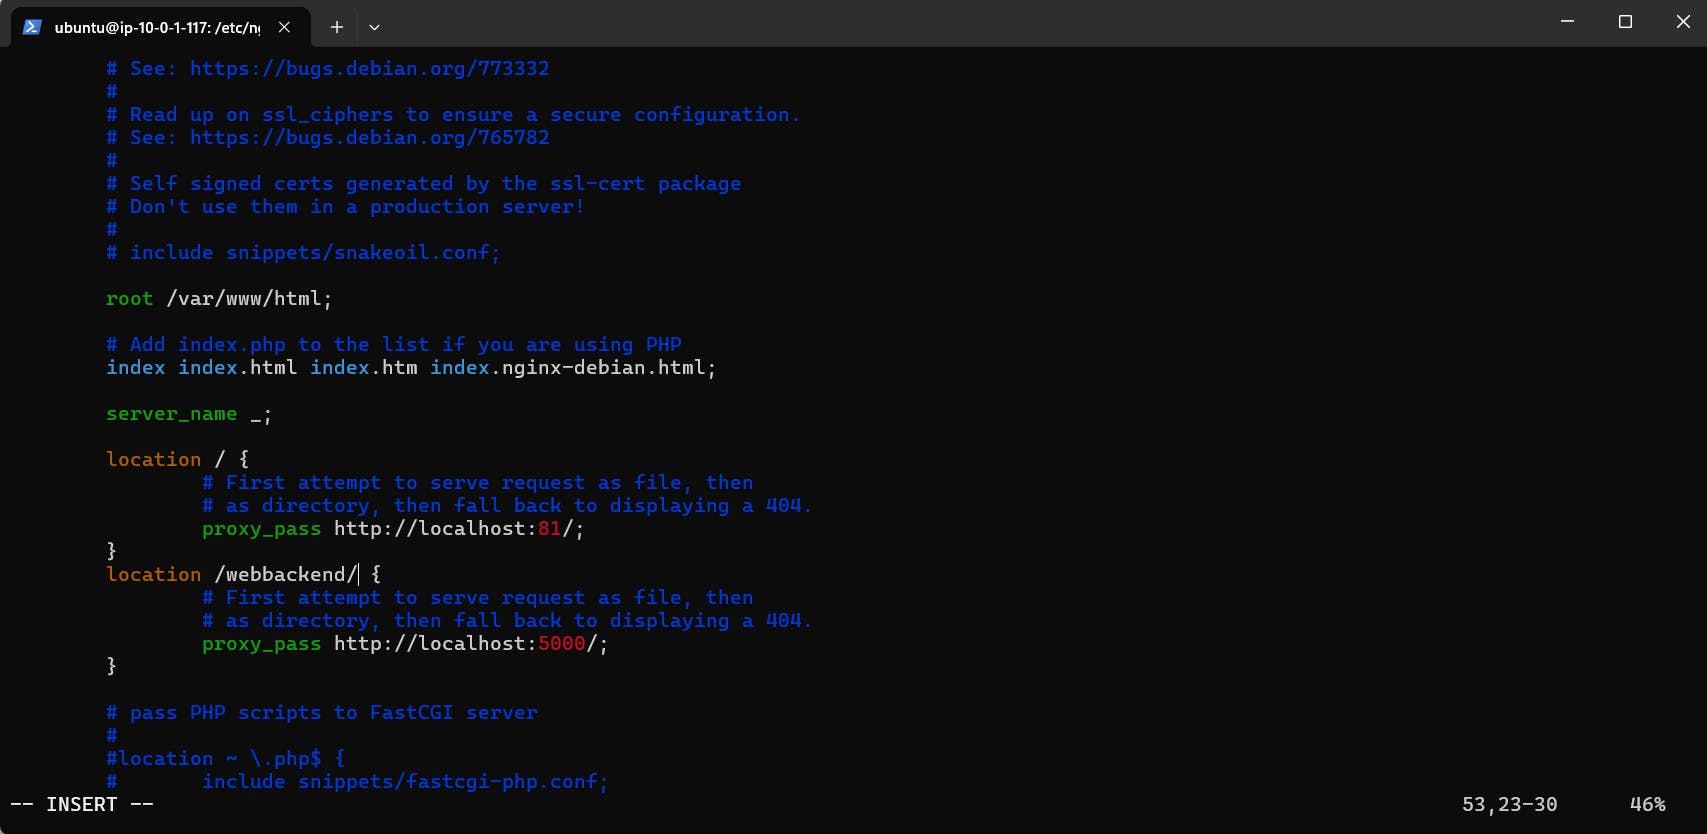
Configuring Nginx:
Edit the Nginx configuration file (/etc/nginx/sites-enabled/default) to proxy pass requests to backend and frontend servers.
Step 6: Setting Up Load Balancer and Auto Scaling
Creating AMI:
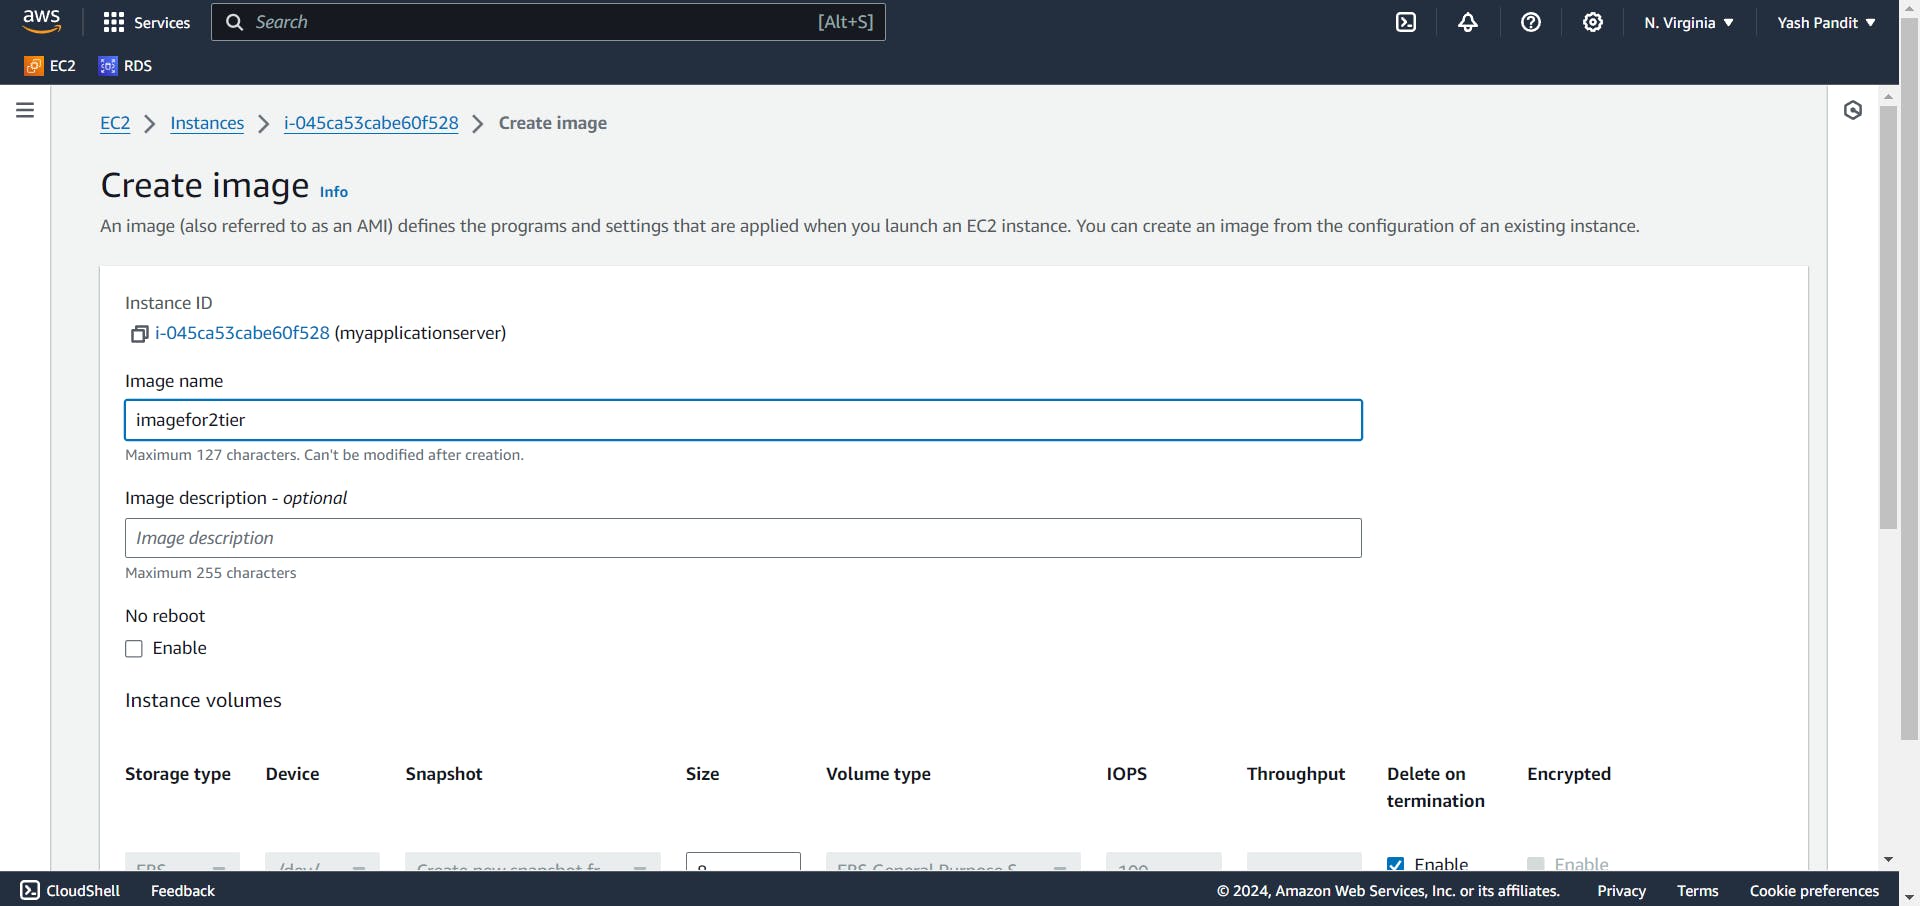
Select instance named "myapplicationserver" and click on Actions>Image and templates>Create image.
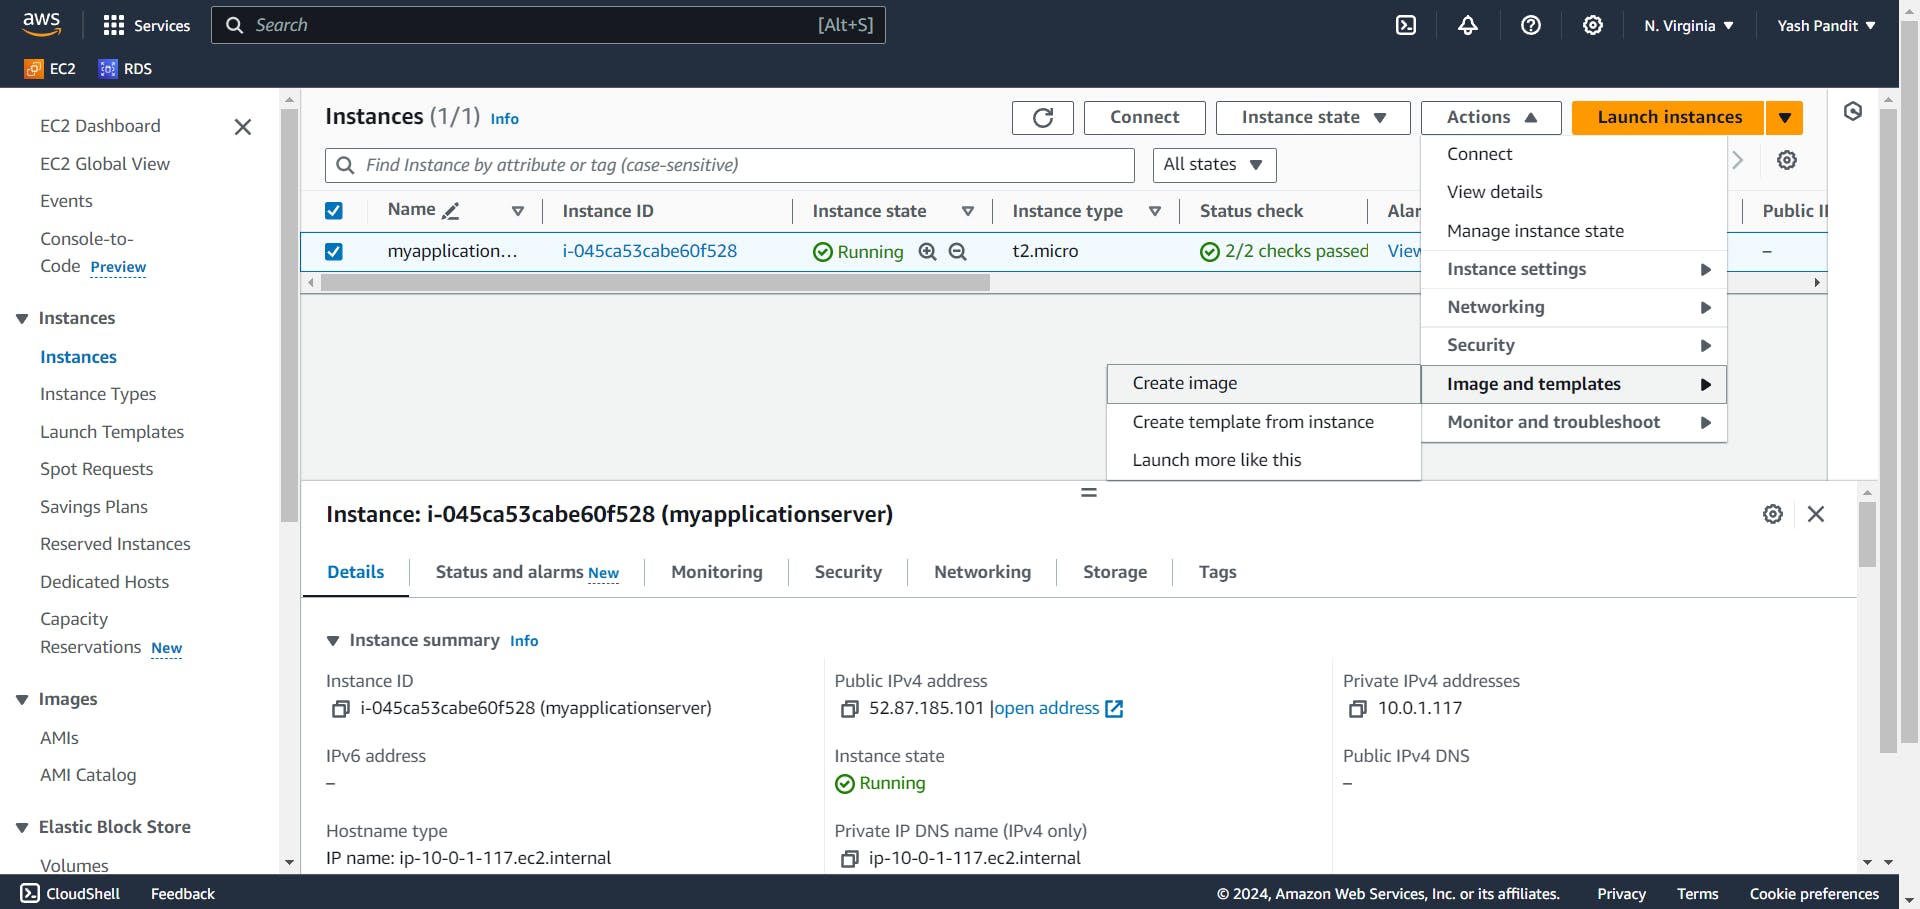
name "imagefor2tier"
Click on "Create image"
Creating Target Group:
Go to target group section under load balancing, Click on "Create target group".
target type "instances"
target group name "TG1" (for routing traffic to instances)
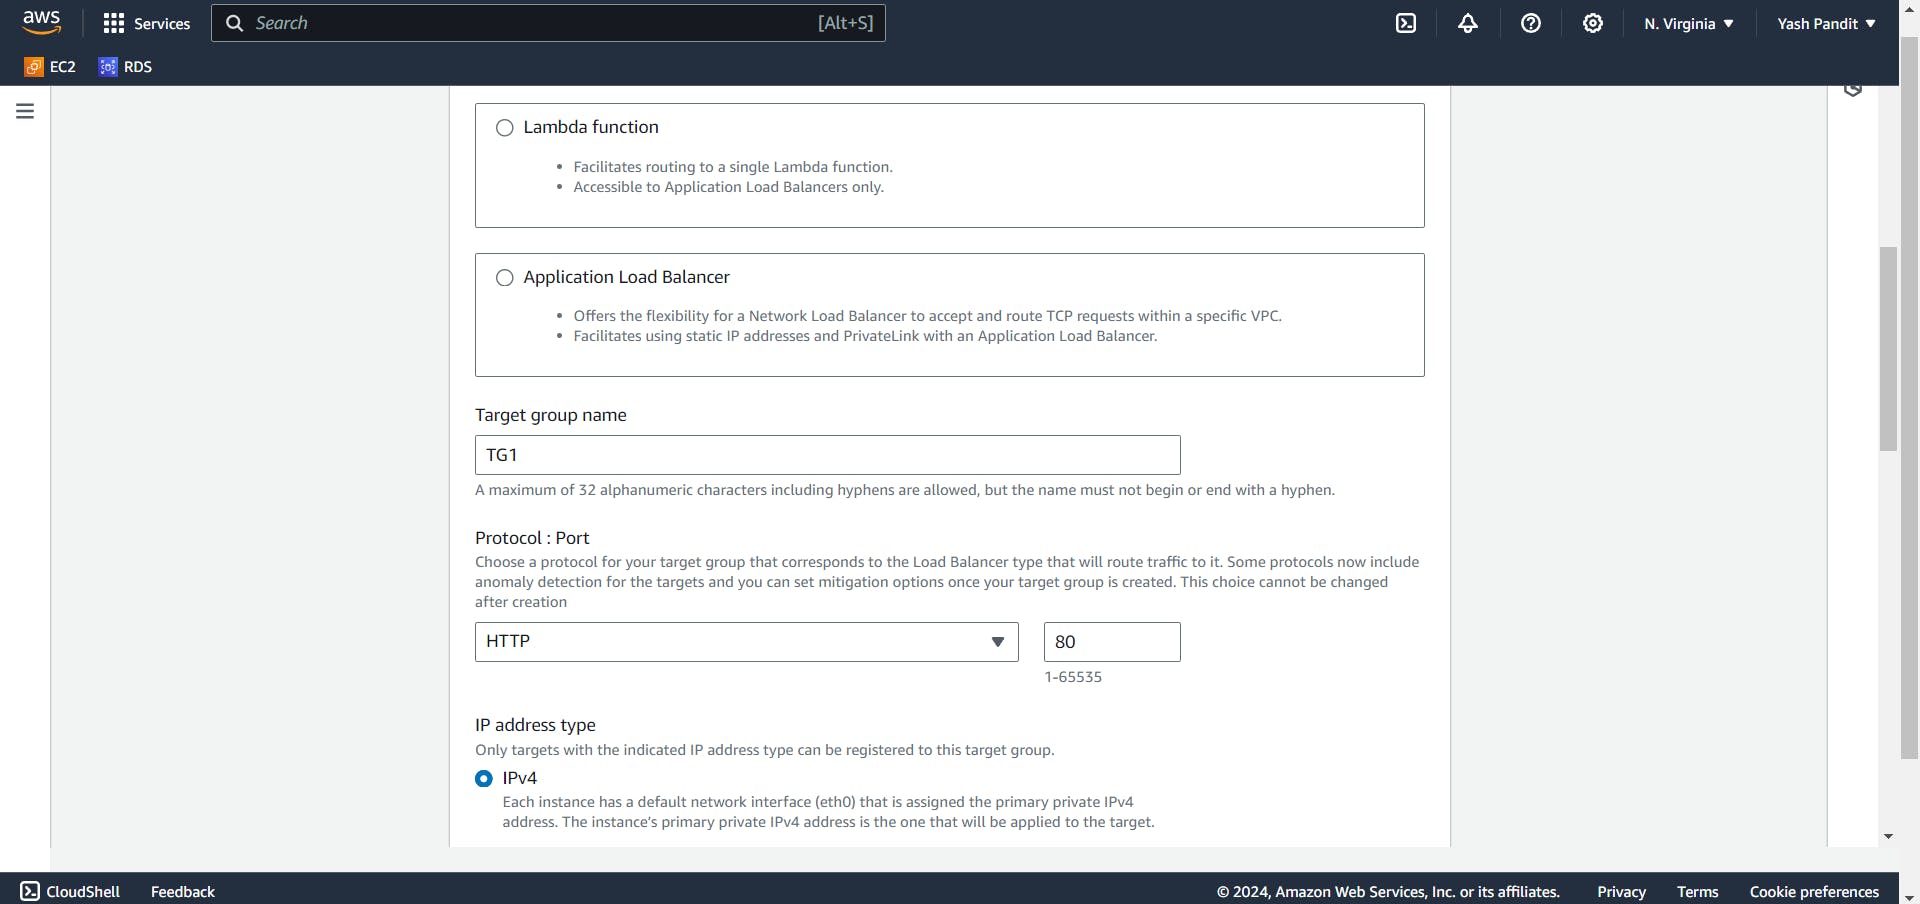
Select VPC "vpc-for-2tier"
Protocol version "HTTP1"
Set protocol to HTTP, health check protocol to HTTP, and health check path to "/".
Click on "Next"
Don't choose any instance for target.
Click on "create target group"
Creating Application Load Balancer (ALB):
Go to Load balancers section under Load balancing, Click on "Create load balancer" .
Select "Application load balancer" and Click on "Create"
Load balancer name "publicfacing-LB"
Scheme "Internet-facing"
IP address type "IPv4"
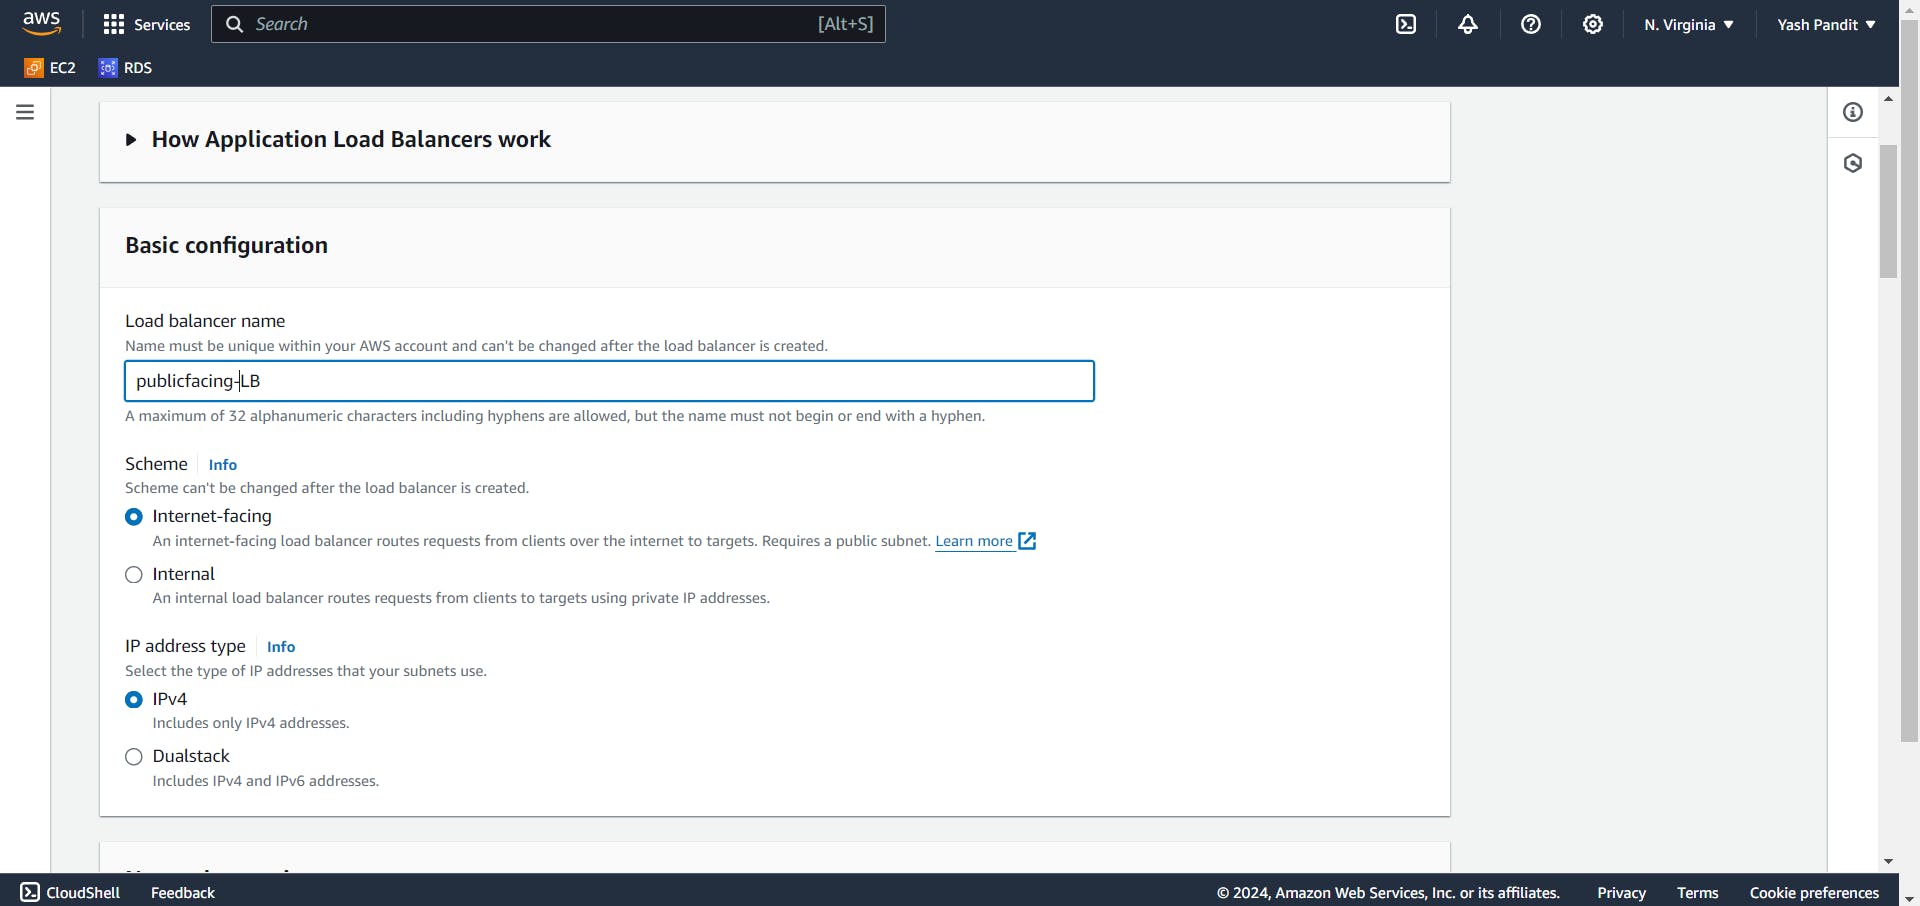
VPC "vpc-for-2tier"
In Mappings select "us-east-1a" and "us-east-1b"
Select "public-subnet-1" under "us-east-1a" and "public-subnet-2" under "us-east-1b"
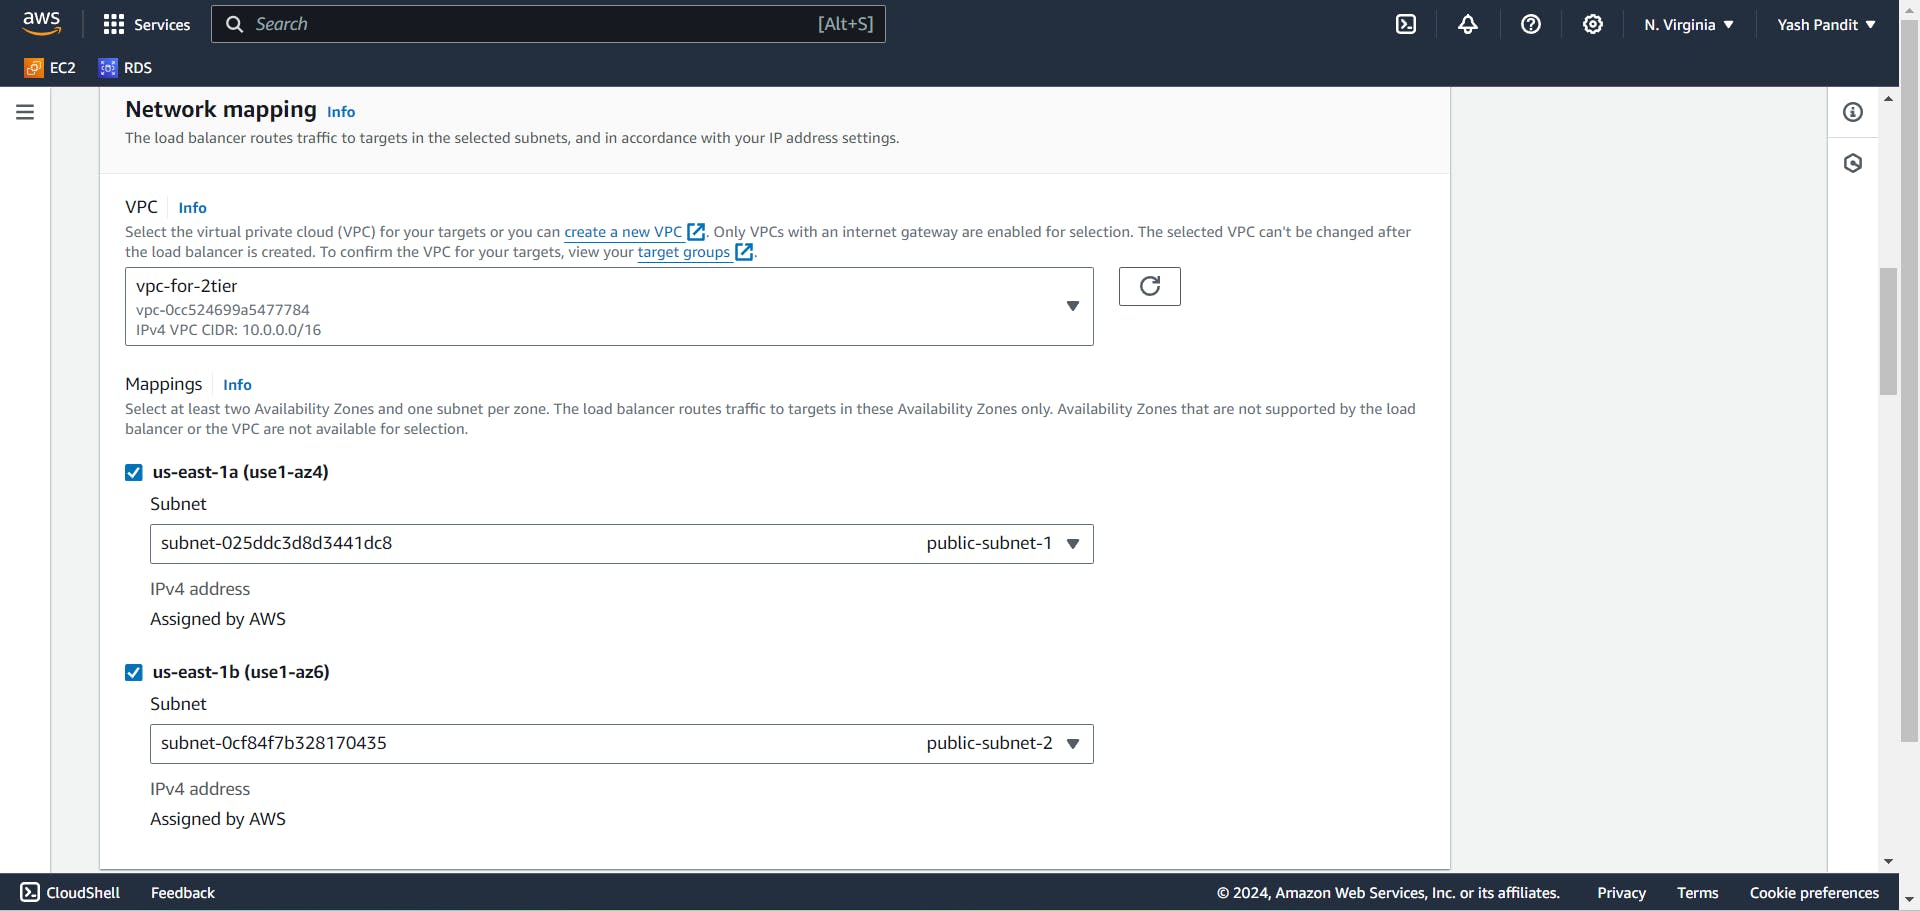
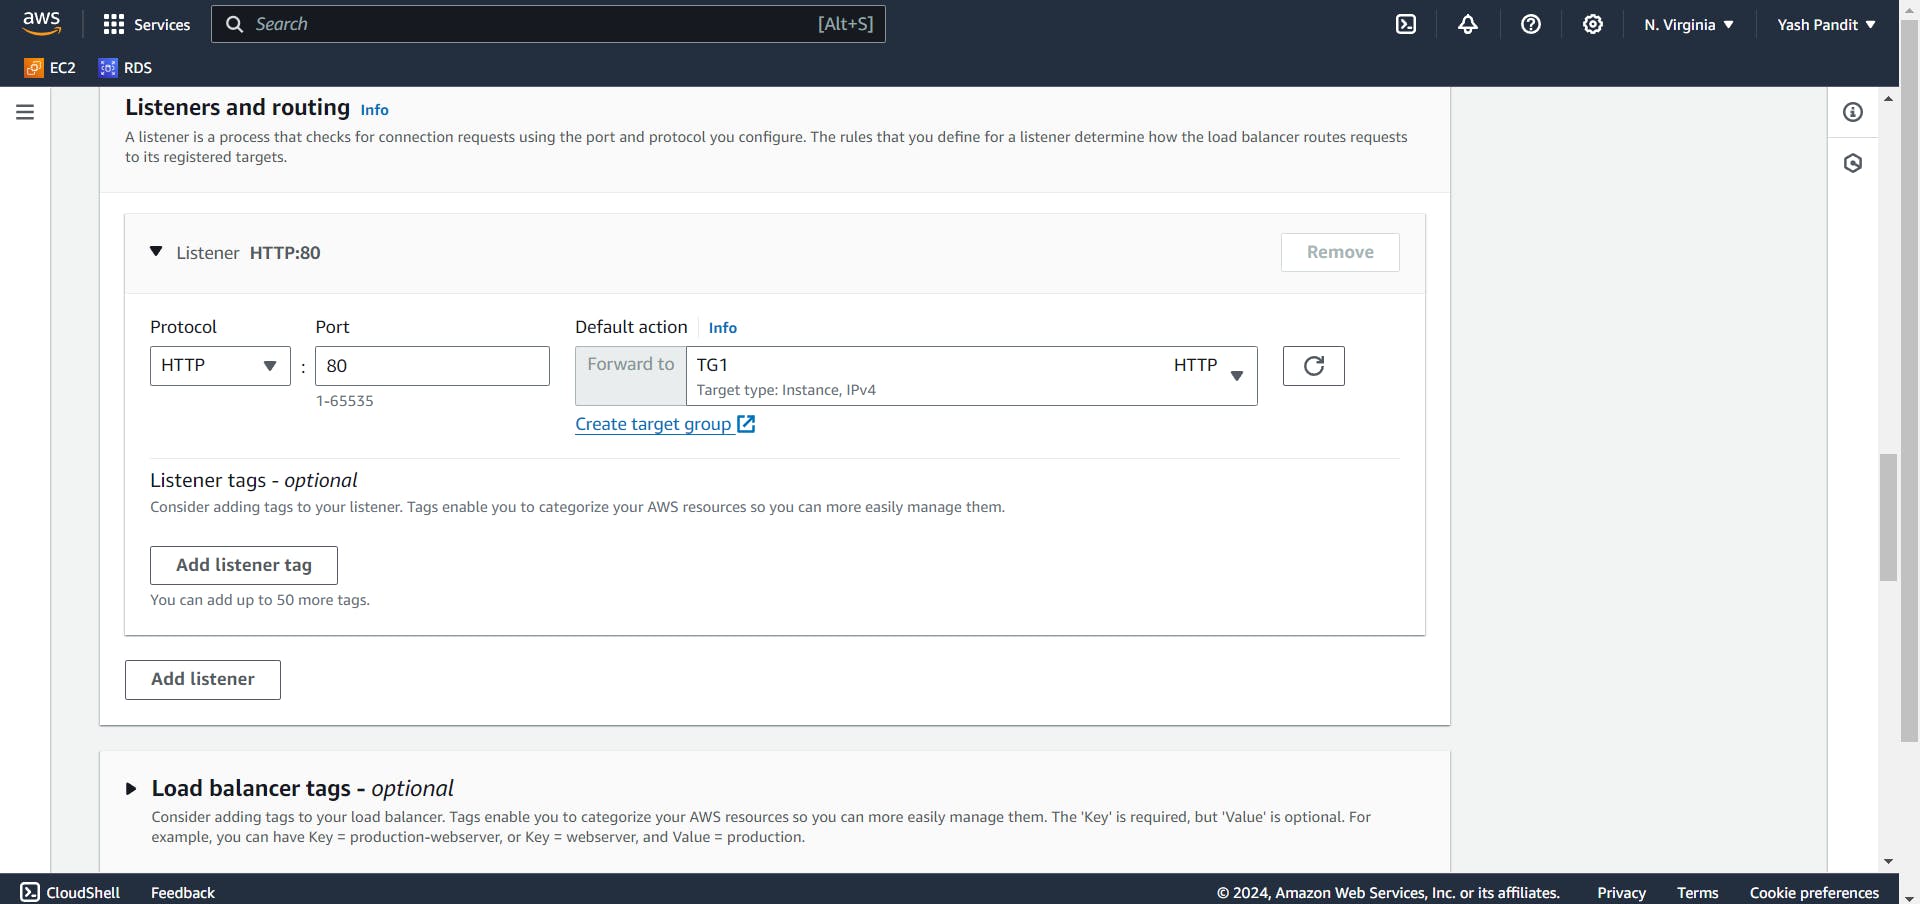
assign the security group "loadbalancer-SG".
Configure listener to forward HTTP traffic on port 80 to "TG1".
Click on "Create load balancer"
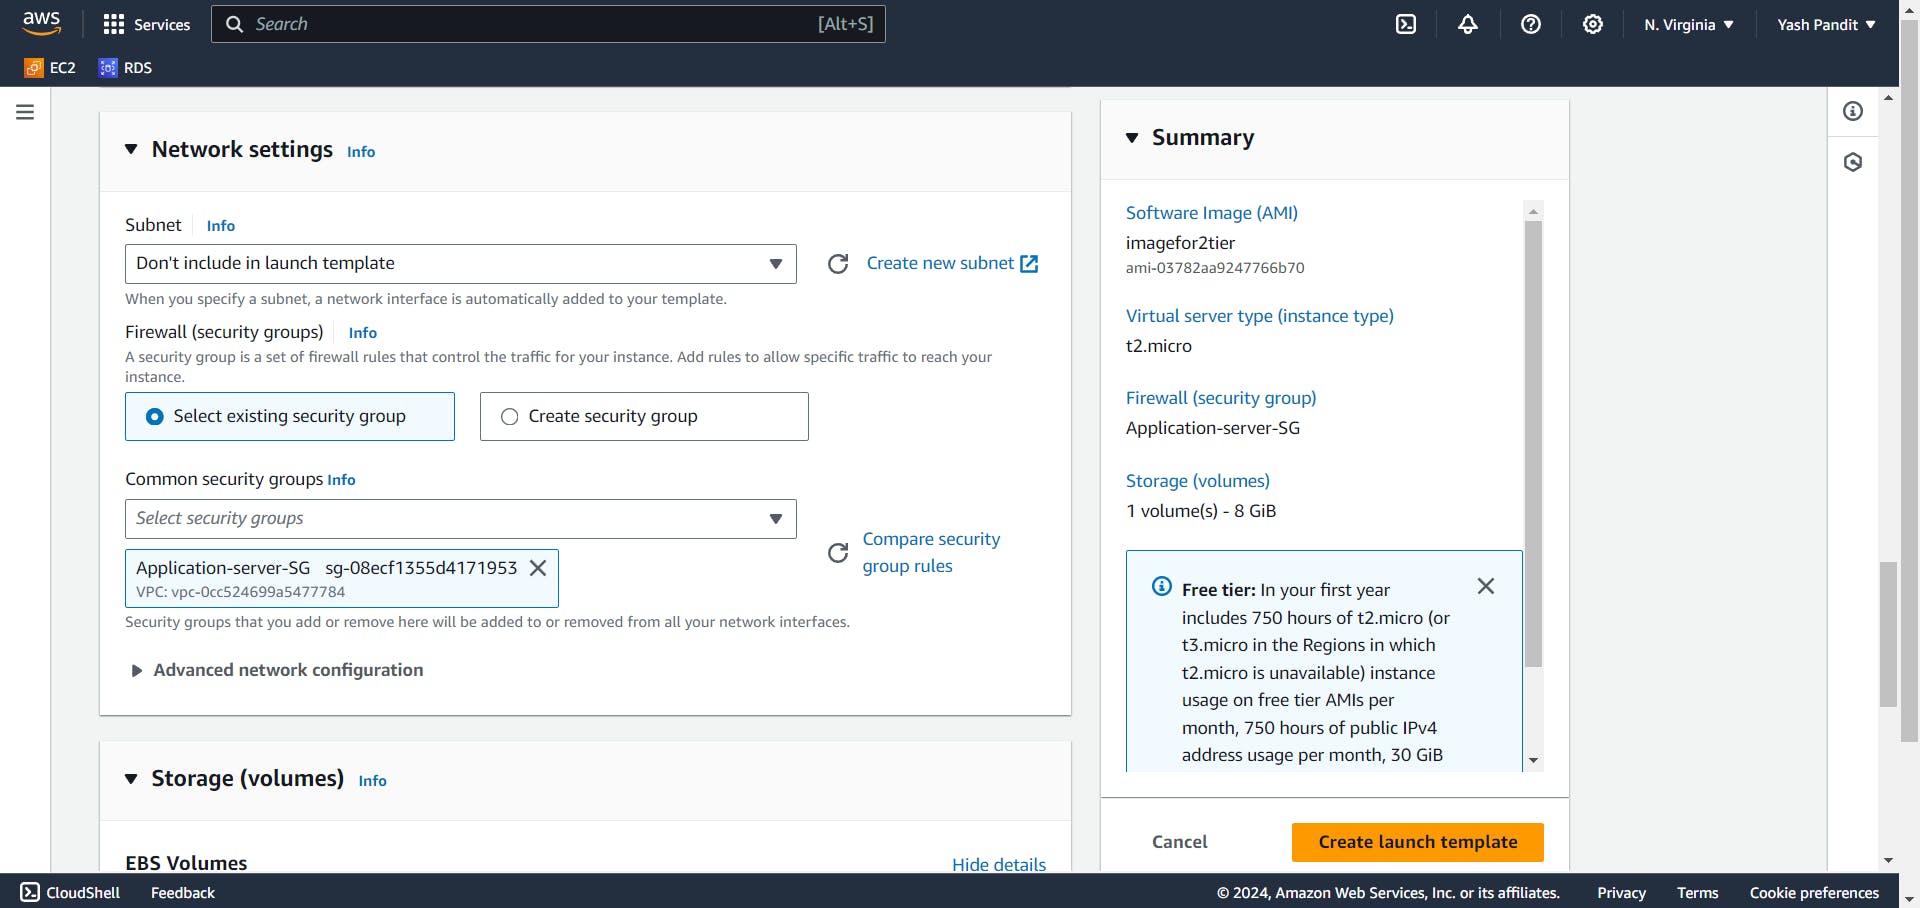
Creating Launch Template and Auto Scaling Group:
Creating launch template.
Go to Launch Template section under instances.
Click on "Create launch template"
Launch template name "2tier-template"
select AMI named "imagefor2tier" under My AMIs
instance type "t2.micro"
key pair "aws-project.pem"
Subnet "Don't include in launch template"
Security group "Application-server-SG"
Click on "Create launch template"
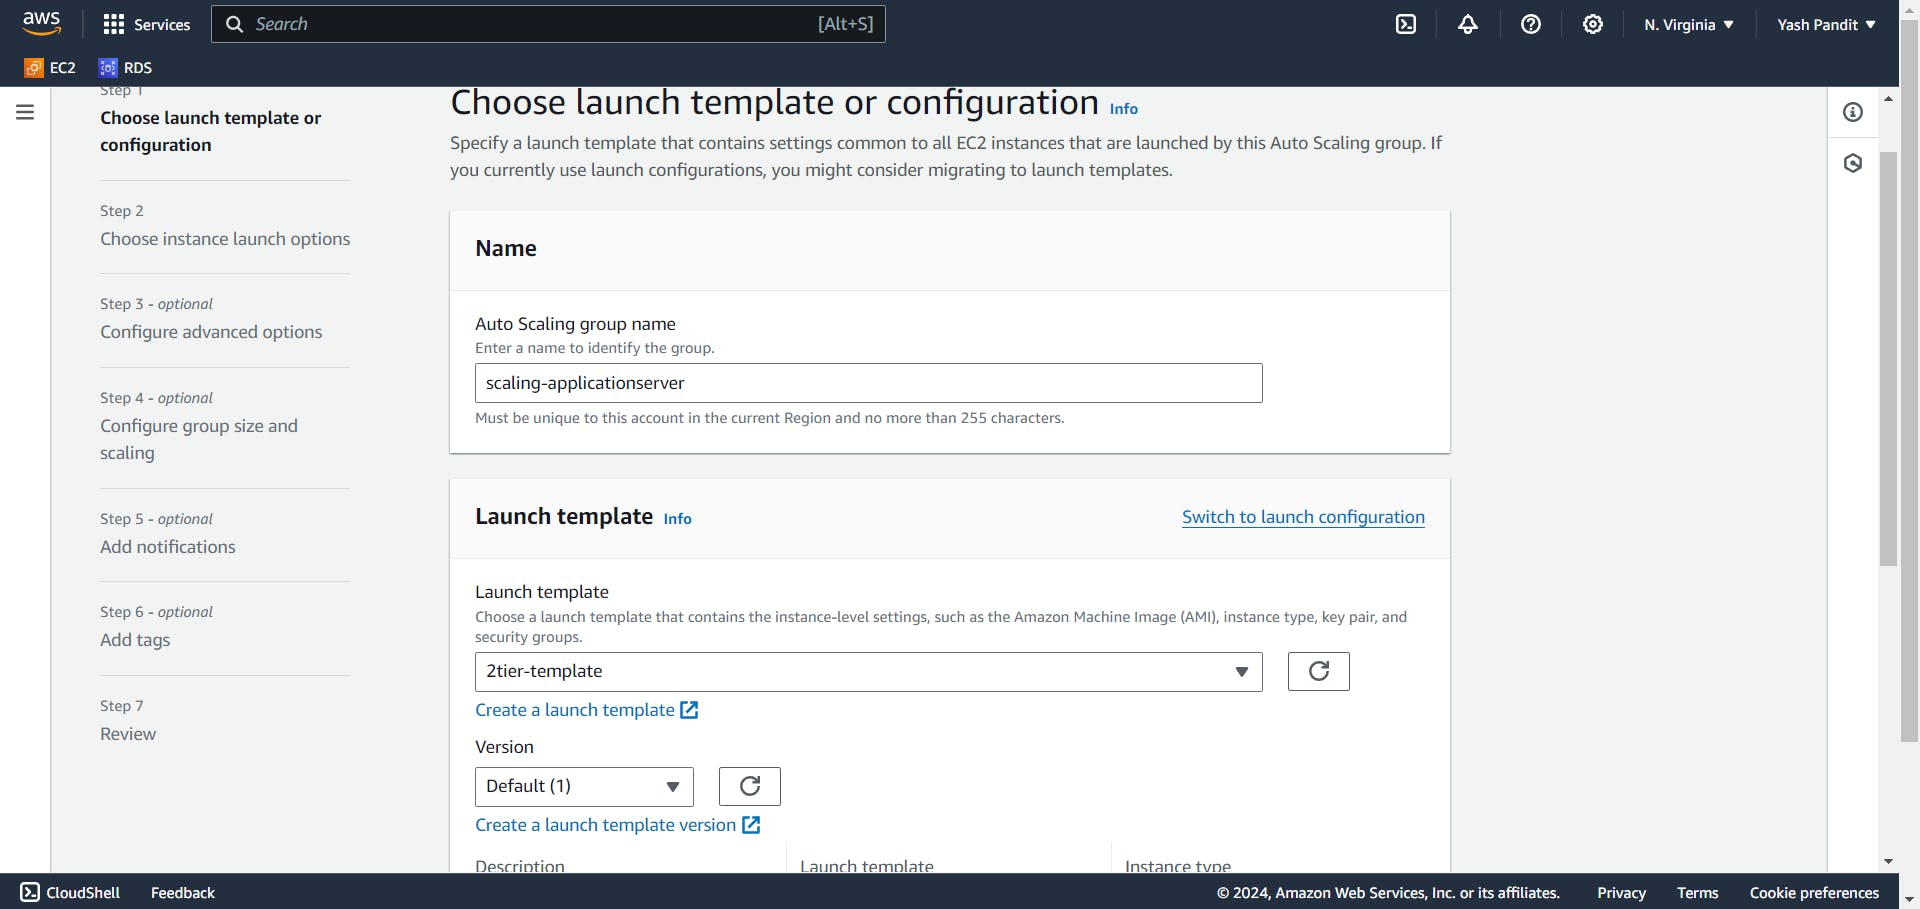
Creating an Auto scaling group.
Go to Auto scaling groups section under Auto scaling.
Click on "Create Auto scaling group"
Auto Scaling group name "scaling-applicationserver"
Launch template "2tier-template"
click "next"
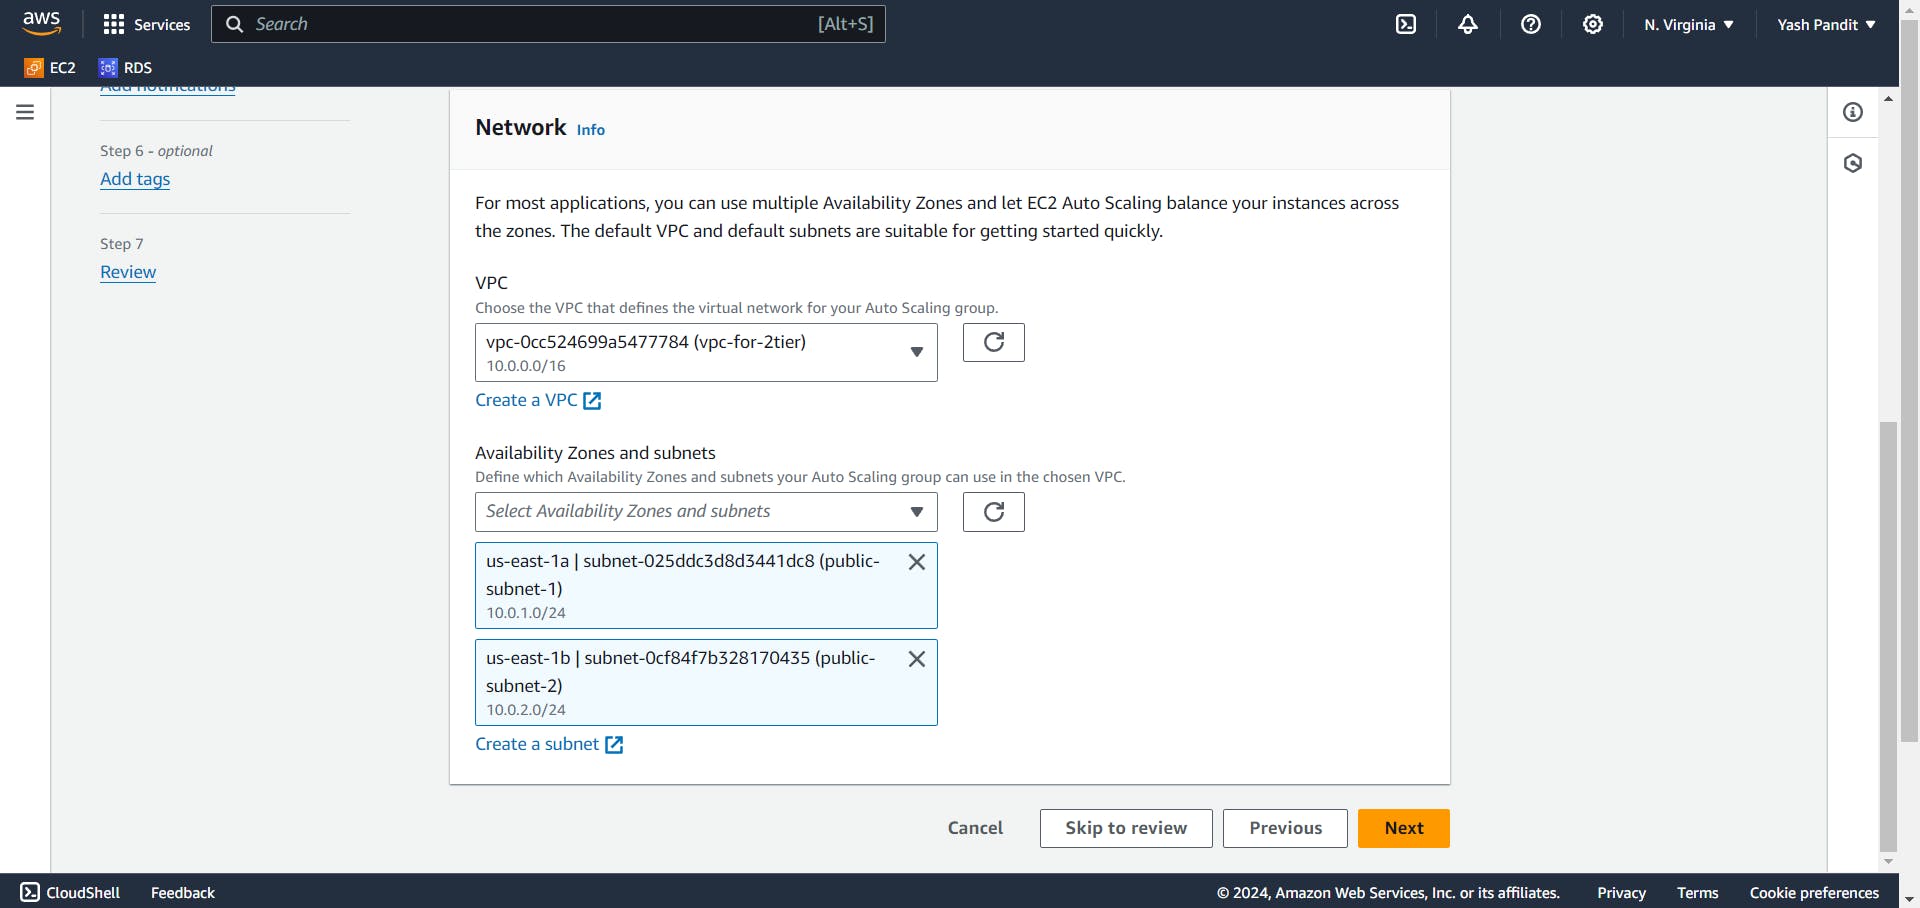
VPC "vpc-for-2tier"
subnets "public-subnet-1","public-subnet-2"
Click on "Next"
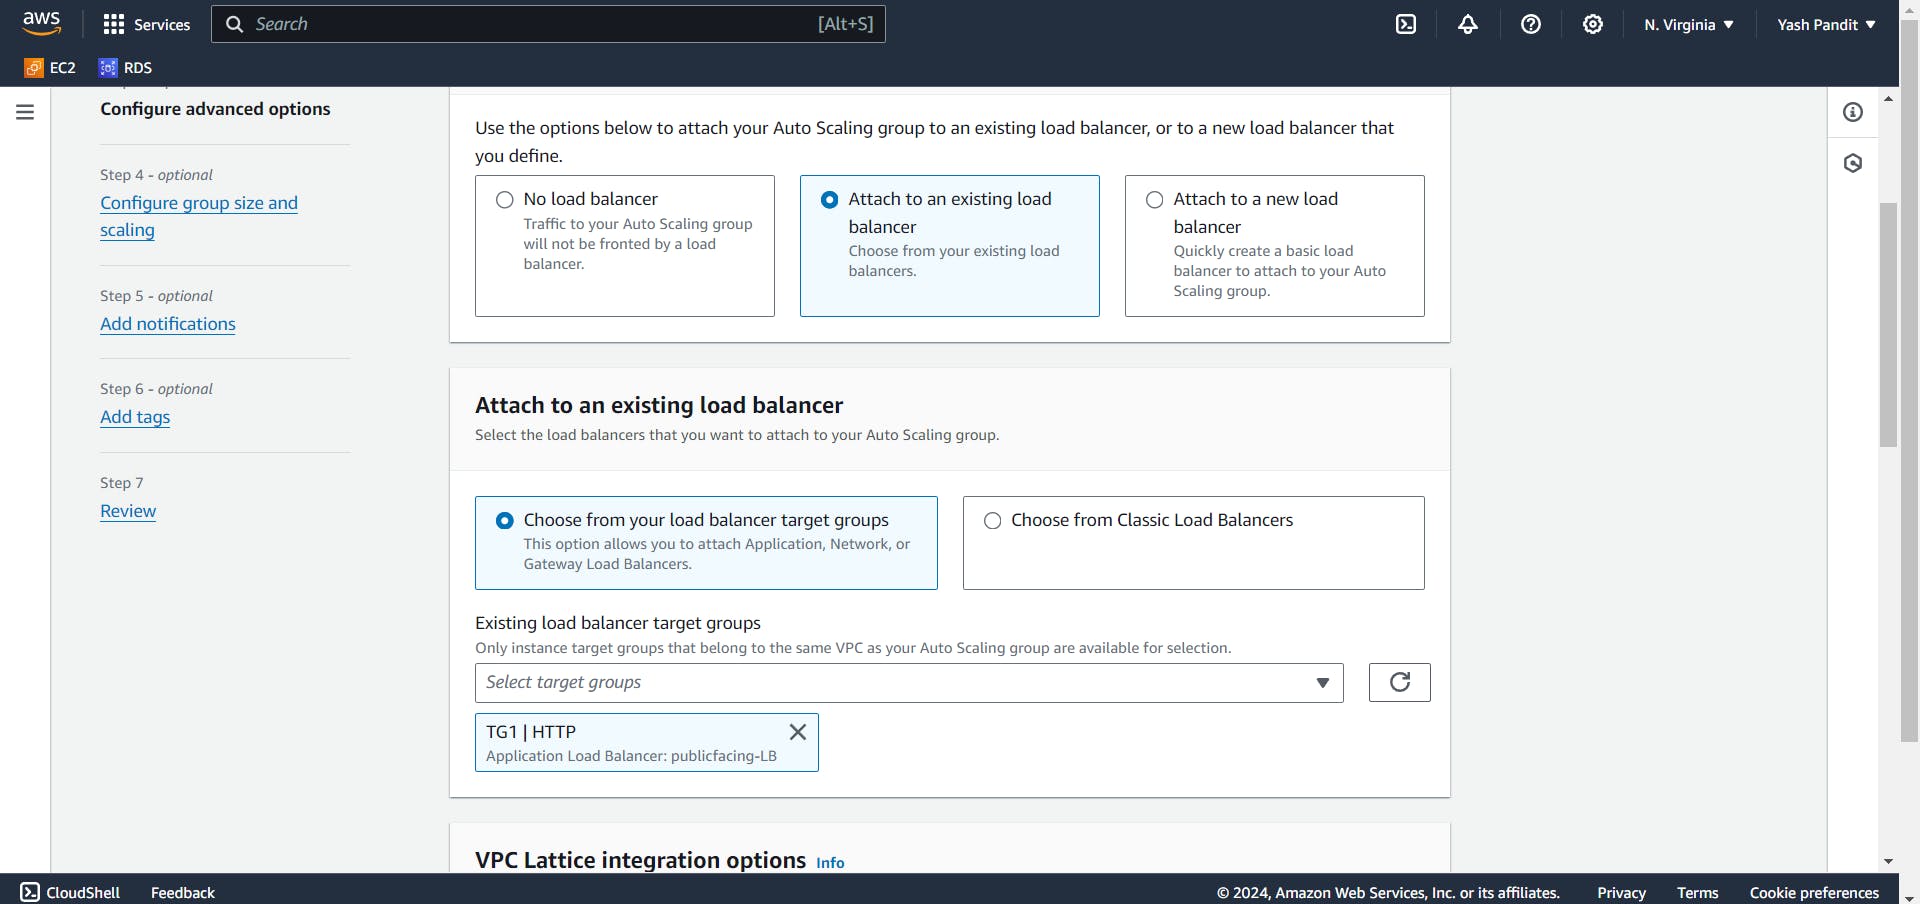
Select "Attach to an existing load balancer" and select target group "TG1".
click on "Next"
Configure scaling policies with desired, minimum, and maximum capacity.
Creating an Auto scaling group.
Configure scaling policies with desired, minimum, and maximum capacity as per your requirements
I select desired capacity "2", Min desired capacity "2", Max desired capacity "2"
Click on "Next"
Set notifications and tag if you want
Click on "Next"
Review it and click on "Create"
Step 7: Accessing the Application
Accessing the Application:
Copy the DNS name of the ALB ("publicfacing-LB") and access the application through it.
Congratulations! You have successfully deployed a two-tier application on AWS using a 2-tier architecture, ensuring scalability and high availability.