

How to Create a Kubernetes Cluster on AWS Using Ansible and Terraform 🚀: A Step-by-Step Guide
Optimizing Deployment Workflow with Kubernetes, Ansible, Terraform, and Jenkins


Table of contents
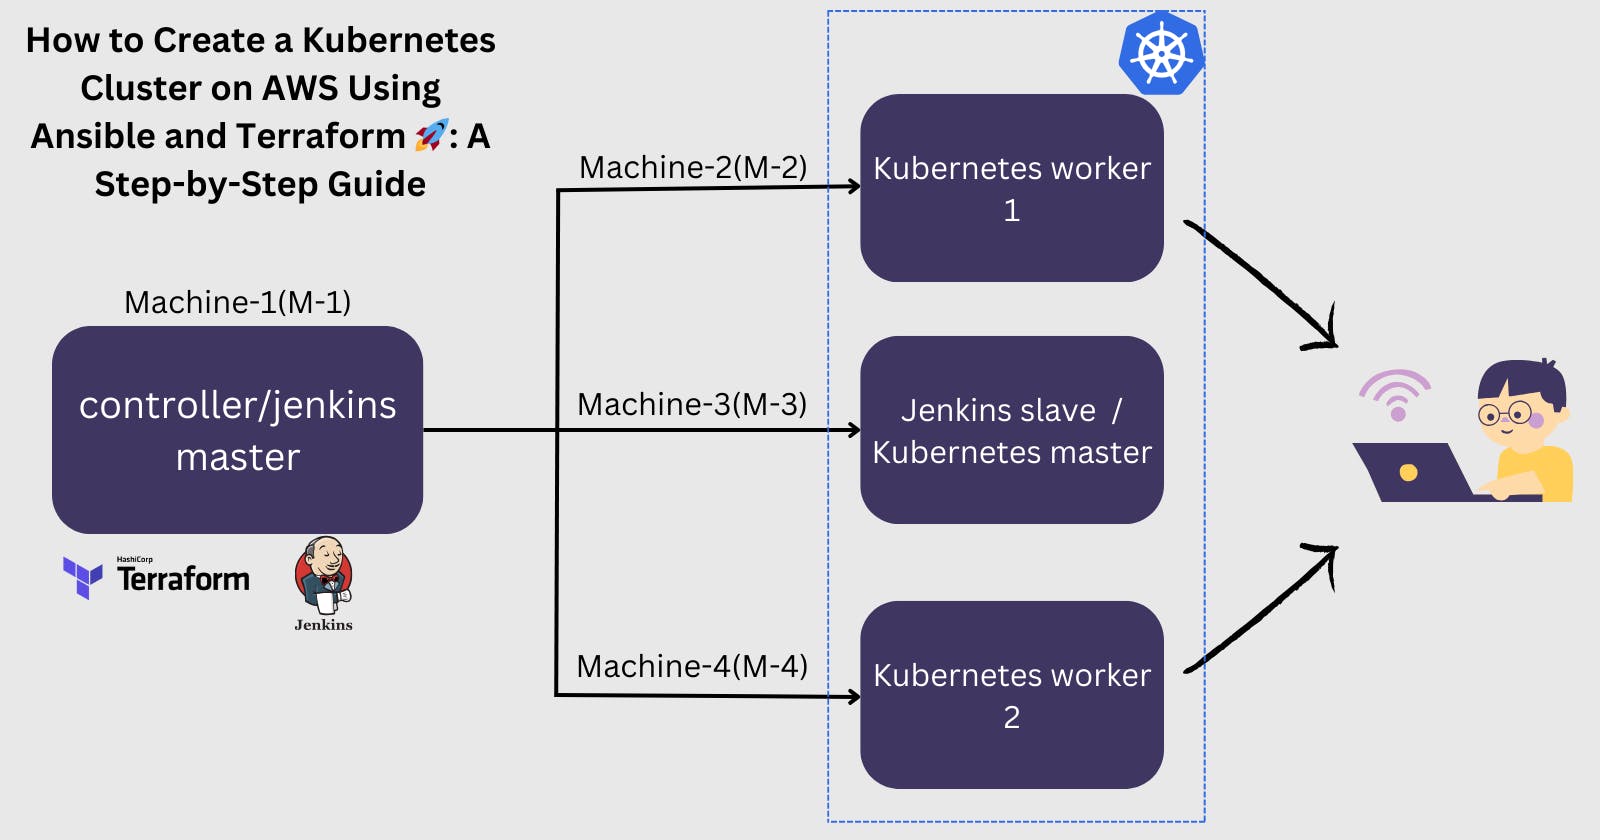
Setting up a Kubernetes (K8s) cluster can be a complex but rewarding task. In this guide, we'll walk you through the process of creating a K8s cluster on AWS using Ansible for configuration management and Terraform for infrastructure provisioning.
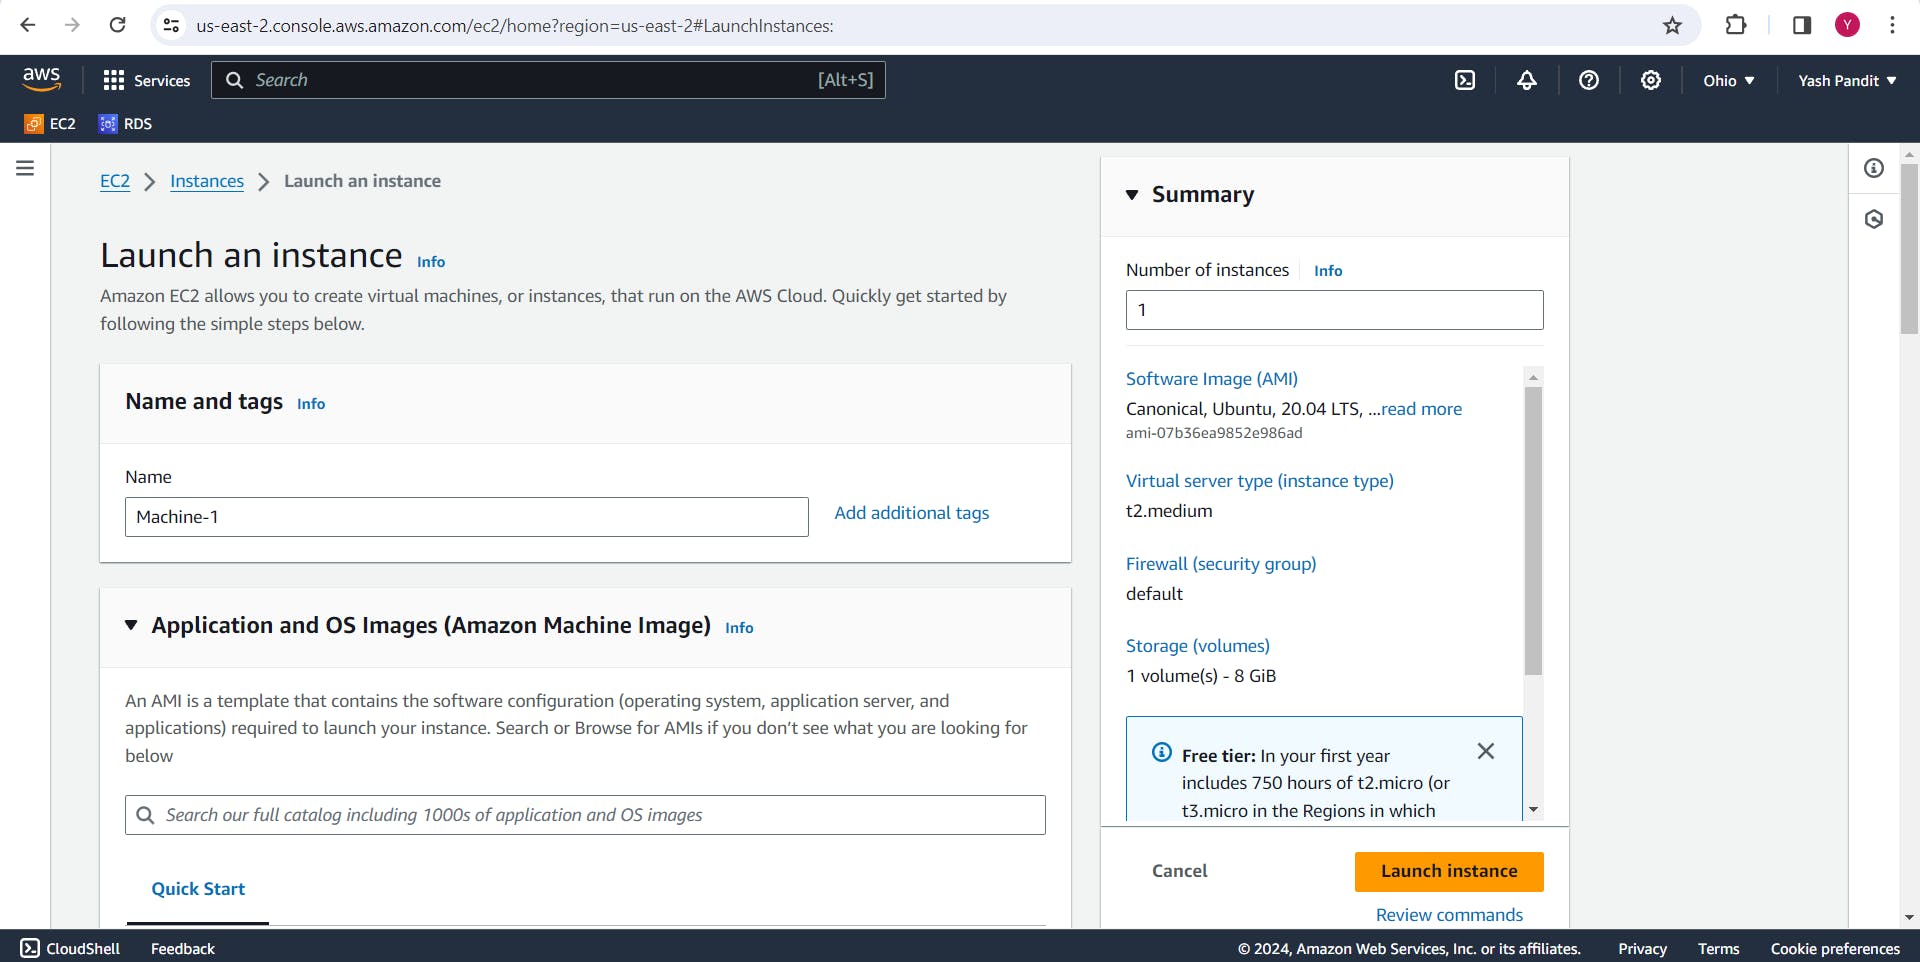
1. Launching EC2 Instances:
Click on "Launch instances".
Name - "Machine-1"
AMI - "Ubuntu"
Instance type - "t2.medium"
Key pair : Create > "devops-project.pem" (Download the .pem file.)
VPC - "Default"
Subnet - "No preference"
Auto-assign public IP - "Enable"
Firewall (security groups) - "Select existing security group"
security group - "default"
Click on "Launch instance"
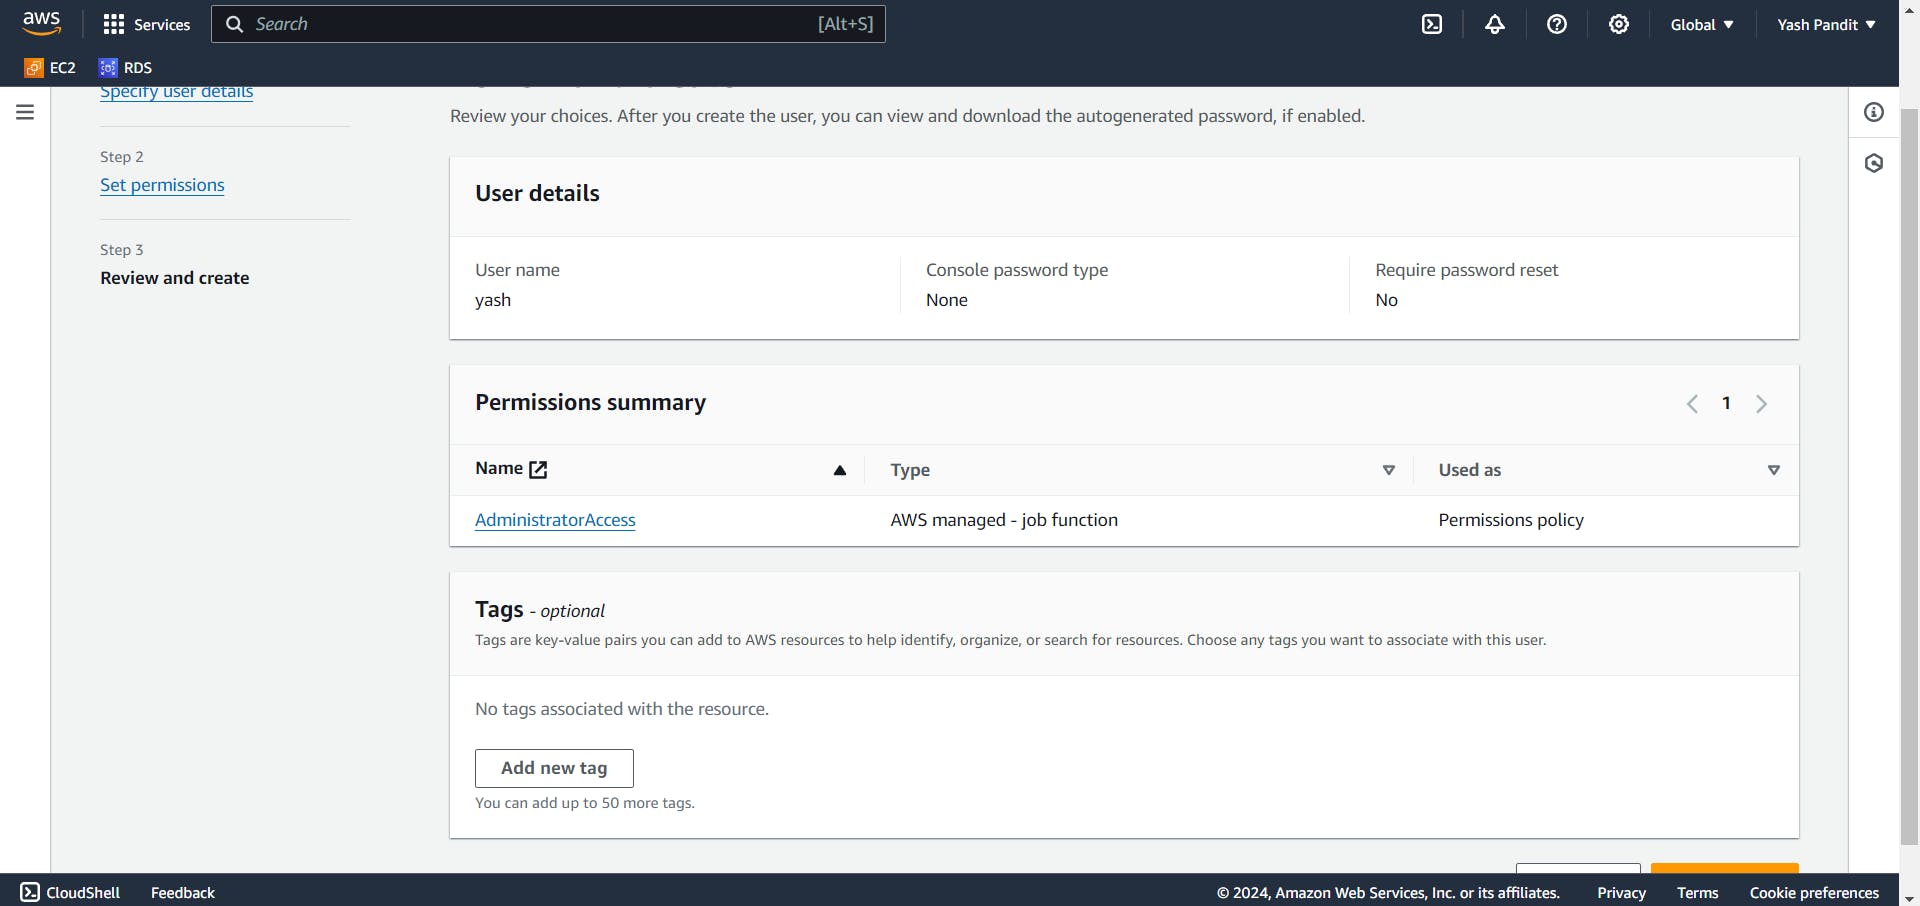
2. Setting up IAM:
Go to Users under Identity and Access Management (IAM)
Click on "Create user"
User name - "yash"
Click on "Next"
Click on "Attach policies directly"
Search "AdministratorAccess" and attch policy.
Click on "Create user"
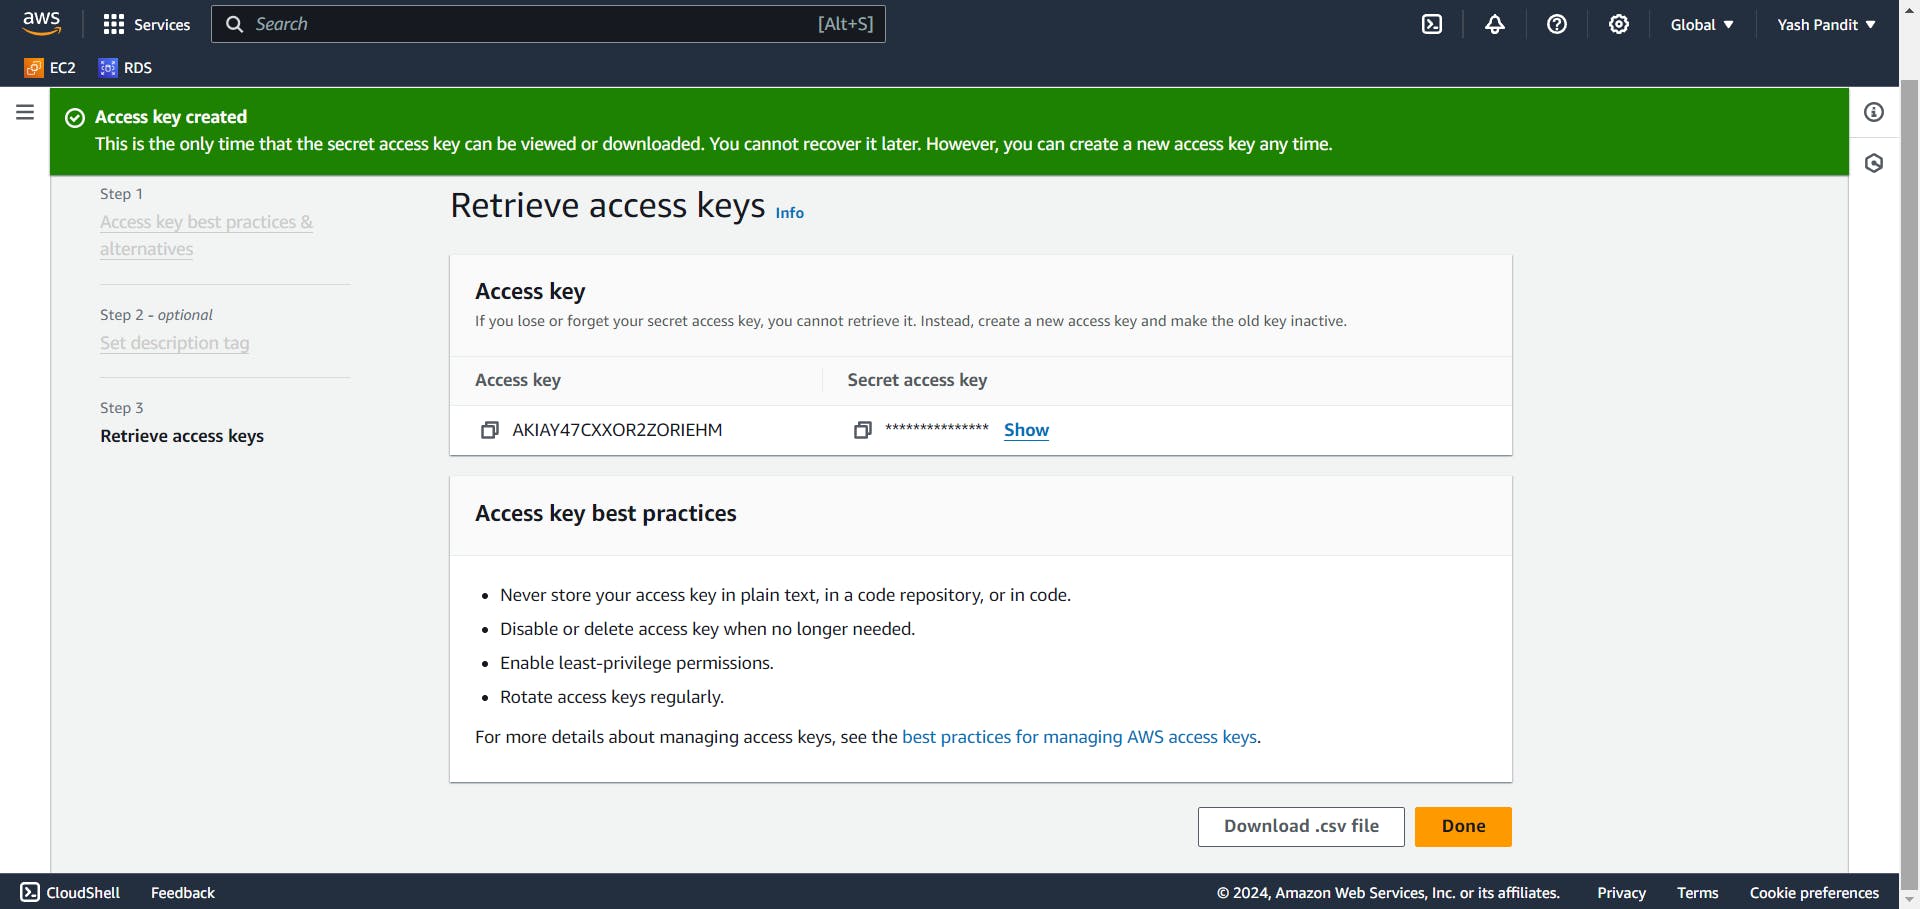
Generate an access key and secret access key for the user.
3. Installing Terraform:
Change Tag of ec2 "Machine-1" to "M-1"
SSH into Machine-1 (M-1) using the provided key pair.(change pem key and public ip address as per your instance)
ssh -i 'devops-project.pem' ubuntu@3.142.133.179Install Terraform on "M-1" using the command below or click here and follow the instructions provided.
  wget -O- https://apt.releases.hashicorp.com/gpg | sudo gpg --dearmor -o /usr/share/keyrings/hashicorp-archive-keyring.gpg
  echo "deb [signed-by=/usr/share/keyrings/hashicorp-archive-keyring.gpg] https://apt.releases.hashicorp.com $(lsb_release -cs) main" | sudo tee /etc/apt/sources.list.d/hashicorp.list
  sudo apt update && sudo apt install terraform
4. Creating Terraform Configuration:
Write a Terraform configuration file to create instances for K8s master (M-3) and worker nodes (M-2, M-4) :-
Create a new file named "main.tf"
sudo nano main.tfCopy and paste the configuration provided below into "main.tf"
  provider "aws" {
          region = "us-east-2"
          access_key = ""
          secret_key = ""
  }
  resource "aws_instance" "K8-M" {
          ami = "ami-07b36ea9852e986ad"
          instance_type = "t2.medium"
          key_name = "devops-project"
          tags = {
          Name = "M-3"
          }
  }
  resource "aws_instance" "K8-S1" {
          ami = "ami-07b36ea9852e986ad"
          instance_type = "t2.micro"
          key_name = "devops-project"
          tags = {
          Name = "M-2"
          }
  }
  resource "aws_instance" "K8-S2" {
          ami = "ami-07b36ea9852e986ad"
          instance_type = "t2.micro"
          key_name = "devops-project"
          tags = {
          Name = "M-4"
          }
  }
Save the file.
Run
terraform initto initialize the working directory and download any required providers.After initialization, run
terraform plan. This command will show you what Terraform plans to do without actually doing it.Run
terraform applyand confirm by typingyeswhen prompted.Terraform will now execute the plan and create the infrastructure defined in your
main.tffile.
5. Configuring Ansible:
Install Ansible on M-1 using the command below or click here and follow the instructions provided.
  sudo apt update
  sudo apt install software-properties-common
  sudo add-apt-repository --yes --update ppa:ansible/ansible
  sudo apt install ansible
Generate an SSH key pair on M-1 if you haven't already using the
ssh-keygencommand.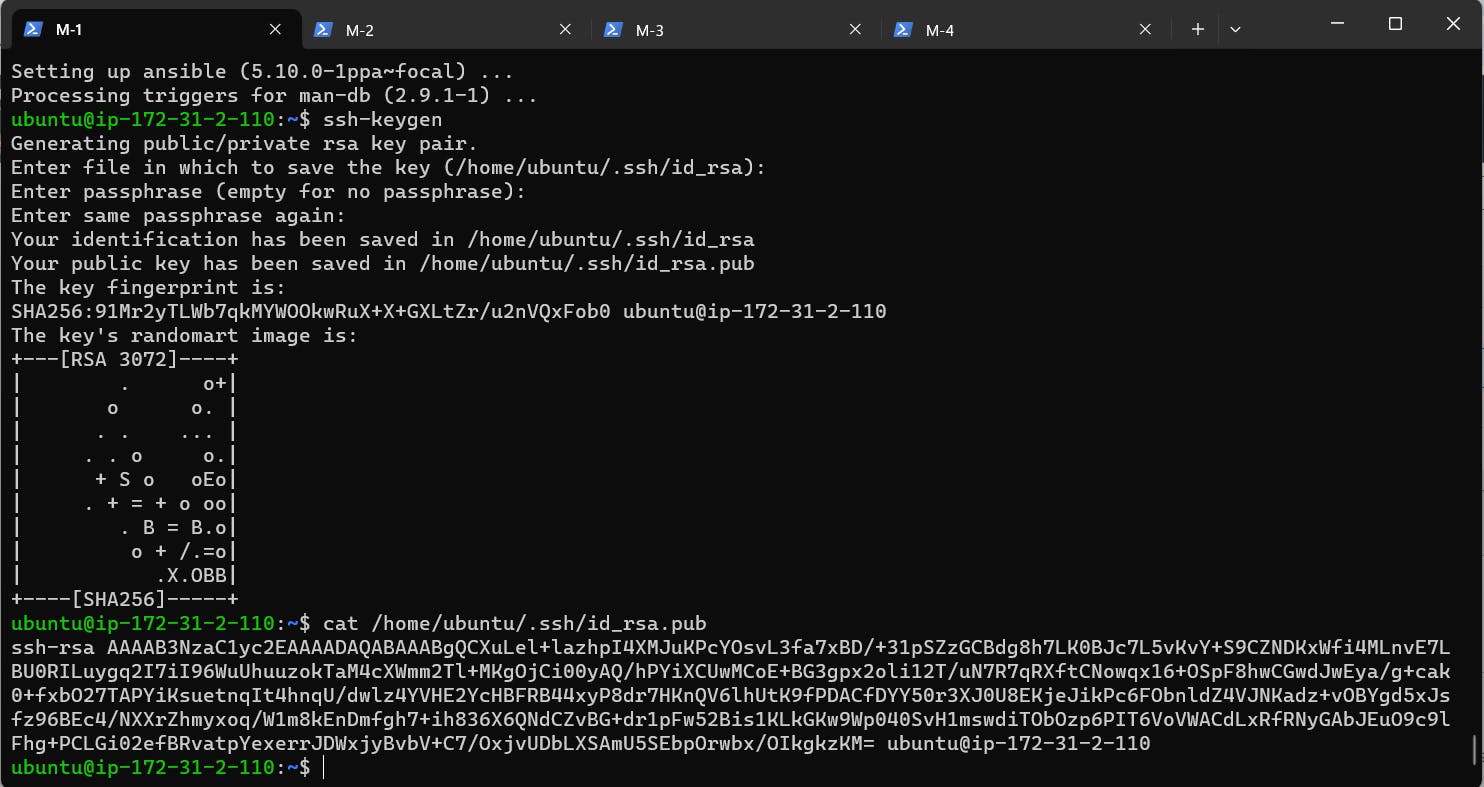
Copy the public key (
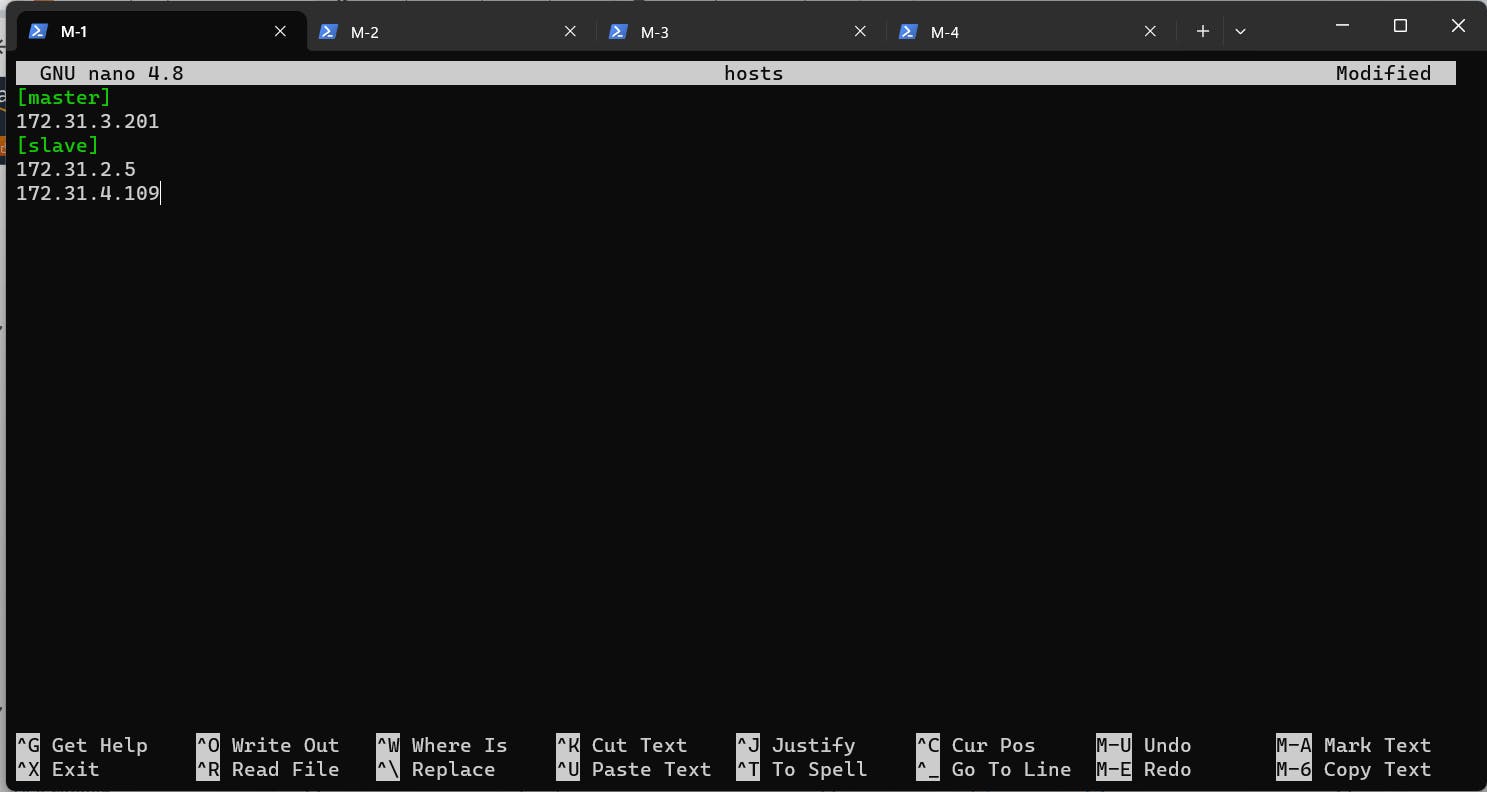
~/.ssh/id_rsa.pub) and paste in~/.ssh/authorized_keysfile on M-2, M-3, and M-4.Update the Ansible hosts file (/etc/ansible/hosts) with the private IP addresses of M-2, M-3, and M-4.
Before running any playbooks, ensure that Ansible can connect to your hosts using
ansible all -m ping.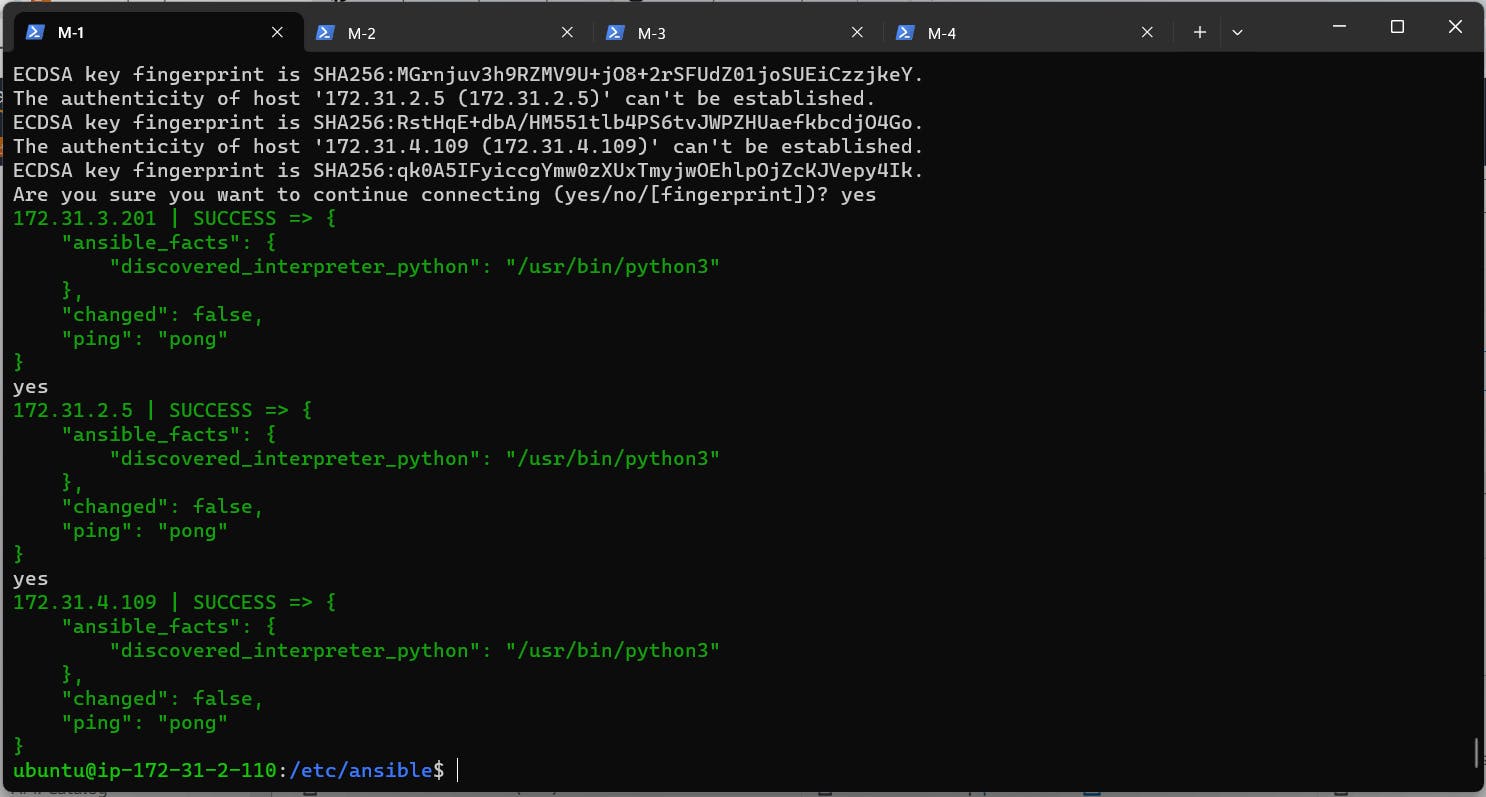
6. Ansible Playbooks:
To create Ansible playbooks for M-1, M-2, M-3, and M-4 for install necessary software such as Java, Docker, Kubernetes components, and Jenkins :-
Create a new file named "w1.sh" for the respective task of M1.
  sudo apt update
  sudo apt install openjdk-11-jdk -y
  sudo wget -O /usr/share/keyrings/jenkins-keyring.asc \
    https://pkg.jenkins.io/debian/jenkins.io-2023.key
  echo deb [signed-by=/usr/share/keyrings/jenkins-keyring.asc] \
    https://pkg.jenkins.io/debian binary/ | sudo tee \
    /etc/apt/sources.list.d/jenkins.list > /dev/null
  sudo apt-get update
  sudo apt-get install jenkins -y
Create a new file named "w3.sh" for the respective task of M3.
  sudo apt-get update
  sudo apt install openjdk-11-jdk -y
  sudo apt-get install docker.io -y
  sudo apt update
  sudo apt upgrade -y
  sudo apt install -y curl apt-transport-https ca-certificates software-properties-common
  curl -s https://packages.cloud.google.com/apt/doc/apt-key.gpg | sudo apt-key add -
  sudo add-apt-repository "deb http://apt.kubernetes.io/ kubernetes-xenial main"
  sudo swapoff -a
  sudo apt update
  sudo apt install -y kubelet kubeadm kubectl
Create a new file named "w24.sh" for the respective task of M2 and M4.
  sudo apt-get update
  sudo apt-get install docker.io -y
  sudo apt update
  sudo apt upgrade -y
  sudo apt install -y curl apt-transport-https ca-certificates software-properties-common
  curl -s https://packages.cloud.google.com/apt/doc/apt-key.gpg | sudo apt-key add -
  sudo add-apt-repository "deb http://apt.kubernetes.io/ kubernetes-xenial main"
  sudo swapoff -a
  sudo apt update
  sudo apt install -y kubelet kubeadm kubectl
Write a playbook (play.yaml) to execute the individual scripts on respective nodes:-
Create a new file named "play.yaml"
  ---
  - name: installing jenkins and java
    hosts: localhost
    become: true
    tasks:
    - name: executing script w1.sh
      script: w1.sh
  - name: installing java, docker and k8s
    hosts: master
    become: true
    tasks:
    - name: executing w3.sh
      script: w3.sh
  - name: installing k8s and docker in k8s slaves
    hosts: slave
    become: true
    tasks:
    - name: executing script w24.sh
      script: w24.sh
7. Executing Ansible Playbooks:
Before executing a playbook, it's a good practice to perform a syntax check to catch any syntax errors. To check the syntax, use the command below:
ansible-playbook playbook.yml --syntax-checkThe
--checkoption allows you to perform a dry-run of your playbook, which simulates playbook execution without making any changes to the target hosts. To dry-run , use the command below:ansible-playbook playbook.yml --checkRun the play.yaml playbook to automate the setup process on all instances.
ansible-playbook playbook.yml
8. Kubernetes Configuration:
On M-3, apply the configuration for the network plugin (e.g., Weave Net) using kubectl.
  sudo kubeadm init
  mkdir -p $HOME/.kube
  kubectl apply -f https://github.com/weaveworks/weave/releases/download/v2.8.1/weave-daemonset-k8s.yaml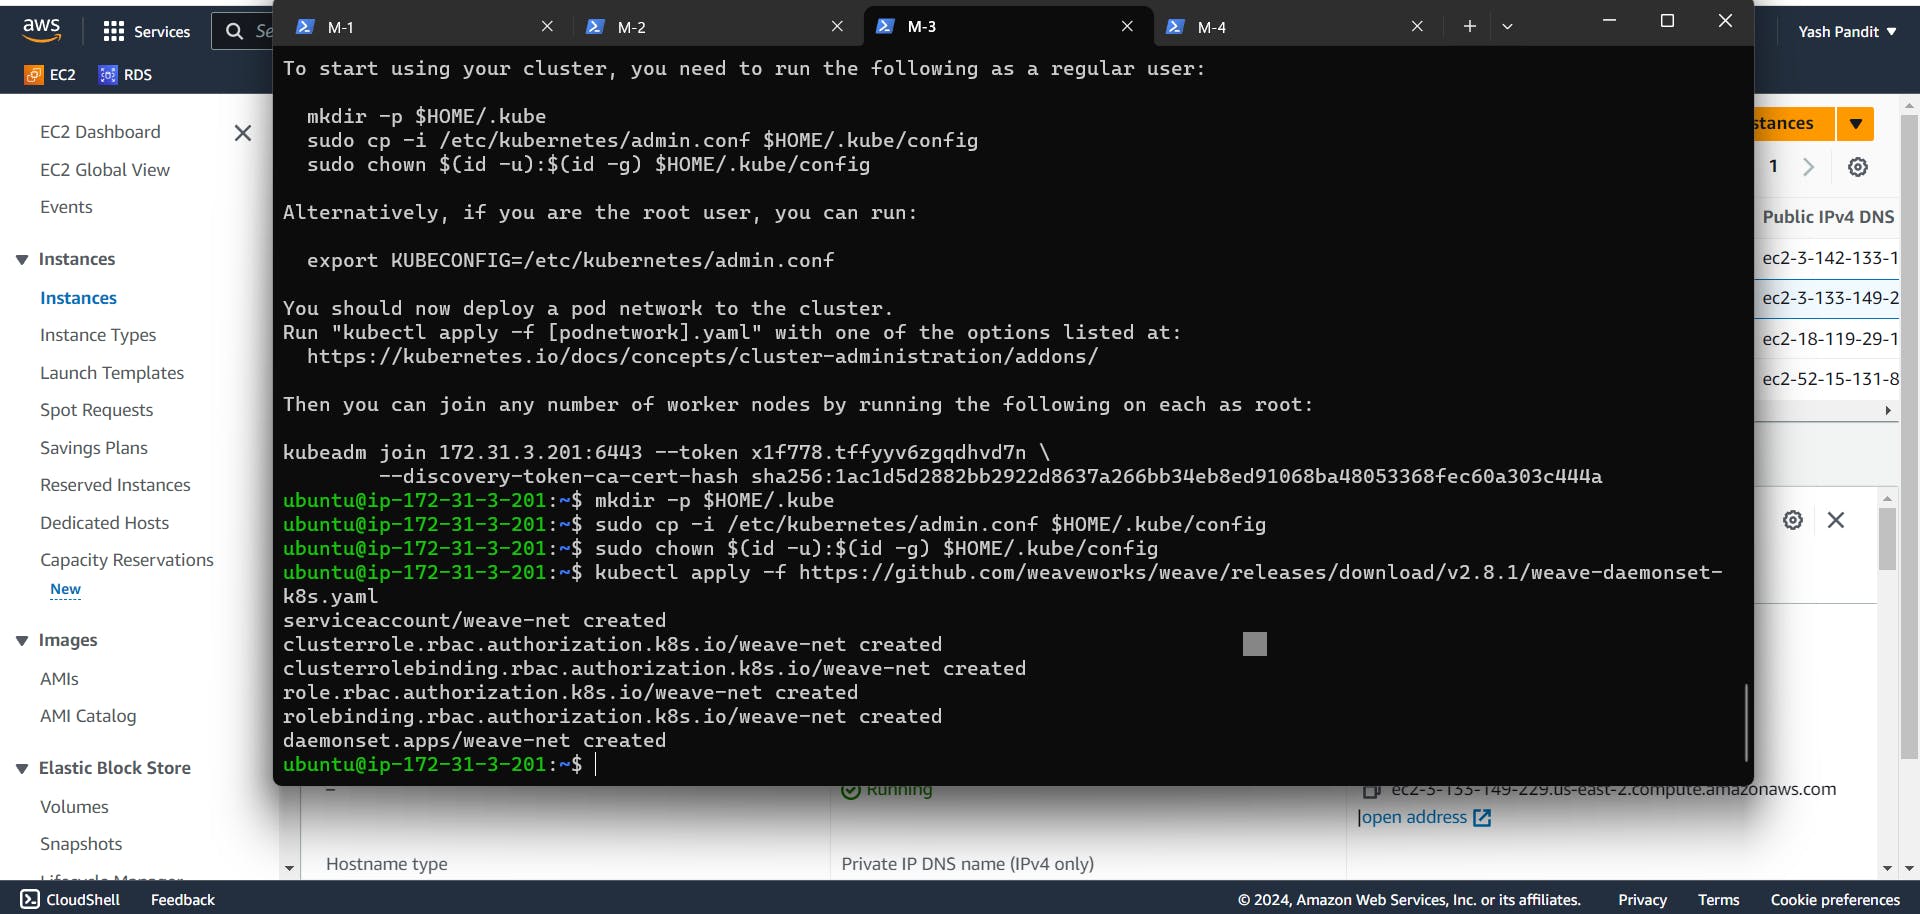
On M-2 and M-4, join the Kubernetes cluster using the 'kubeadm join' command. (After running 'kubeadm init', you will receive the 'kubeadm' command.)
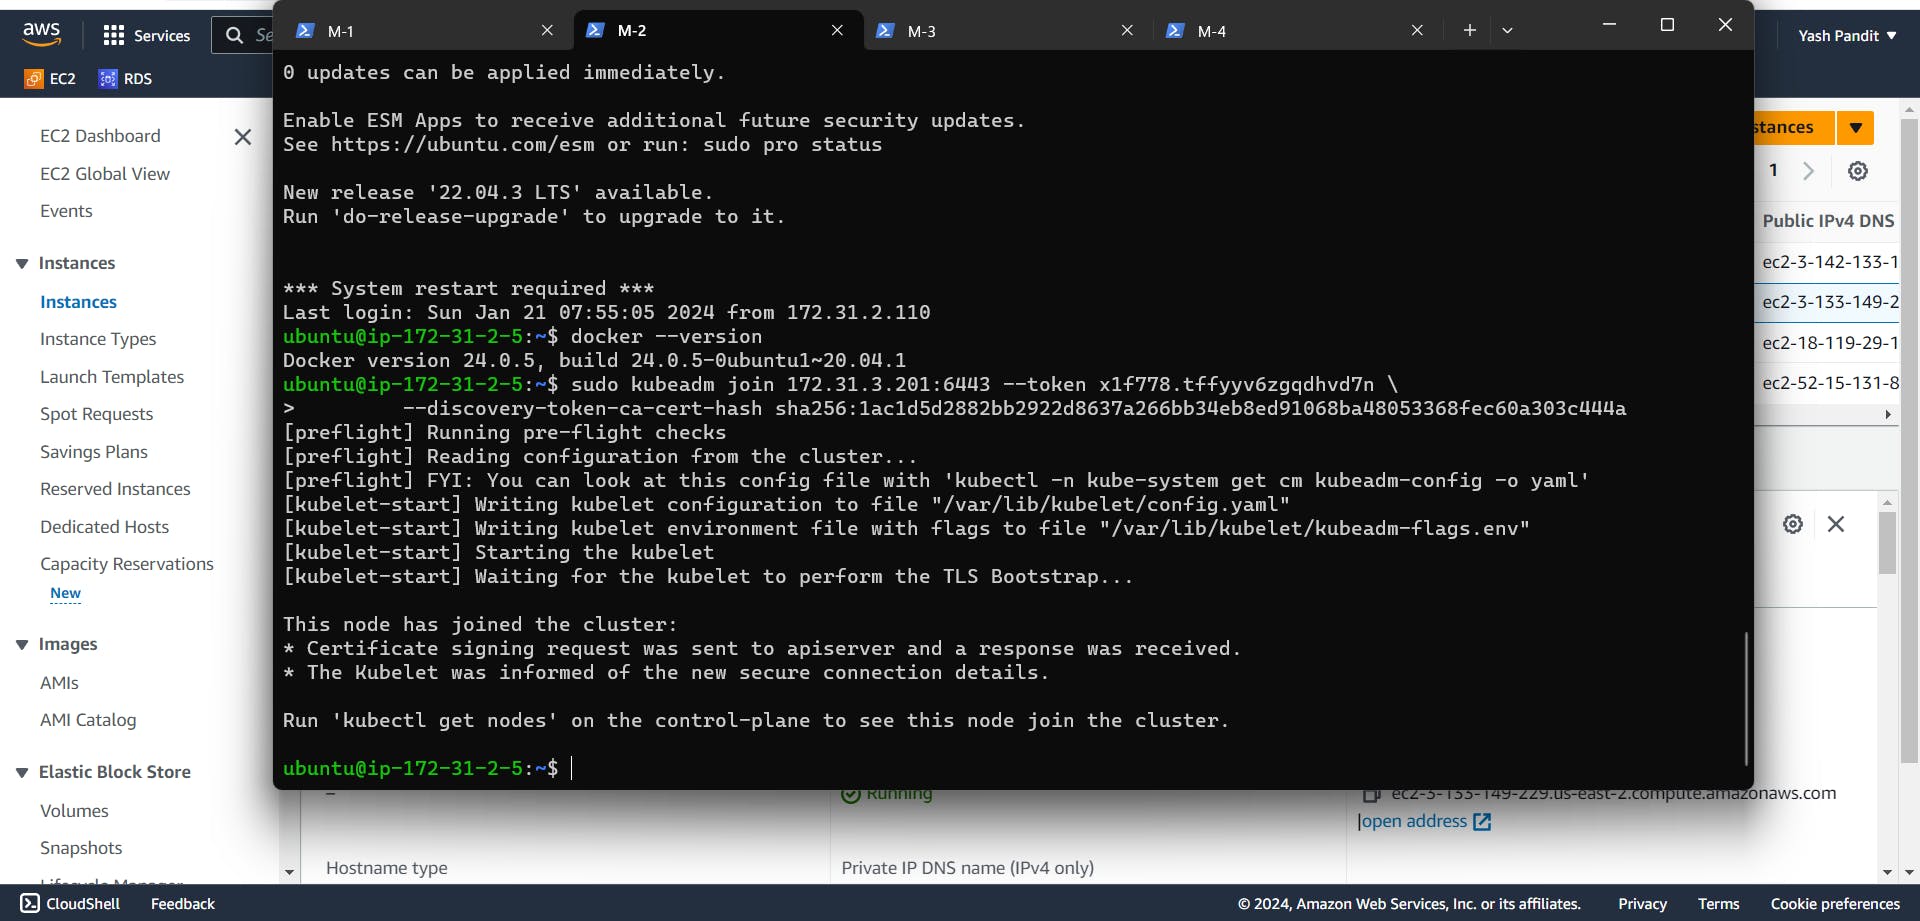
Check node is ready or not using
kubectl get nodes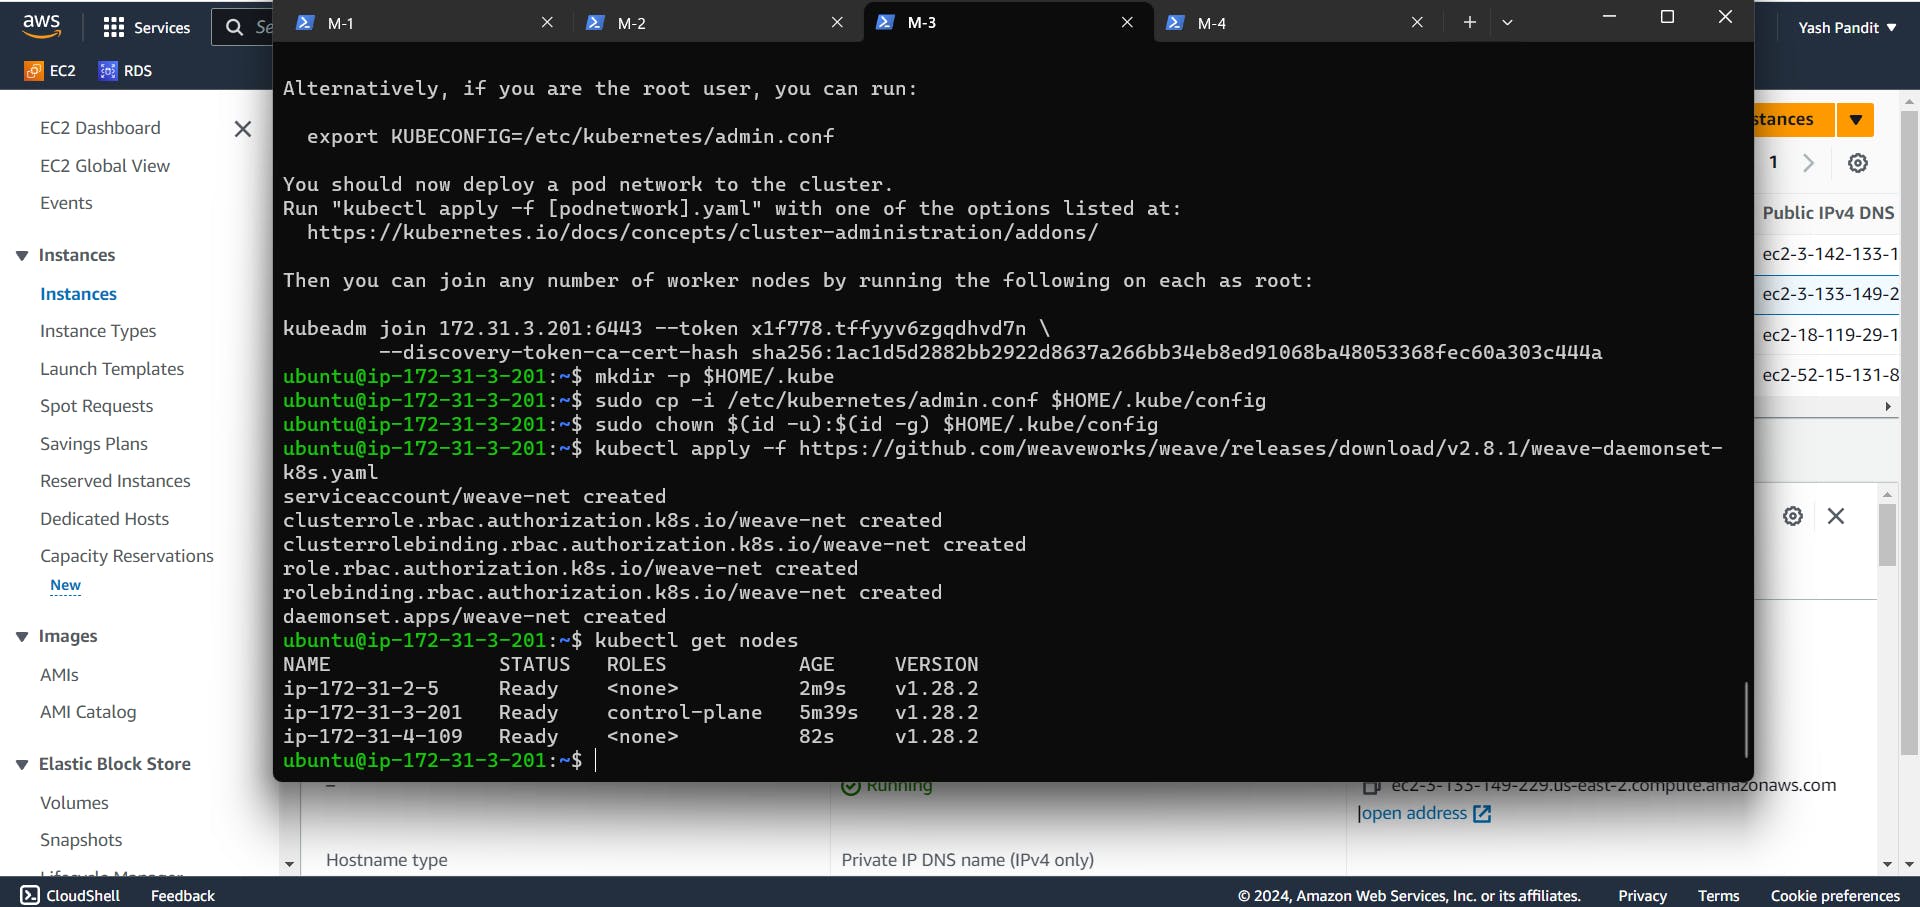
9. Jenkins Setup:
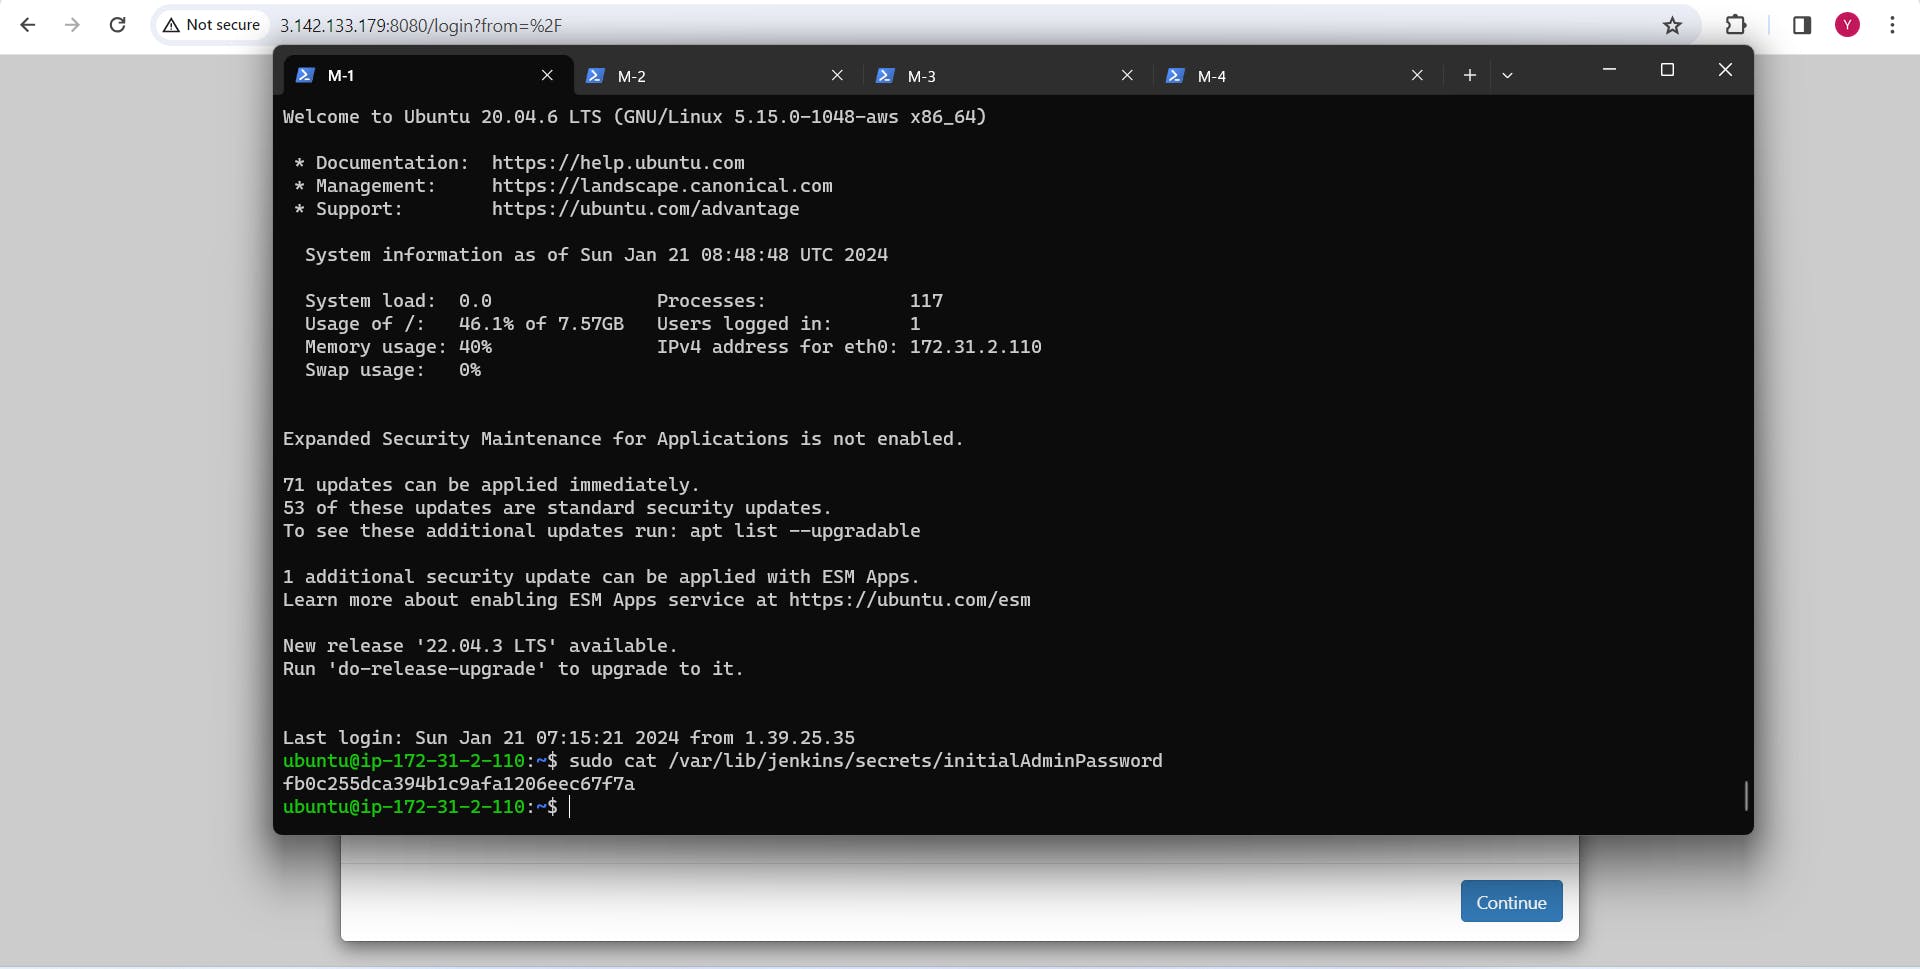
Access Jenkins using http://<public-ip-of-M1>:8080 so im using http://3.142.133.179:8080
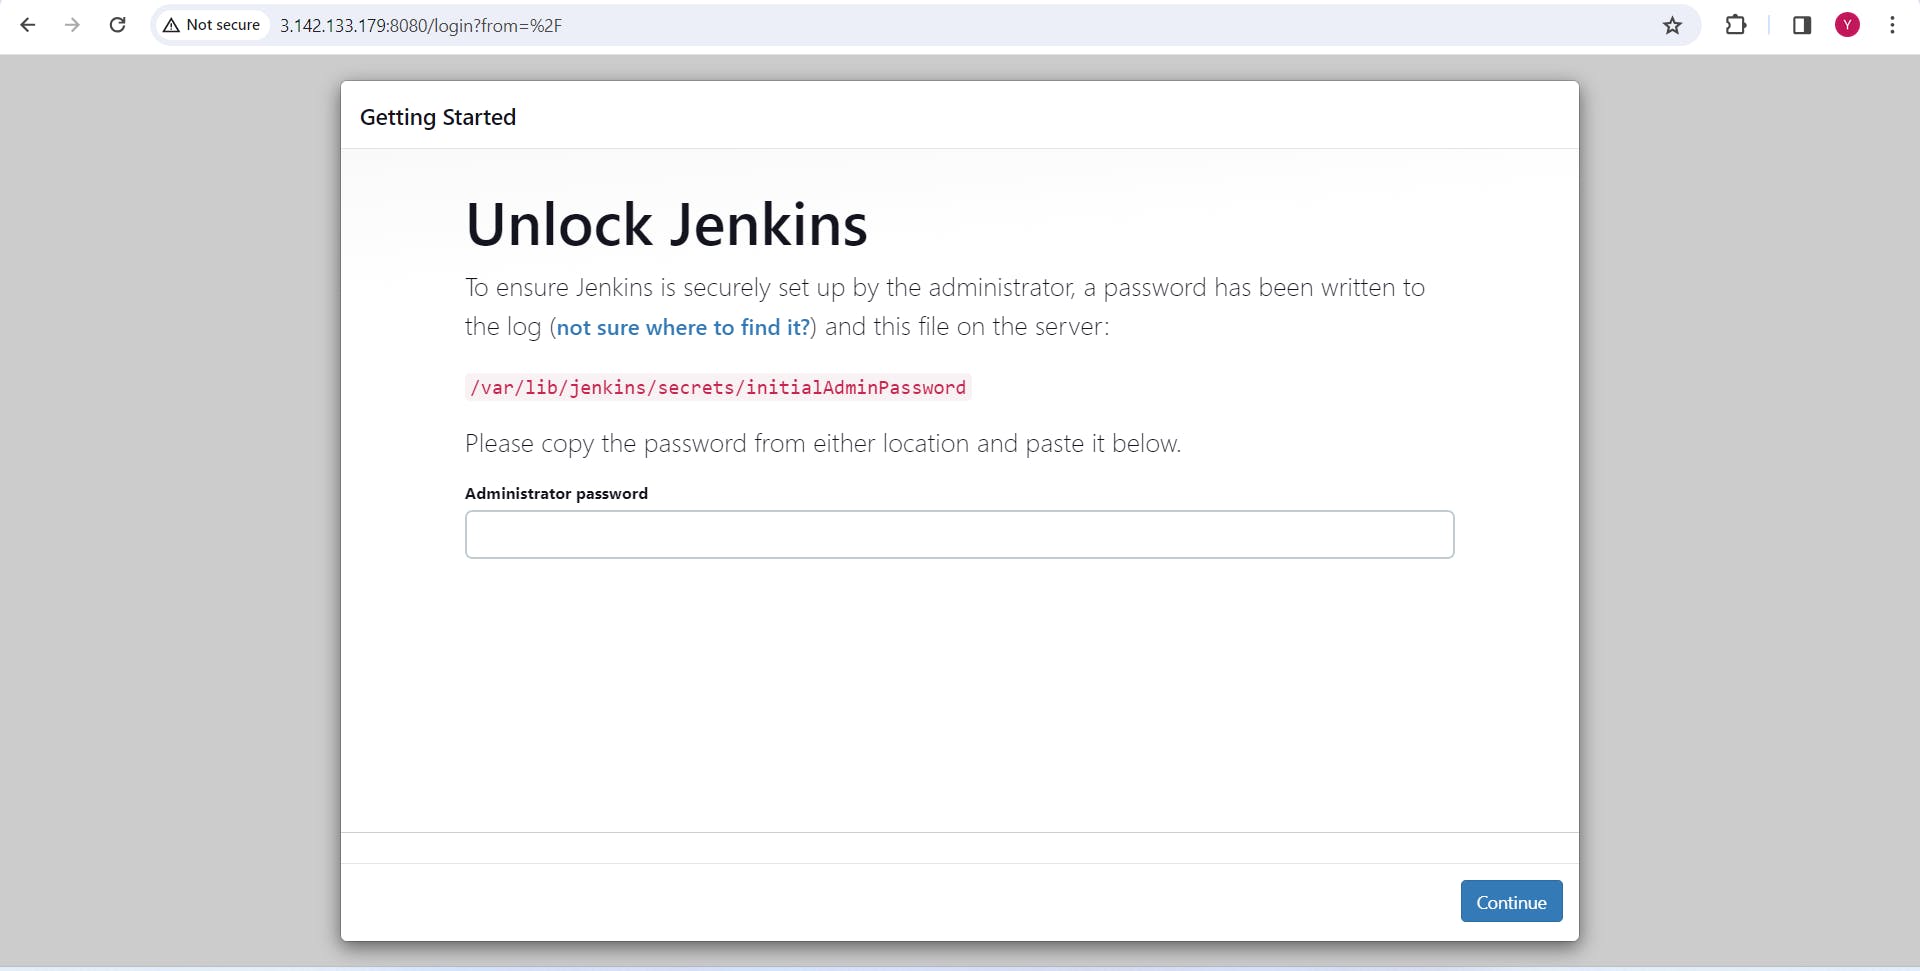
Retrieve the administrator password from the specified path and use it to unlock Jenkins.
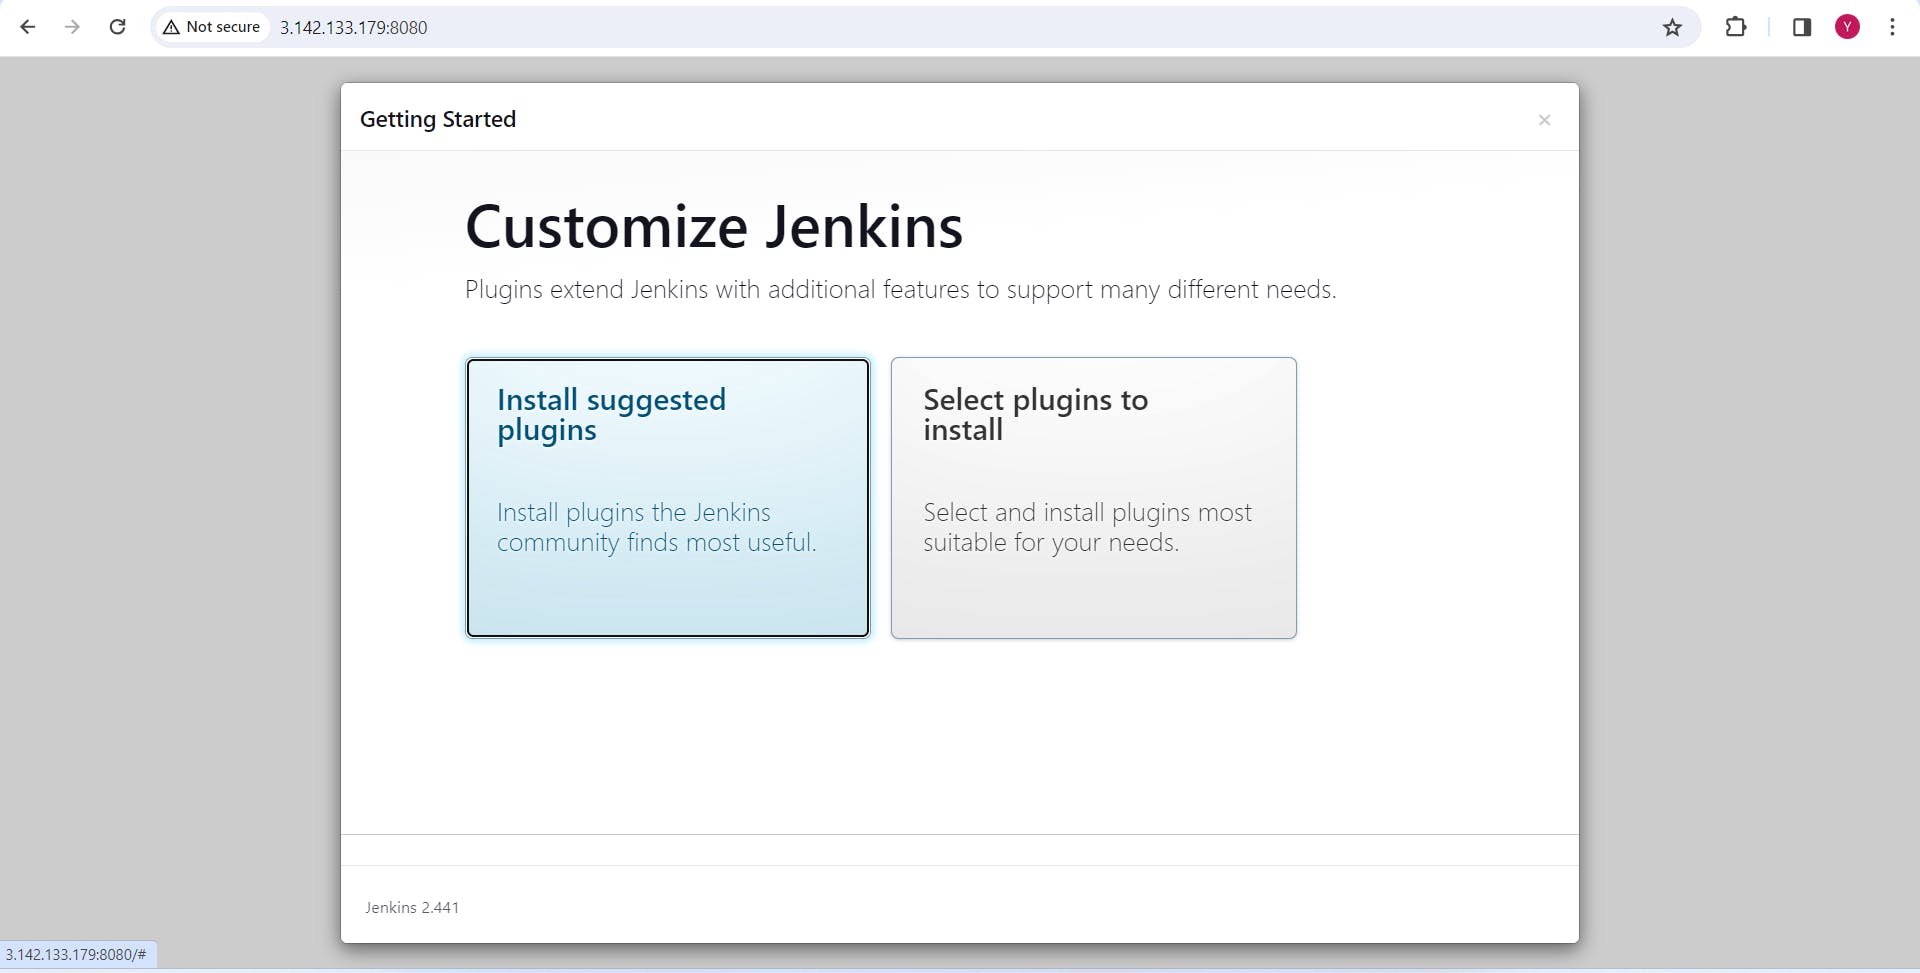
Click on "Install suggested plugins"
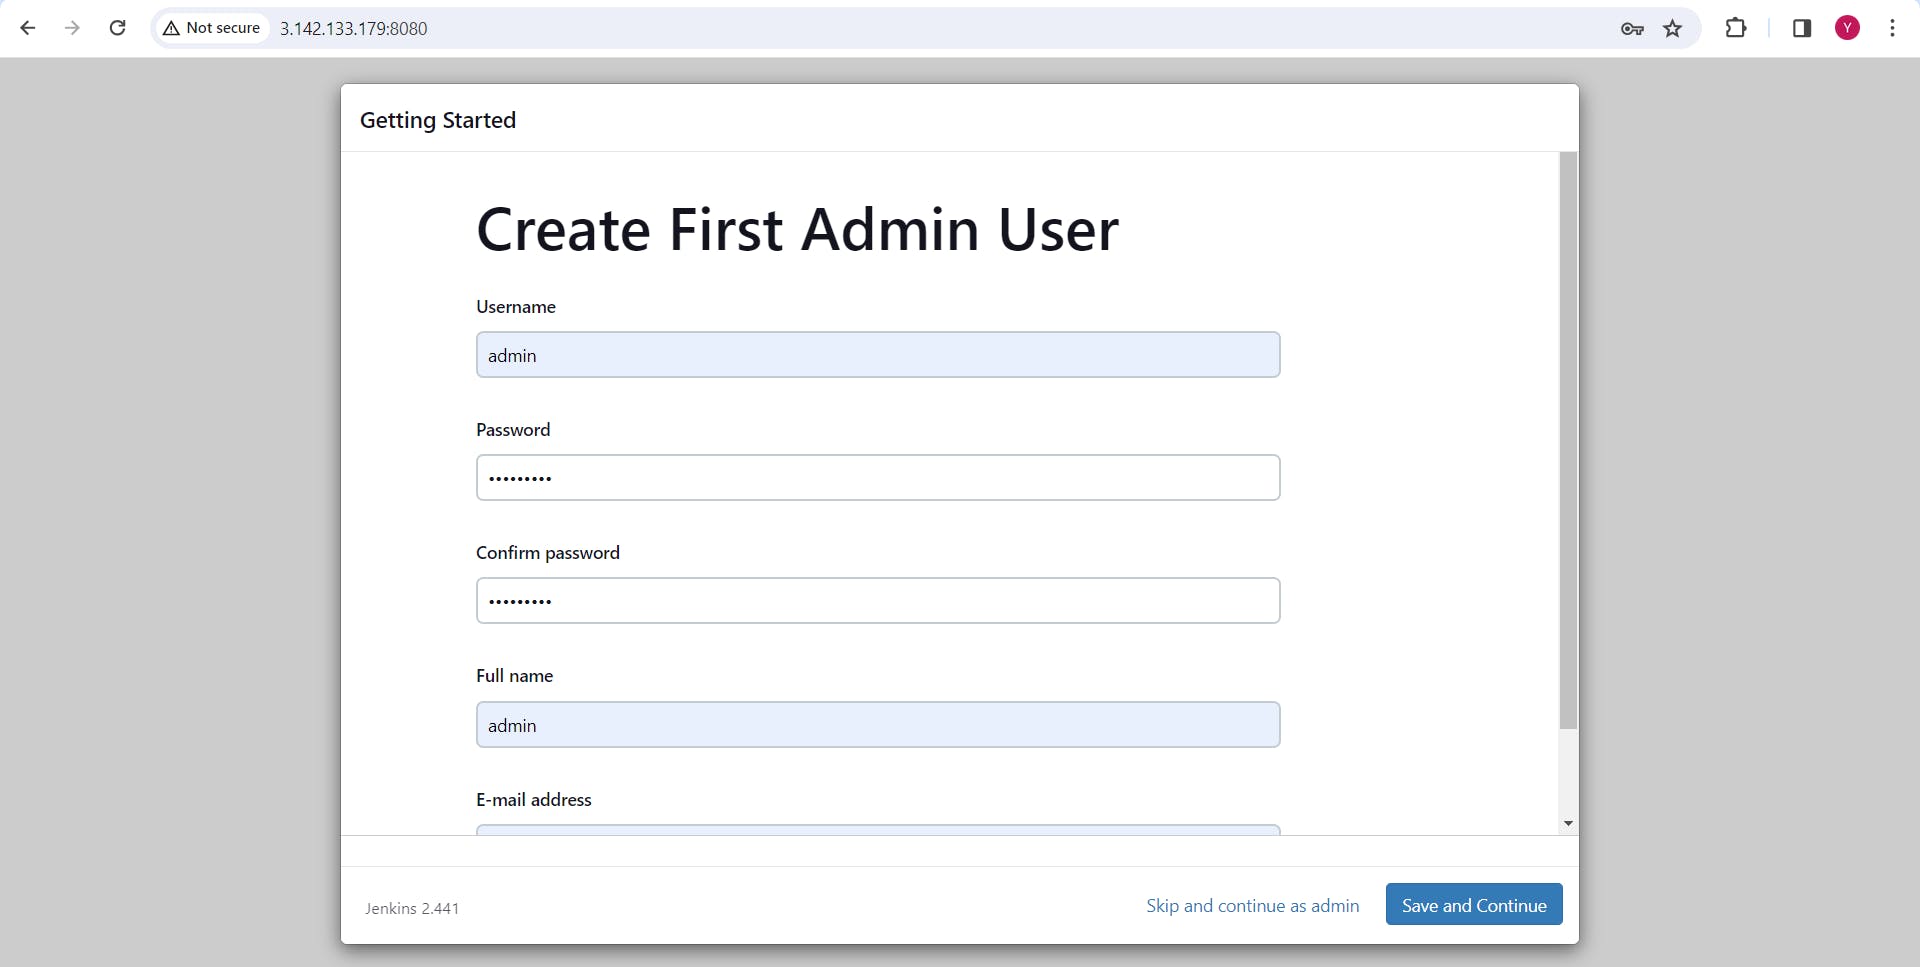
create the first admin user.
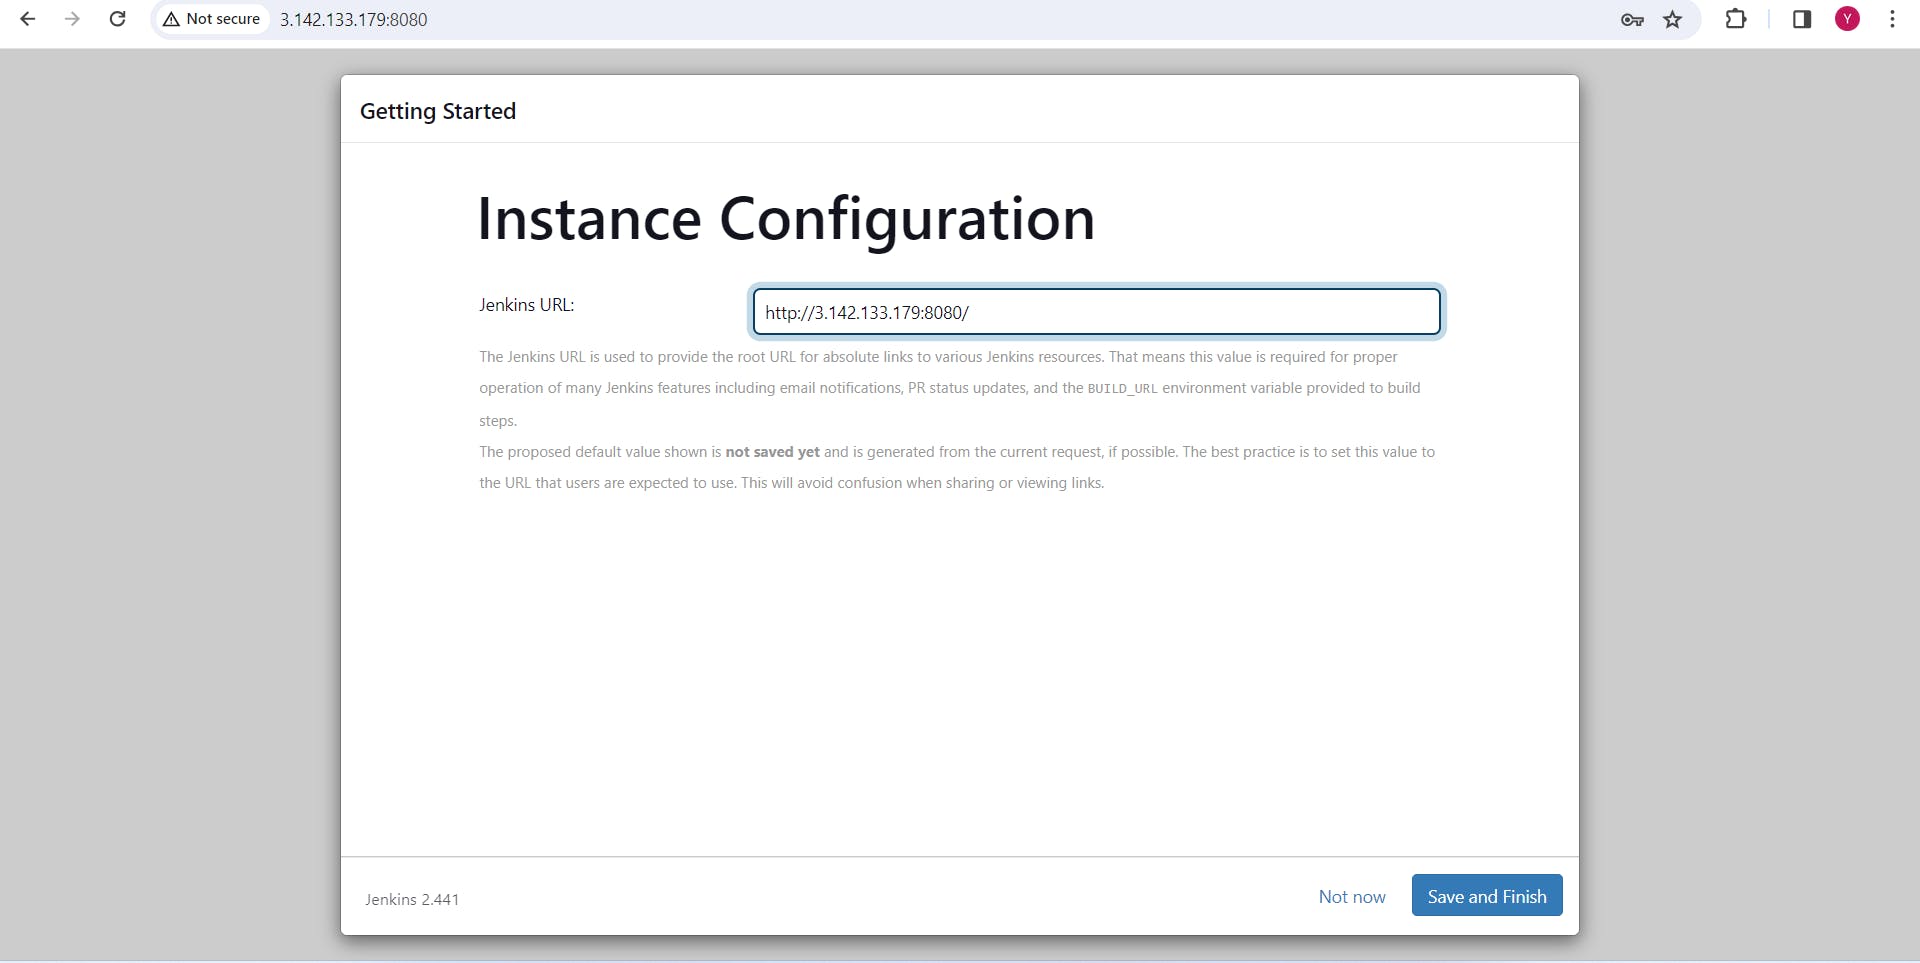
Configure Jenkins URL as http://<public-ip>:8080/ and start using Jenkins.
10. Jenkins Configuration:
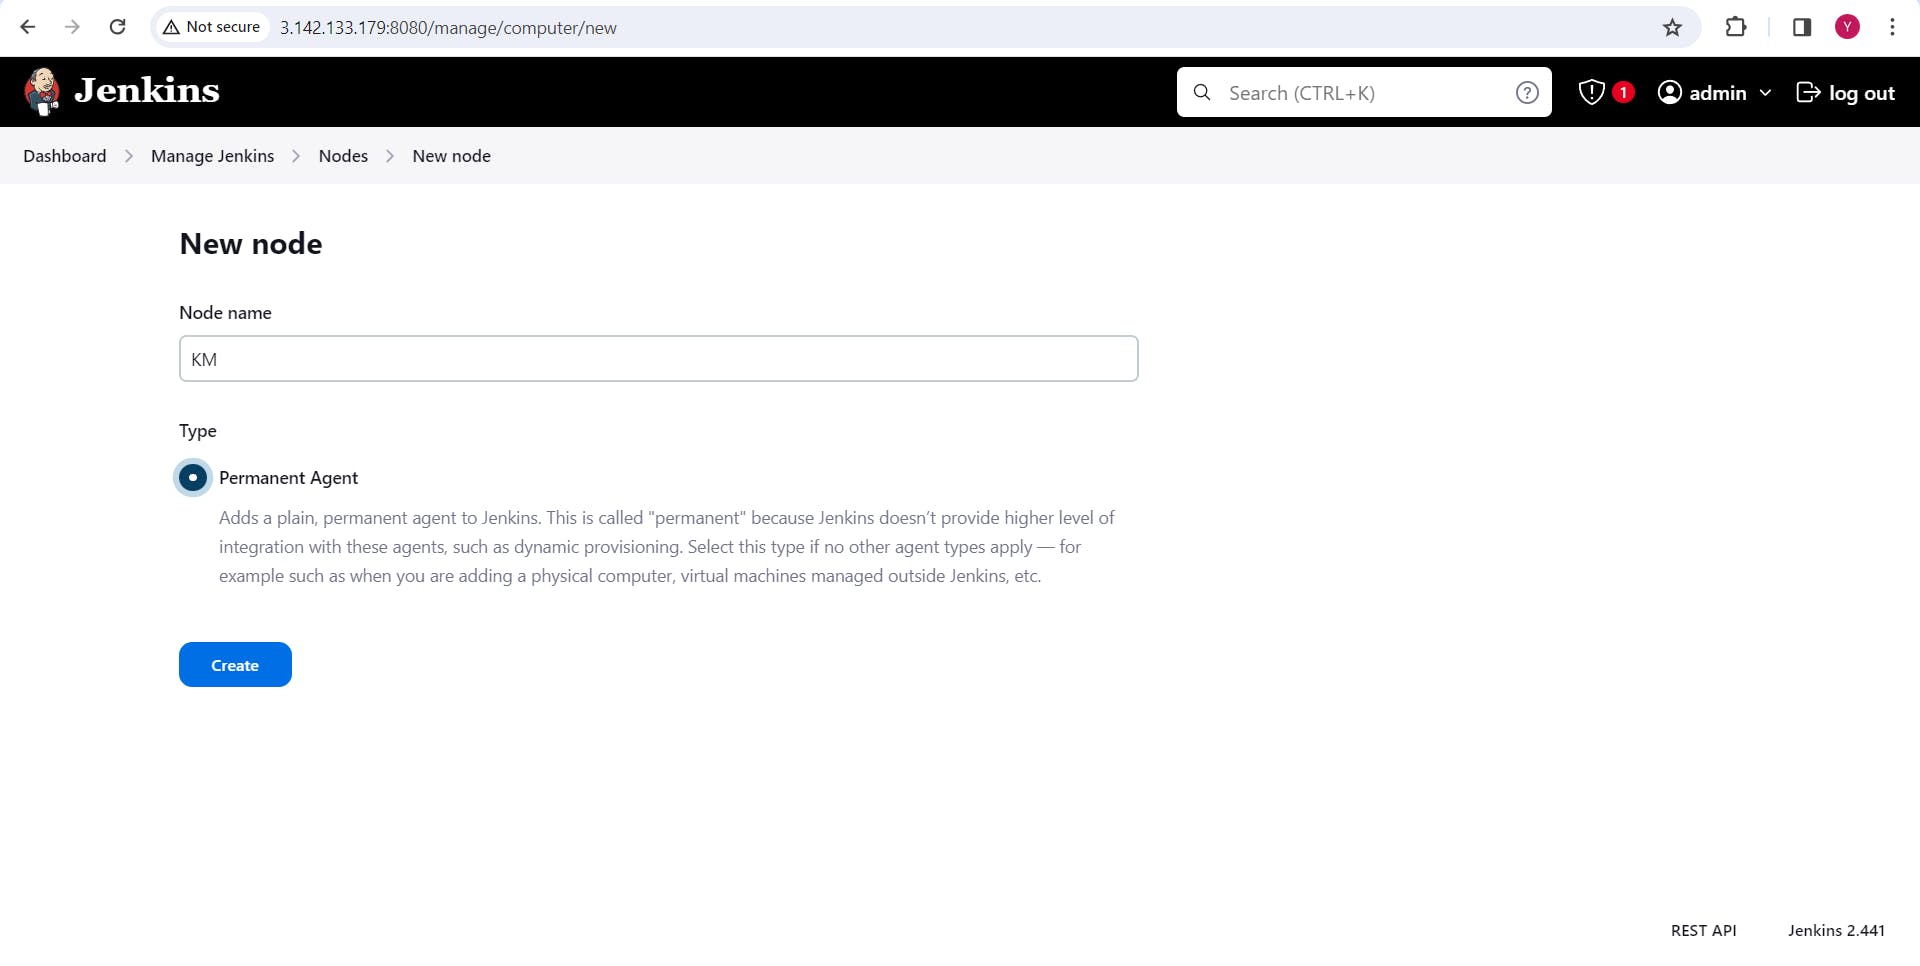
Go to "Manage Jenkins" > "Manage Nodes" > "New Node" to add a new node.
Add a new node named 'KM' for the K8s master (M-3) in Jenkins using the SSH launch method.
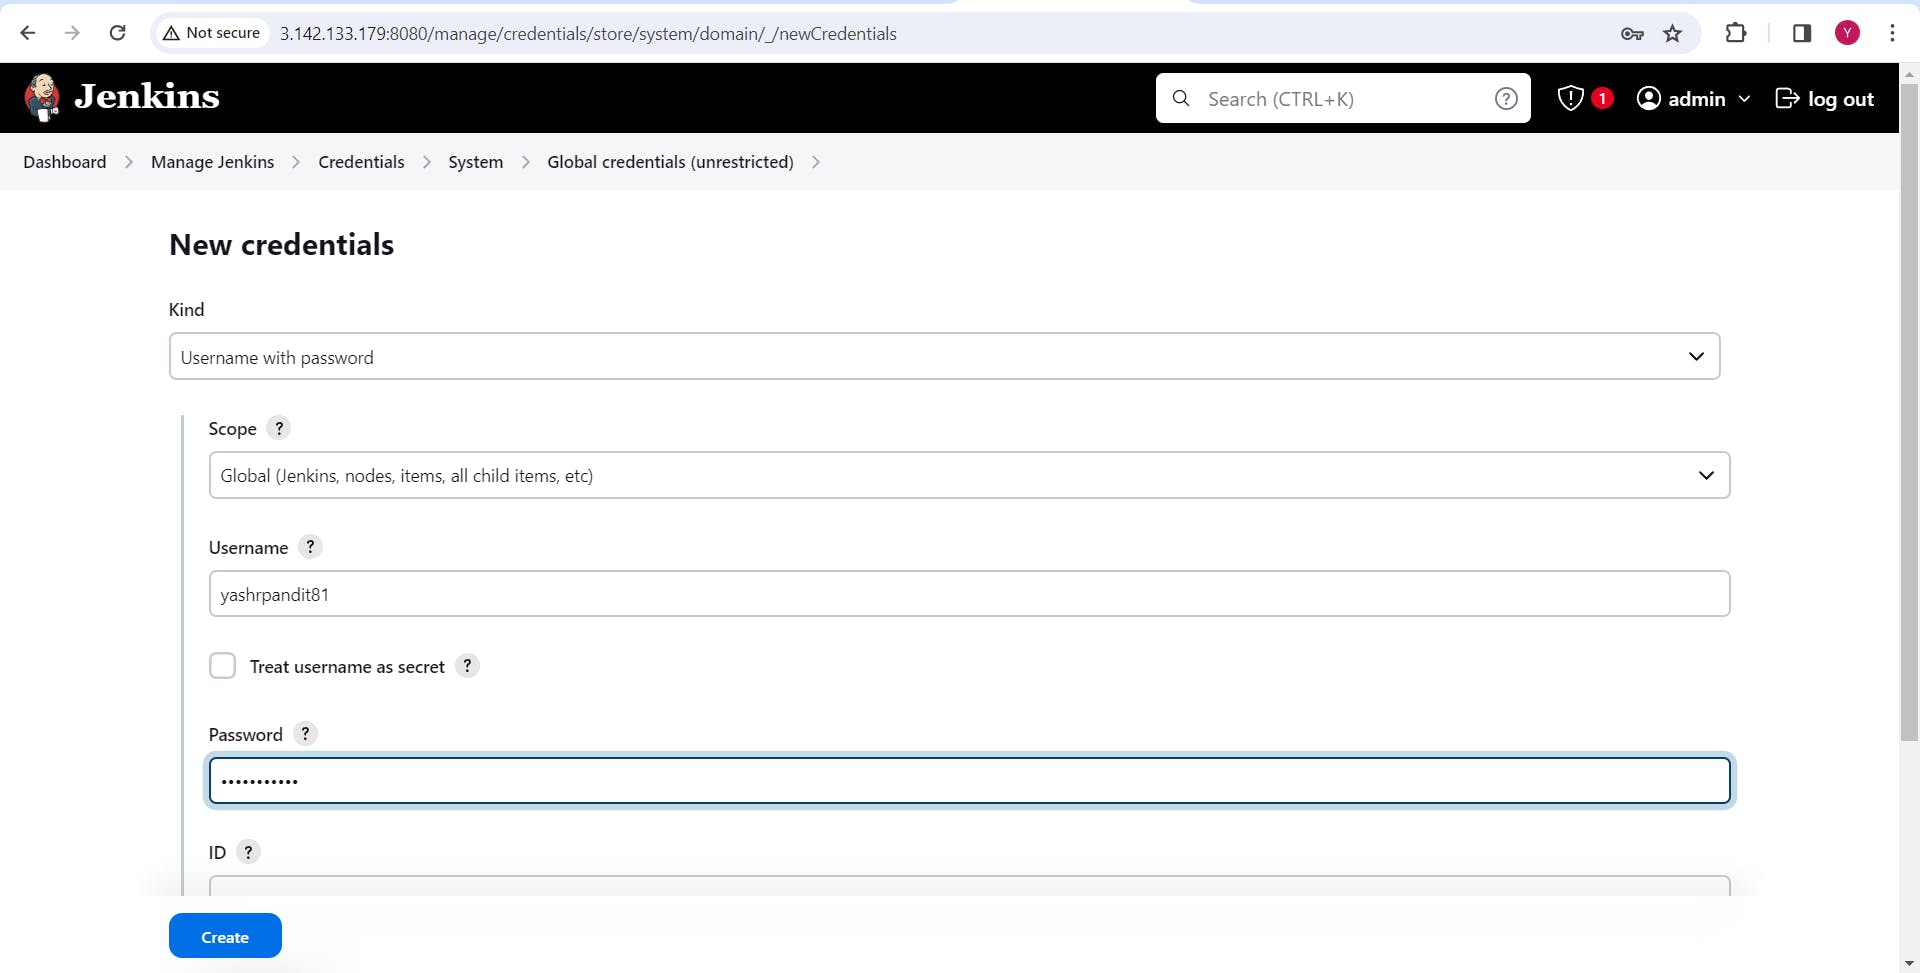
Create credentials for Docker Hub authentication.
11. Project Deployment:
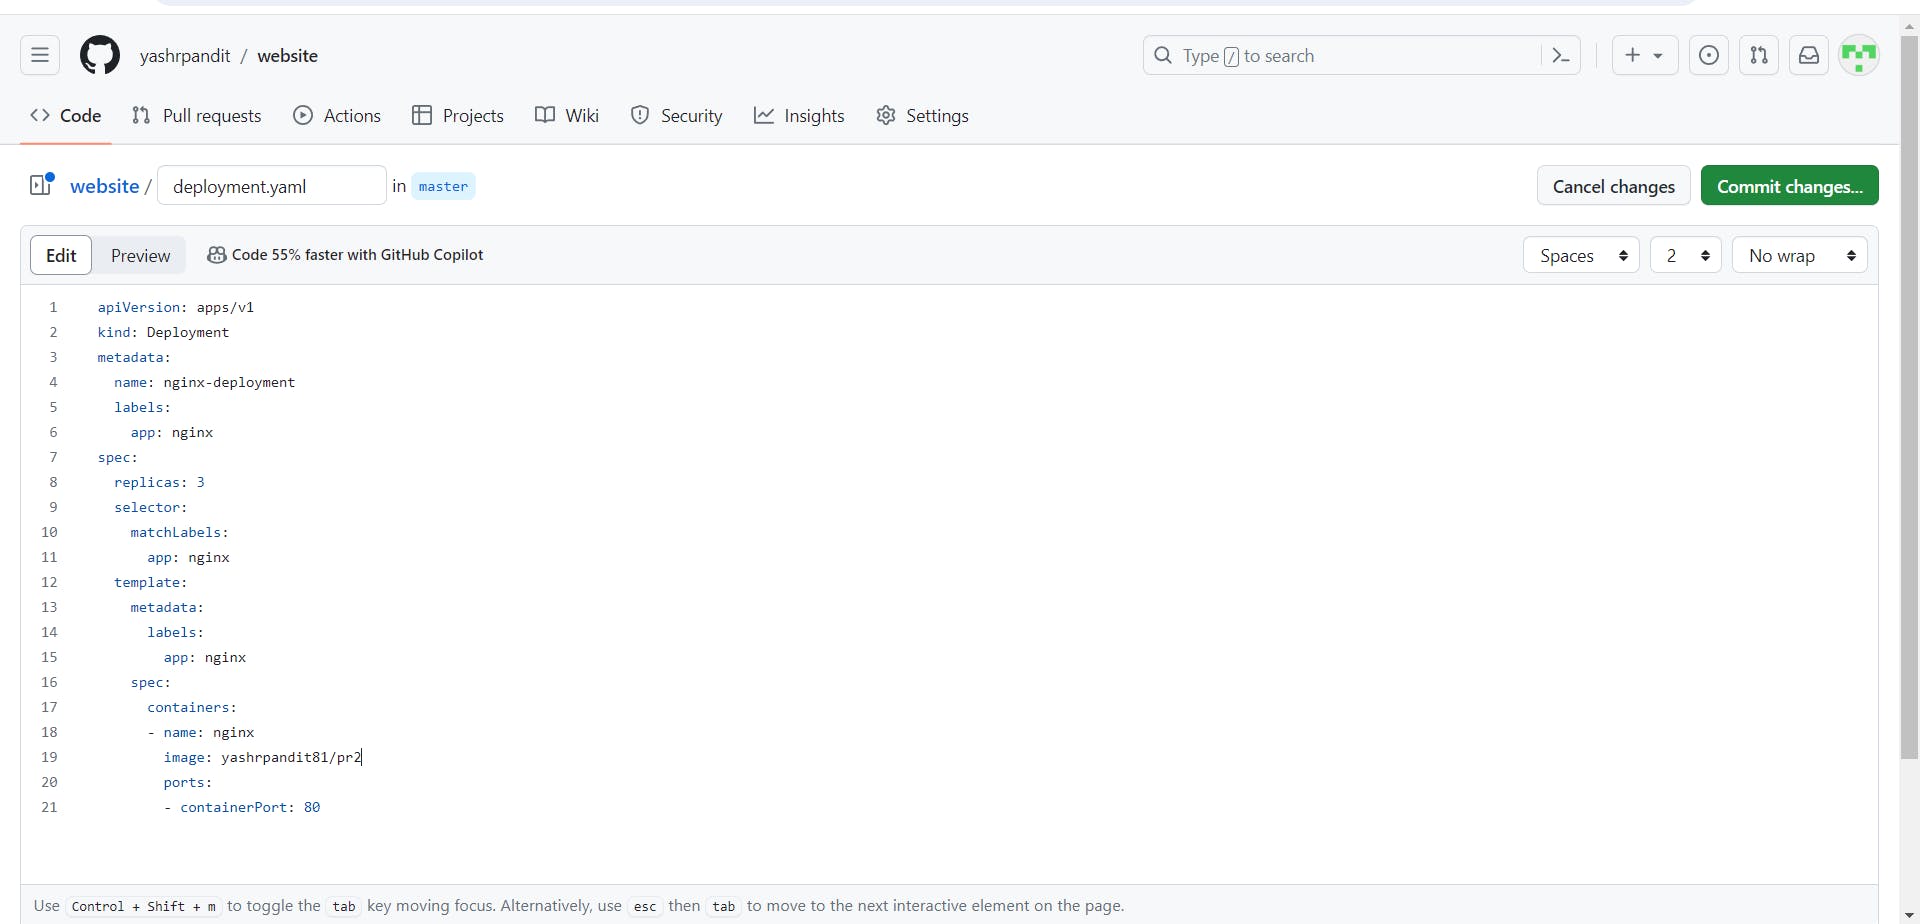
Fork or clone this repository https://github.com/yashrpandit/website.git
In this project change image and put "yourdockerhubusername/pr2"
Create a Pipeline for the projects :
Now, go back to Dashboard
Click on "New Item"
Enter an item name - "project2"
Click on pipeline and click on "ok"

Give Description and scroll down
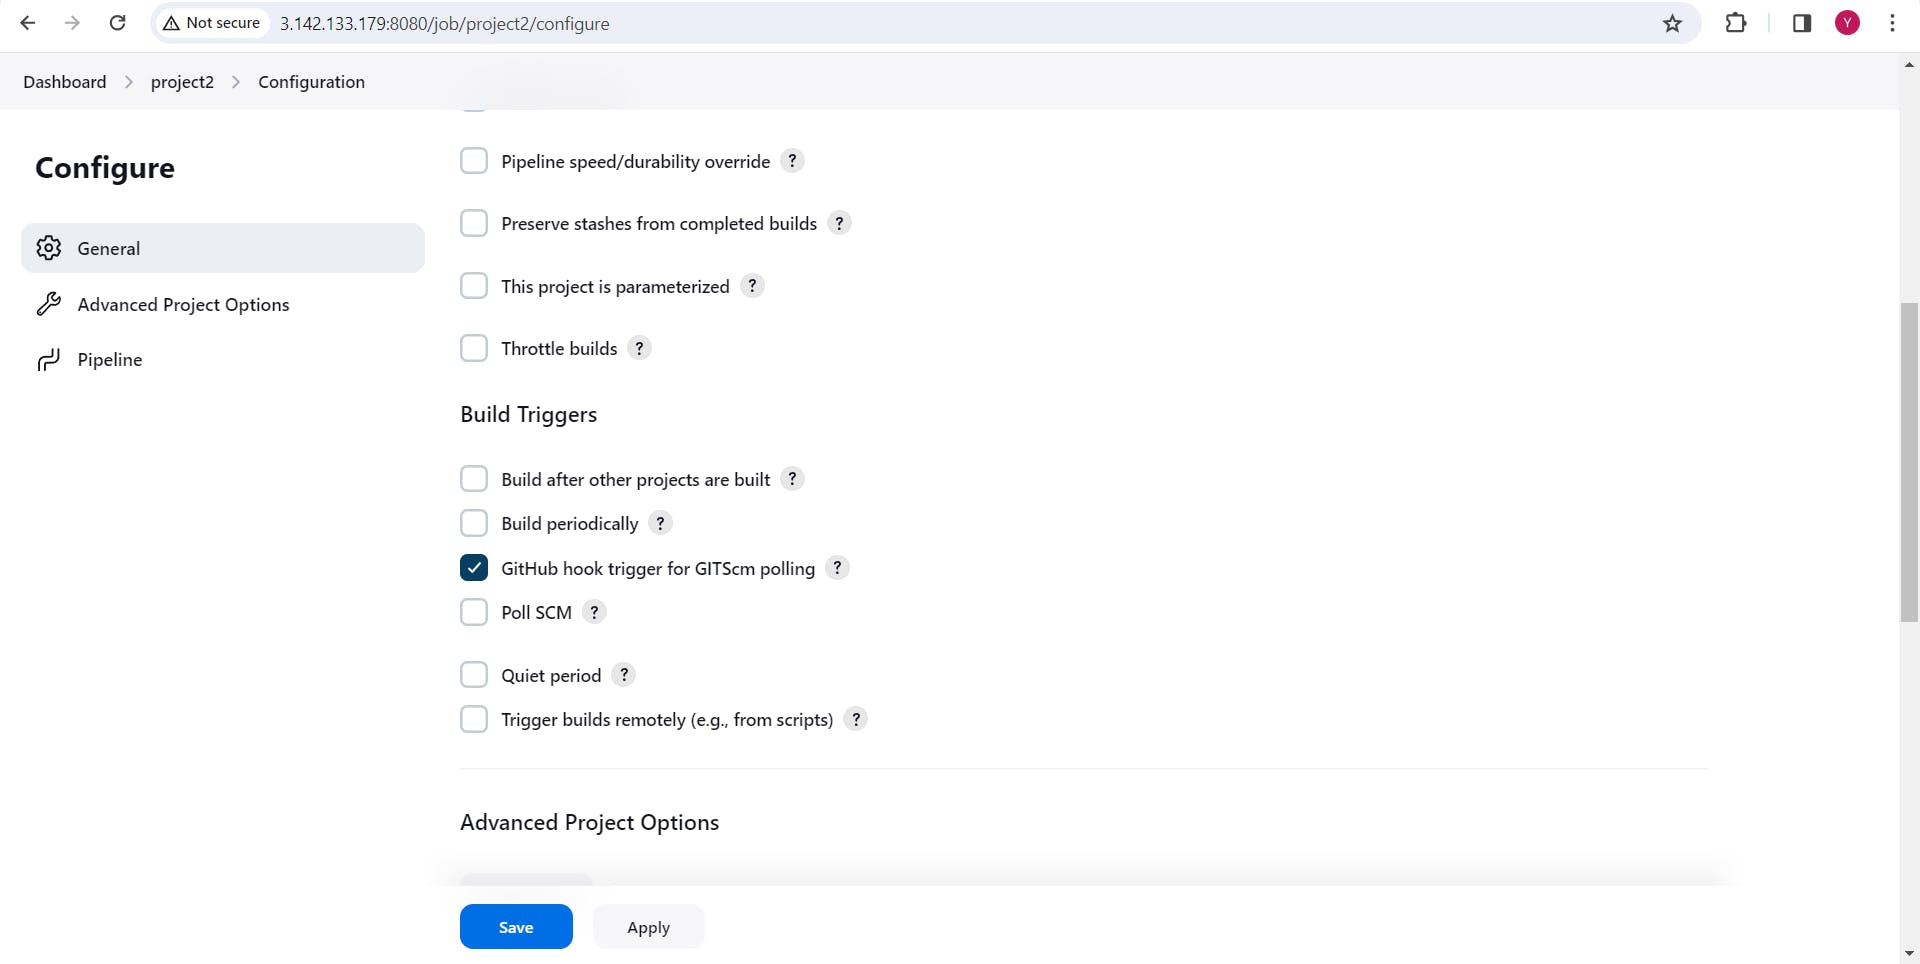
Check on "GitHub hook trigger for GITScm polling" and scroll down
In Pipeline , under Defination select "Pipeline script"
Below is the code to paste in the Script section. Make sure to adjust the DockerHub credentials and image name according to your needs.
  pipeline {
      agent none
      environment {
          DOCKERHUB_CREDENTIALS = credentials("Enter your dockerhub credential")
      }
      stages {
          stage('Git') {
              agent {
                  label 'KM'
              }
              steps {
                  script {
                      git 'https://github.com/yashrpandit/website.git'
                  }
              }
          }
          stage('Docker') {
              agent {
                  label 'KM'
              }
              steps {
                  sh 'sudo docker build /home/ubuntu/jenkins/workspace/Project2/ -t yashrpandit81/pr2'
                  sh 'sudo docker login -u ${DOCKERHUB_CREDENTIALS_USR} -p ${DOCKERHUB_CREDENTIALS_PSW}'
                  sh 'sudo docker push yashrpandit81/pr2'
              }
          }
          stage('K8s') {
              agent {
                  label 'KM'
              }
              steps {
                  //sh 'kubectl delete deploy nginx-deployment'
                  sh 'kubectl apply -f /home/ubuntu/jenkins/workspace/Project2/deployment.yaml'
                  //sh 'kubectl delete svc my-service'
                  sh 'kubectl apply -f /home/ubuntu/jenkins/workspace/Project2/service.yaml'
              }
          }
      }
  }
Click on "save"
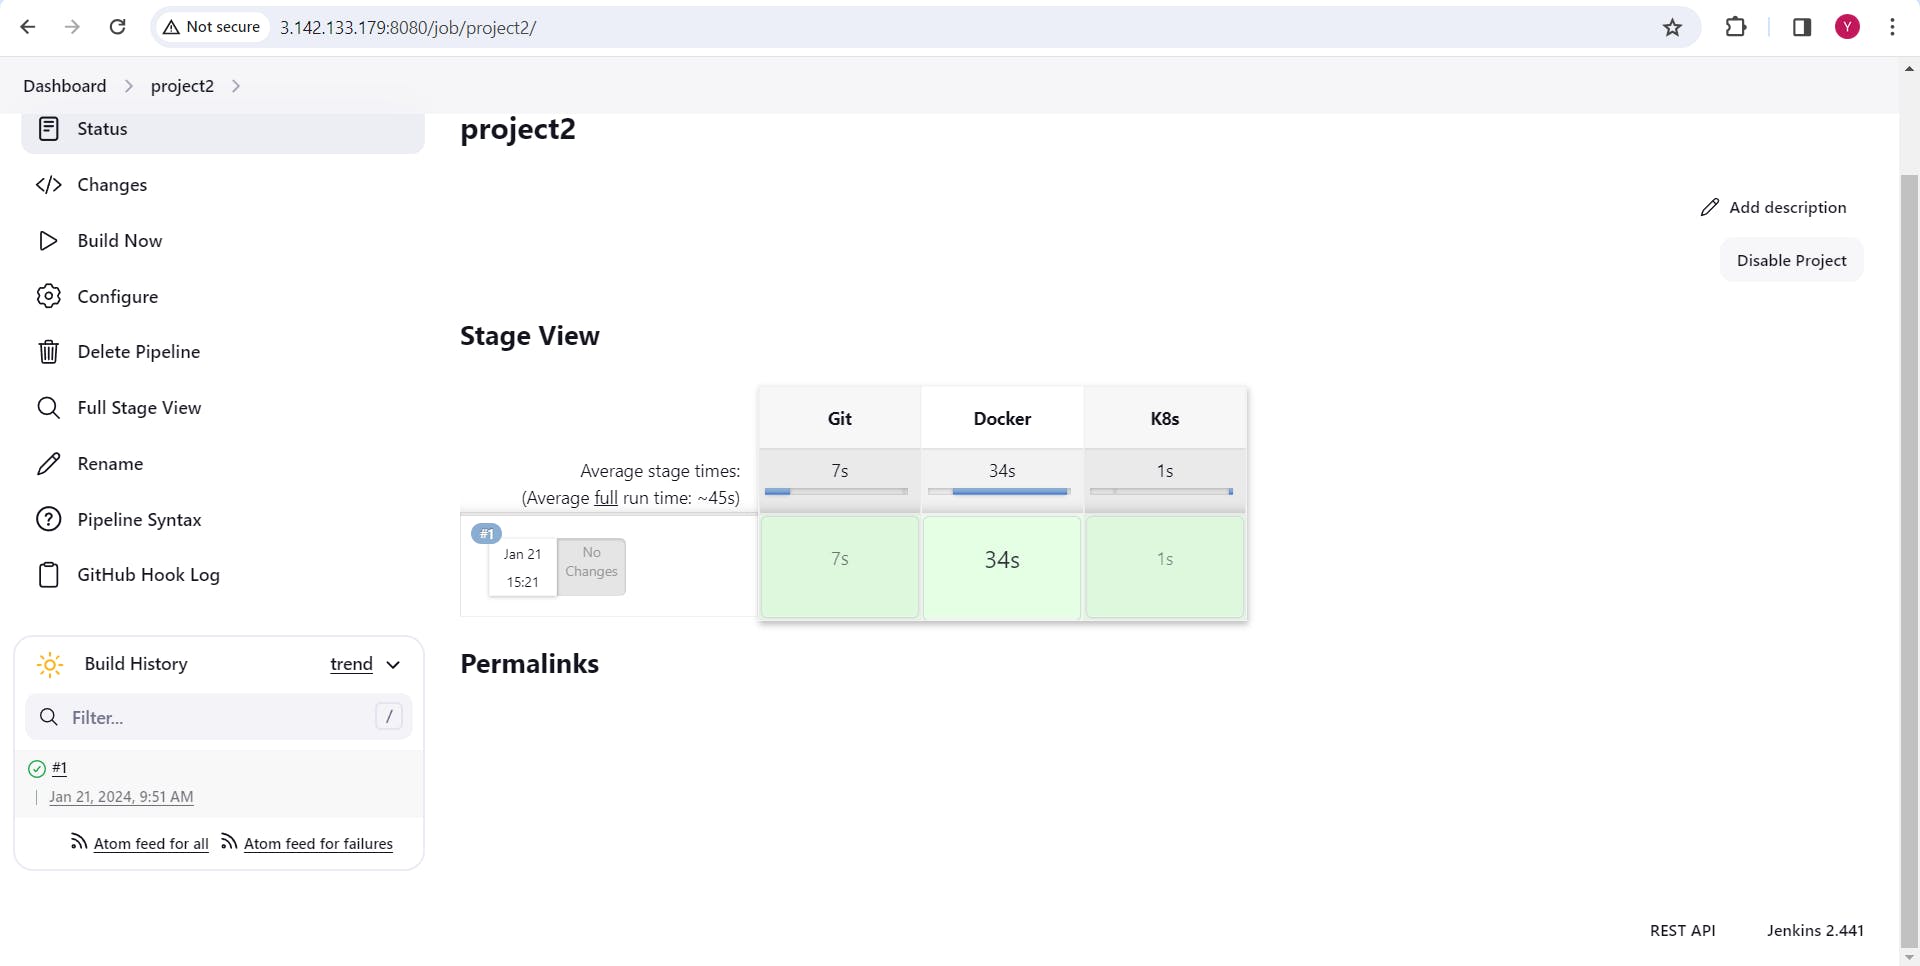
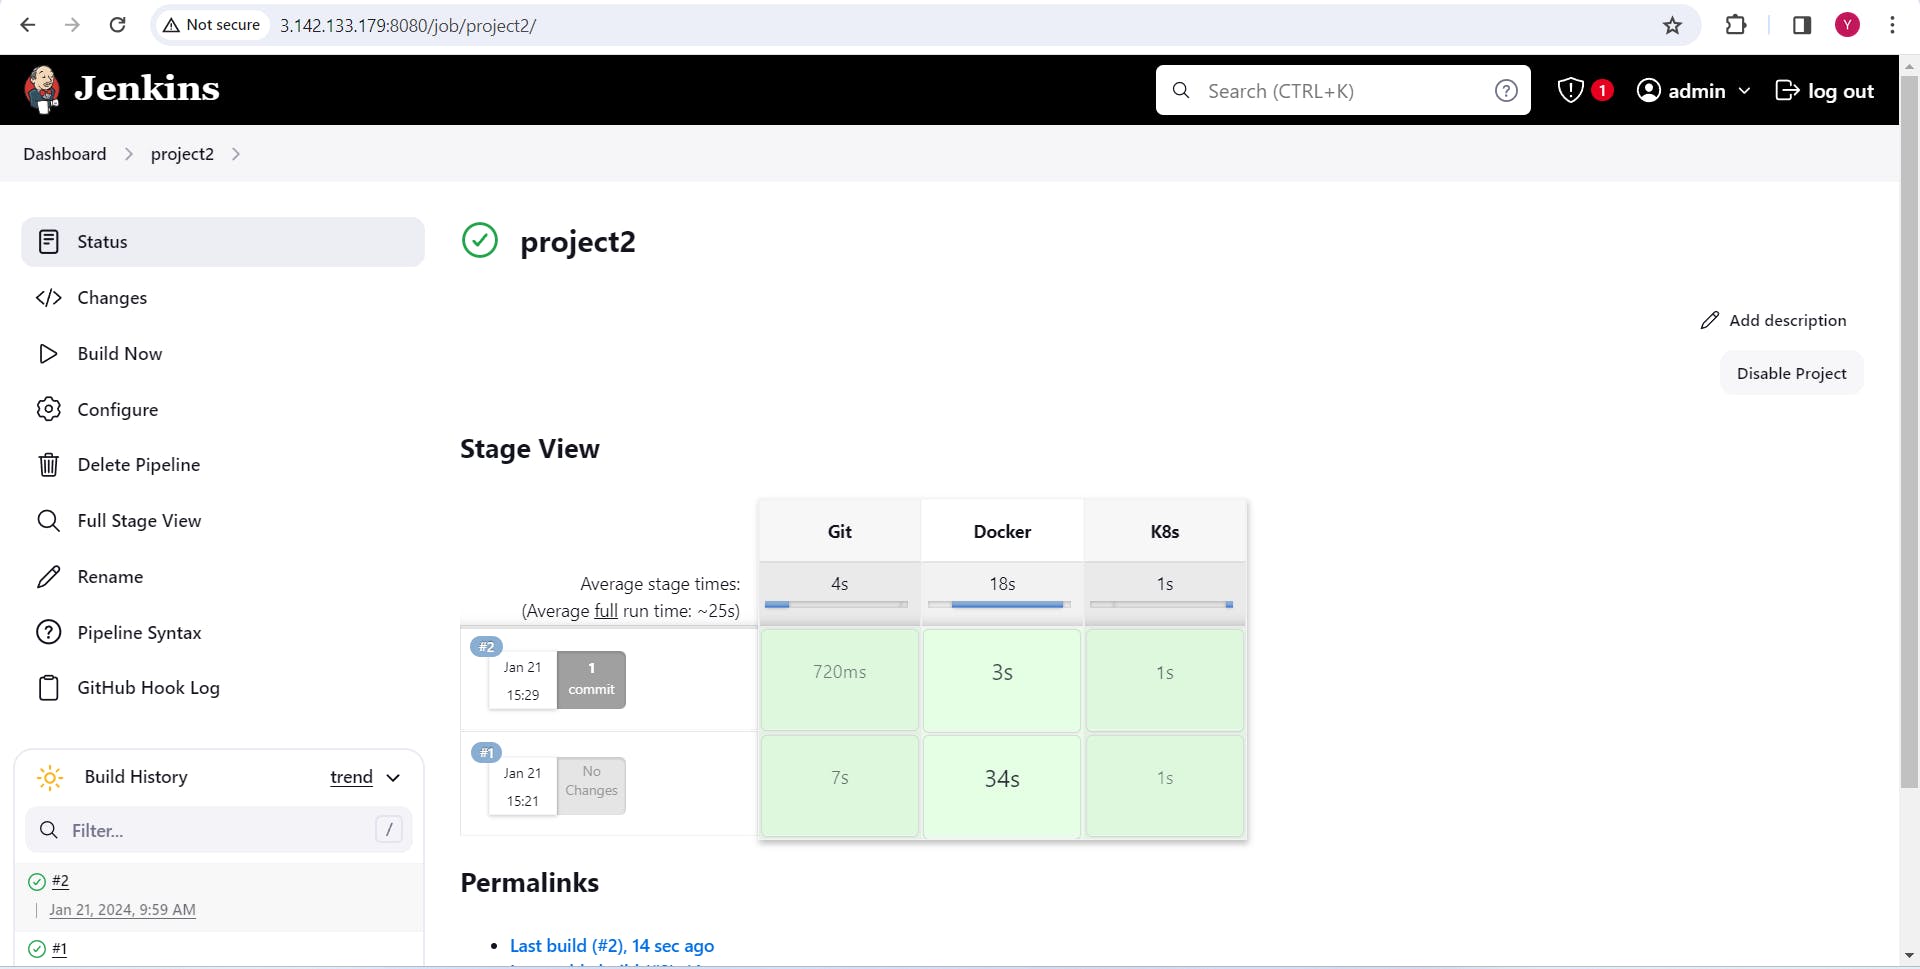
To run pipeline click on "Build Now" or wait for minute so it will trigger automatically.
Now remove // in from the script.
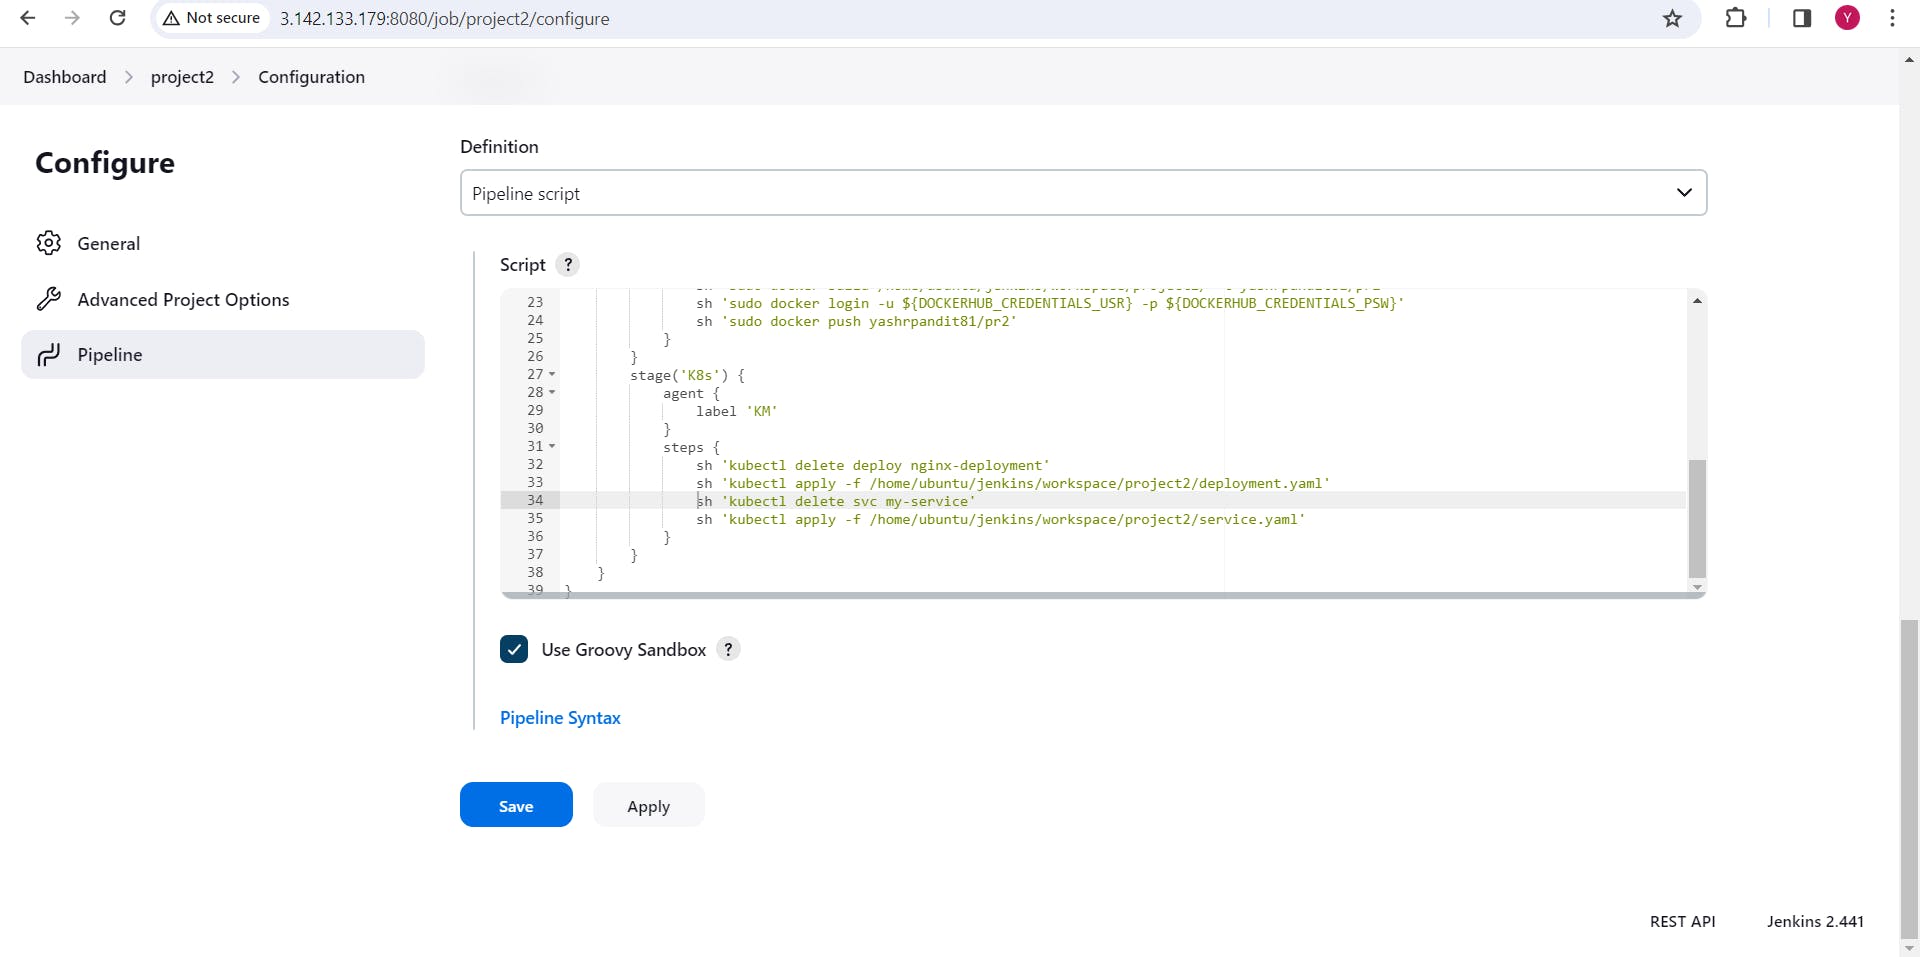
Click on "Save"
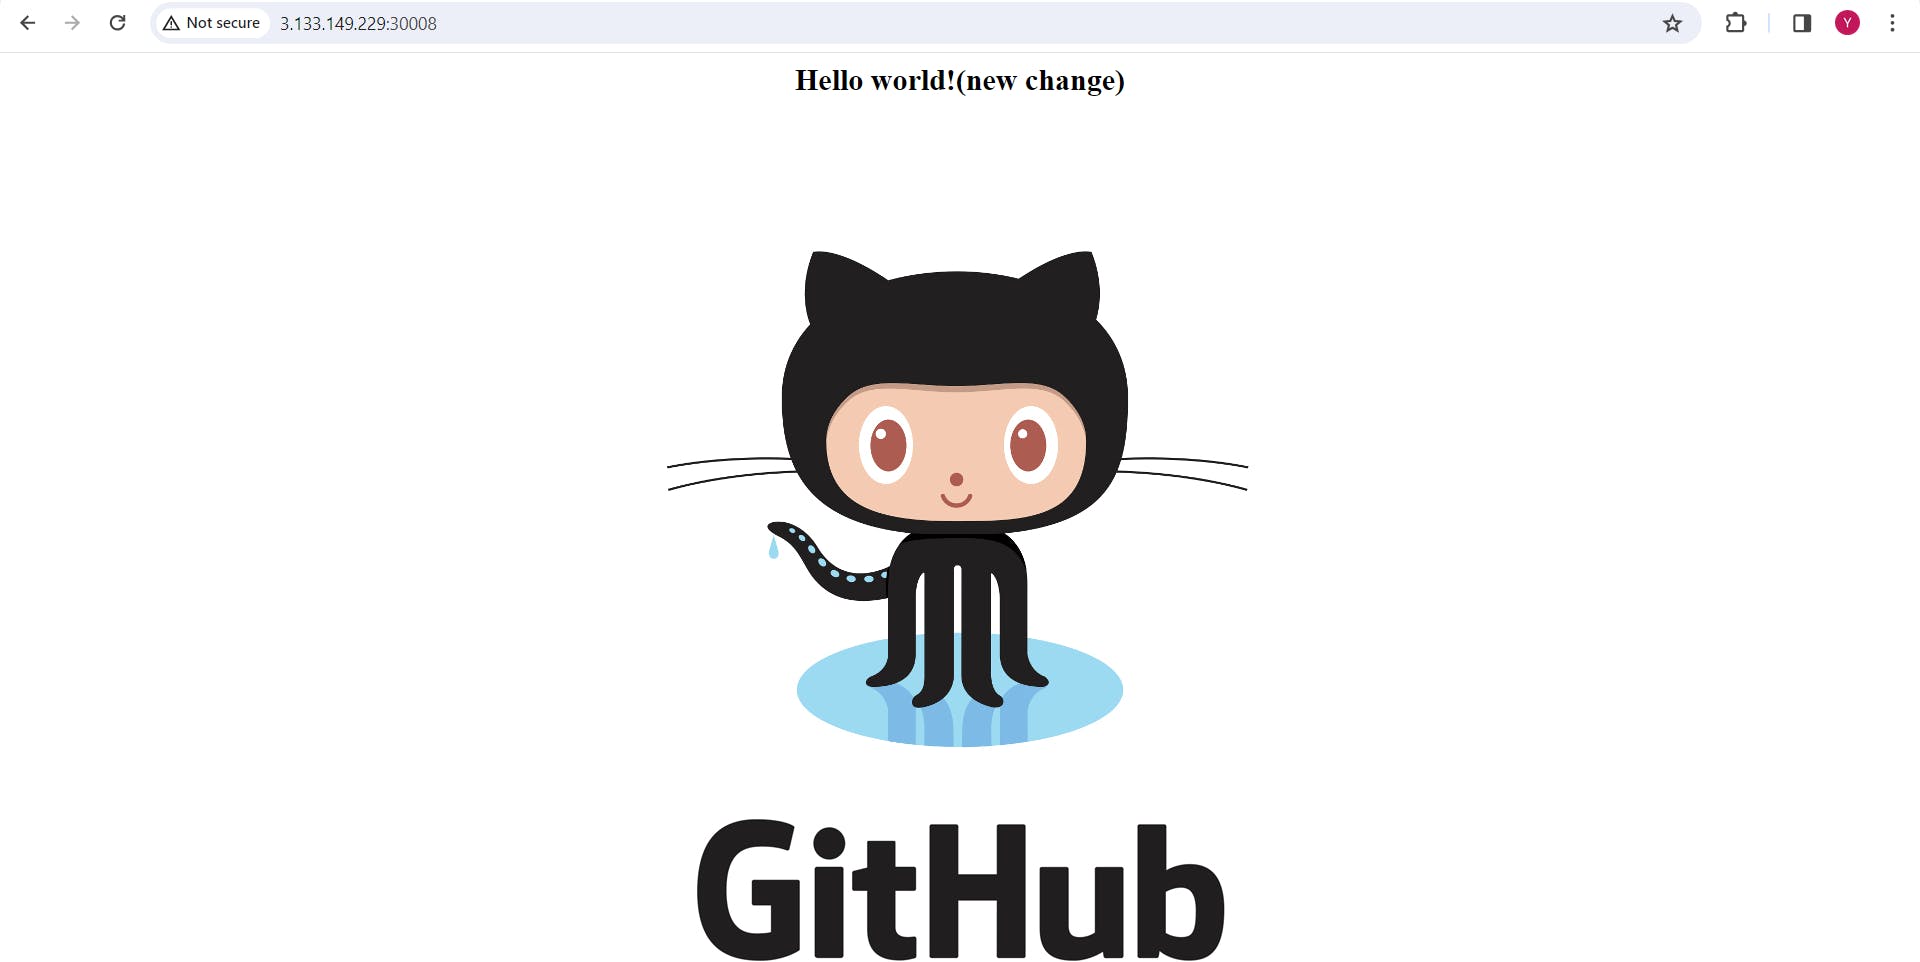
Copy the public IP of the "M-4" instance. Go to your browser and enter the following address:
http://<M-4 public ip>:30008

12. Adding webhook:
Go to "Github > "Specific project" > "Settings" > "Webhooks" to add a webhook
Click on "Add webhook"
In the Payload URL, put http://<M1-instance-public ip>:8080/github-webhook/

Click on "Add webhook"
Update the index.html file, then go to Jenkins and wait for one minute. The project will be built automatically.
Now, check the browser using http://<M-4 public ip>:30008. You will see the changes on this URL.
By following these steps, you'll have successfully set up a Kubernetes cluster on AWS using Ansible and Terraform, integrated with Jenkins for continuous deployment. This infrastructure enables efficient management and scaling of containerized applications.
Please, feel free to drop any questions in the comments below. I would be happy to answer them.
If this Article was helpful, please do follow and click the like button below to show your support 😄✨